~Please also have a look at my other Star Wars costume reproductions! ~
Star Wars Episode 2: Senator Amidala (Padmé’s) Golden Travel / Refugee Dress
(I do have a making-of and tutorial for the male counterpart – Anakin’s travel outfit – on this page.)
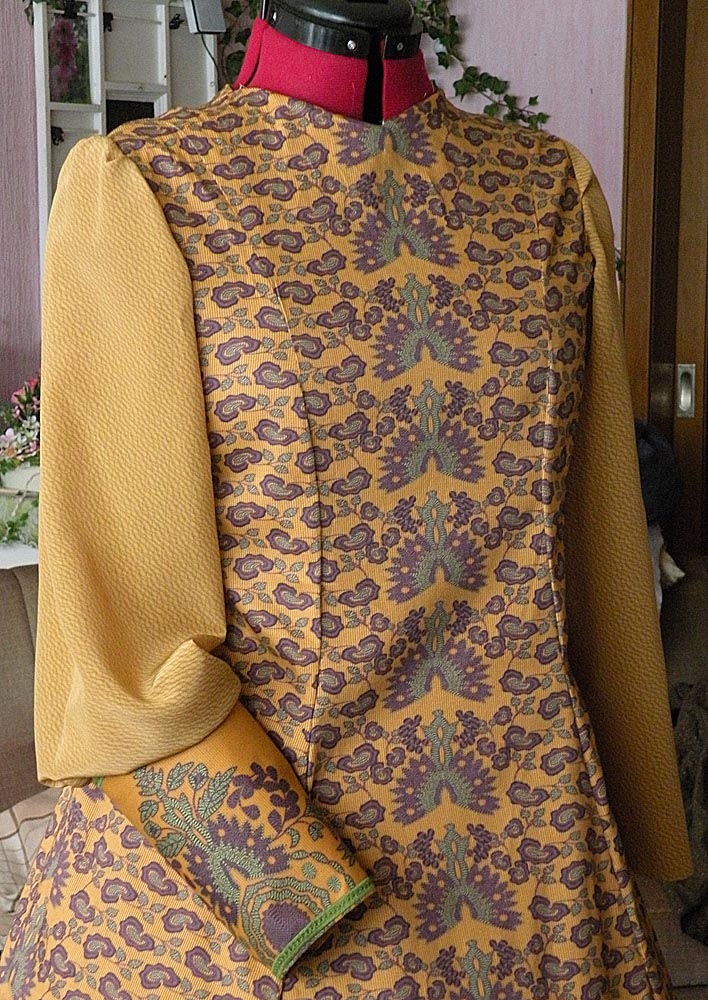
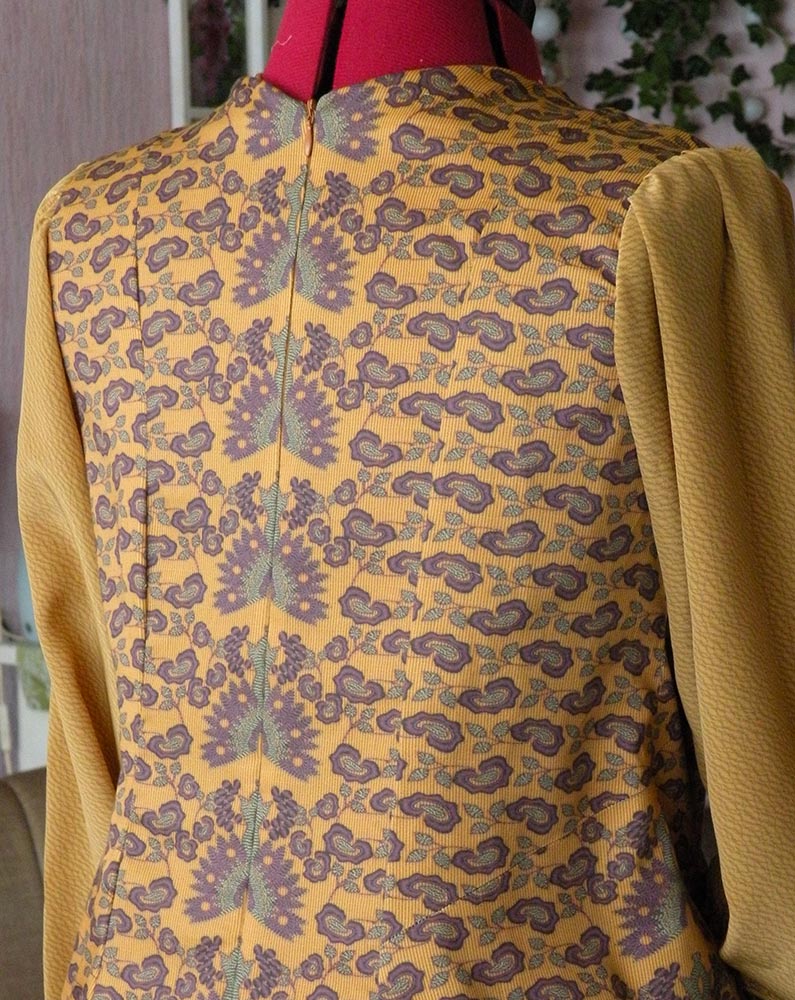
This is one of the interesting, but nevertheless rarely reproduced costumes from Star Wars:
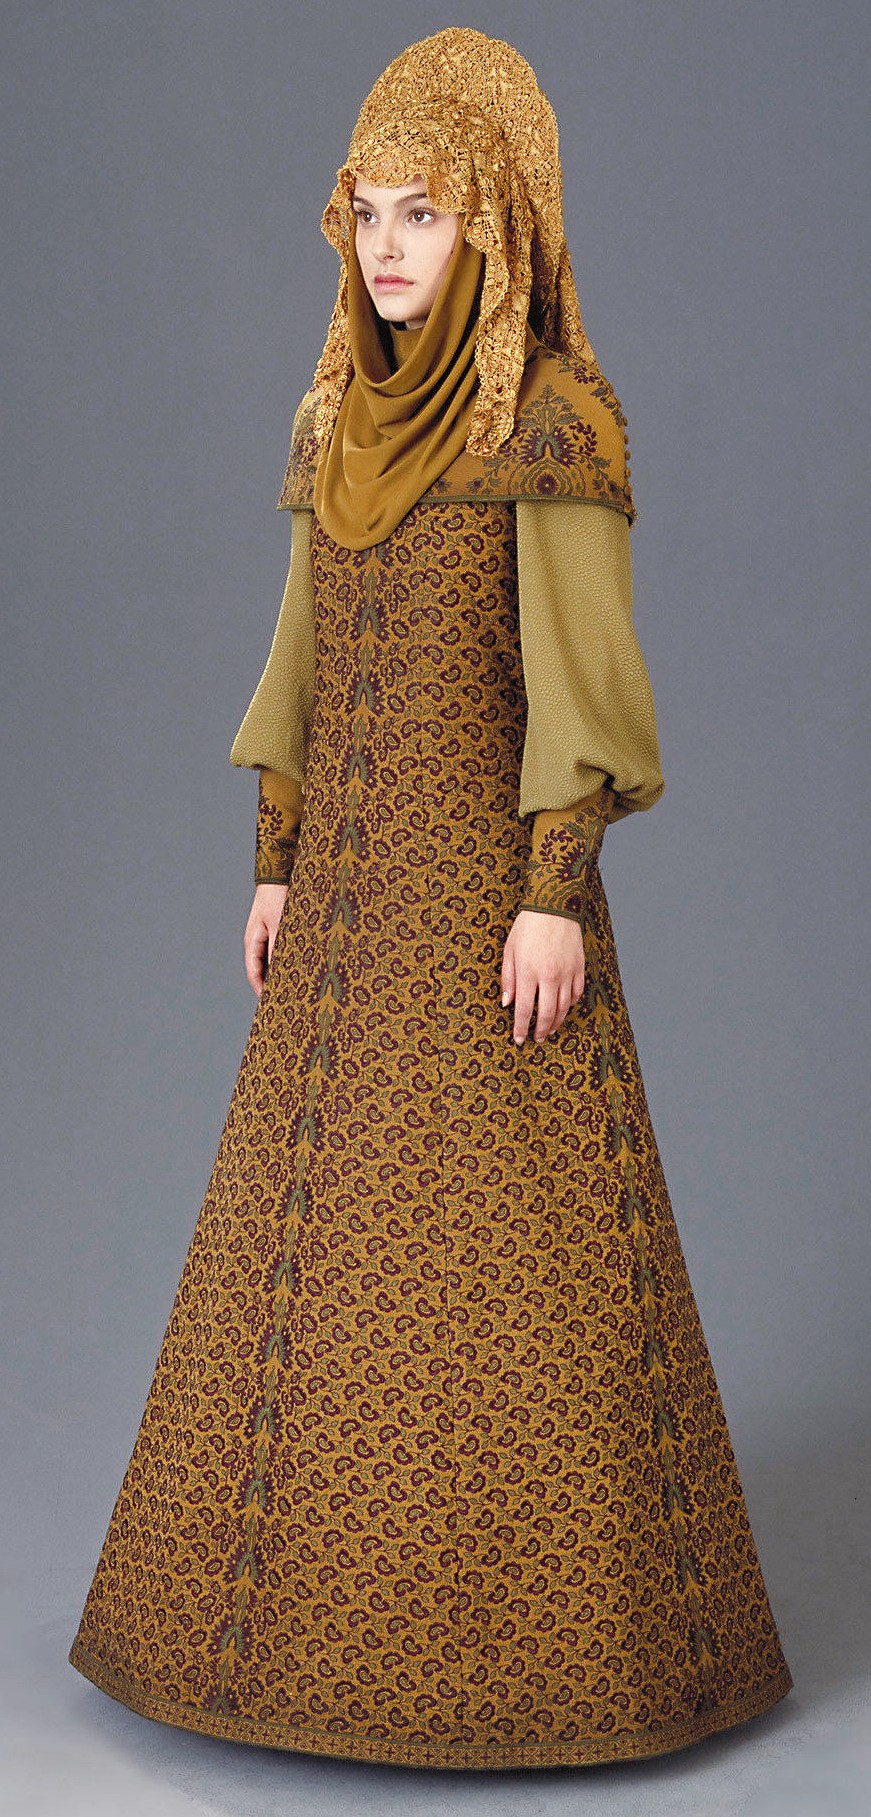
The only reason for this being a not-so-often reproduced dress is, in my (and other people’s) opinion that it’s so damn hard to find matching fabrics. Those that are on the dress are probably custom embroidered, since the background of those embroideries is also a quite rare fabric – a Japanese ‚Ogre Crepe‘ (also called ‚Ogre Crape‘ – and yes, I do suggest you Google that!).
Now, I could have gone ahead and actually make those embroideries with my embroidery machine, like I did on my Jamillia gown – not really a problem. Except of course that those are TONS of embroideries; and from my Jamillia gown I already know that a certain amount within a considerably short time is just too much for an embroidery machine.
So what I instead did was this:
I analyzed the embroideries by studying various exhibit- and other reference photos. Then I digitized the embroideries using my embroidery software (in this case, I used PE-Design 6) and embroidered out one repeat of the embroideries.
After that, I photographed those embroideries, brought the photos into Photoshop and digitized hi-res ‚digital‘ versions of all the fabrics required for the gown.
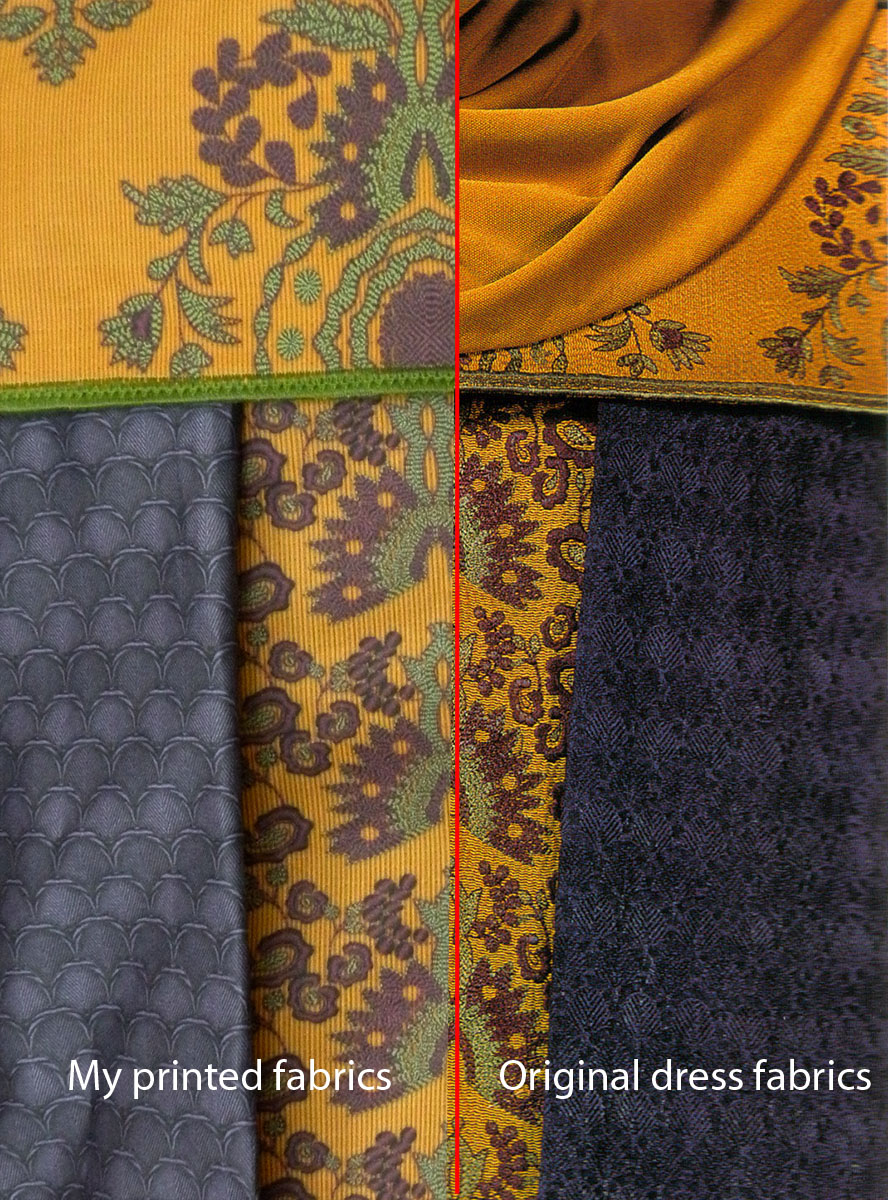
Here’s how they turned out compared to the original fabrics.
Of course I’m only showing slightly distorted, resized and watermarked crops of the designs I made – don’t want ‚a certain someone‘ to (again) „adopt“ my designs and claim them to be her own… and again note that I’m not claiming copyright on the original fabrics; just on the designs that I reproduced:
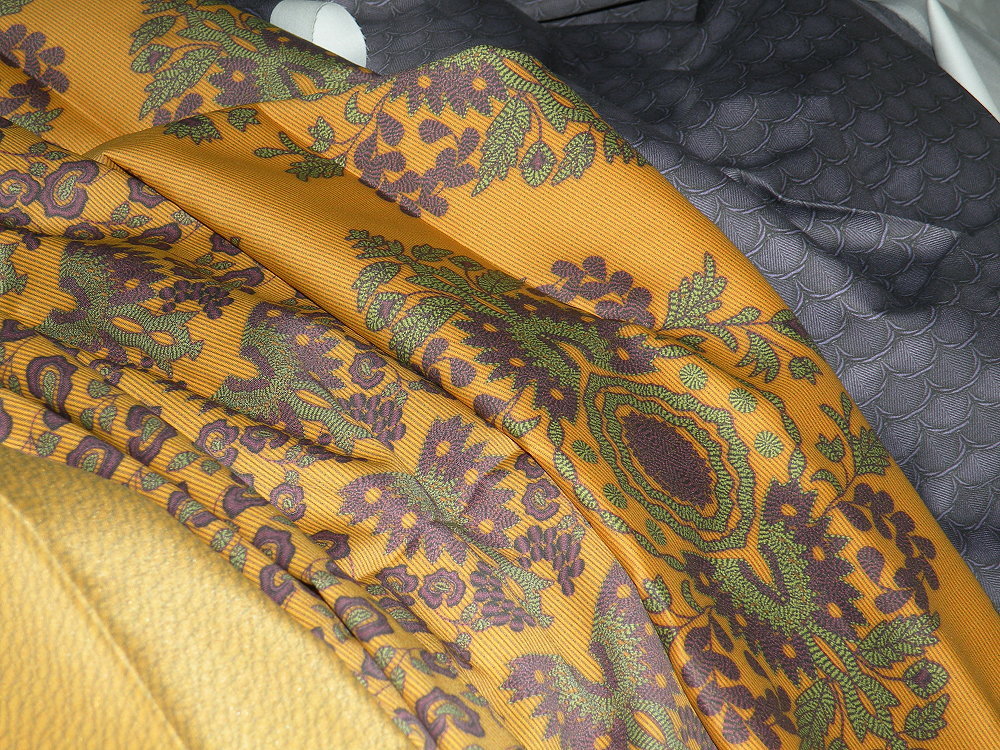
| Base dress fabric plus border design (at bottom of skirt hem) |
Medaillon fabric (for short „cape“) |
„Fans“ fabric (for cloak) |
  |
 |
 |
  |
 |
 |
I also developed a printable version of the ‚bubbles‘ fabric that was used for the sleeves as well as for the rather simple fabric used for the head wrap.
These fabrics are totally different from the embroidered fabrics – they drape much different! – but I thought that to have a consistent kind of coloring, printing each and every fabric on the dress wouldn’t be the worst idea.
Here’s how my ‚bubbles‘ fabric design turned out:

After digitizing the basic designs of the fabrics, I had to think of layouts for the „base“ an „medallions“ fabrics – you know, the way they’re actually printed on fabric so I wouldn’t need too much of them.
Here’s what I came up with (again, click to enlarge since the ’square‘ thumbnail doesn’t show the ‚rectangle‘ layout correctly; and again – of course they’re slightly distorted, resized and watermarked):
 |
 |
| The base dress design layout has one stripe of „butterflies / eagles“ along the center of the fabric, and another half stripe of them at the sides. Also, at the selvages, there’s the border fabric, which can be cut off and used to decorate the hem. |
The medallion fabric for the cape has fewer designs on the (image-wise) left side of the fabric. That’s to accommodate the sleeve cuffs, which are made with the same embroideries but with just one design on them. With this layout one yard of this fabric should be enough to make the cape AND the cuffs! |
With that layout for the base fabric, I can get away using just four yards of fabric – here’s how I planned my layout of the pattern pieces on the fold of the base fabric.
I developed that sewing pattern by analyzing ALL pictures of the original dress that I could find, then basically traced the sewing pattern on my digital fabric, counting the motifs on the original dress vs. my digital fabric and sketching the seam lines accordingly on that digital version of my fabric – basically a variation of the ‚proportional‘ method which I described on the Emperor Palpatine page.
Click to enlarge:

In case you’re wondering why the side of the bodice is cut off in my layout – that’s not a mistake; you can see the cut very clearly in pictures of the original dress. Like so:
 Left: unedited picture; right: the white lines show where the seams are.
If you look at the white lines and then back to the unedited picture, you’ll immediately see how the floral pattern of the dress is cut apart in those places; indicating that there must be seams.
So there I was, having three digital fabrics at hand which imitate the original fabrics to an extend that probably no off-the-rack fabric can (except if you’d be really lucky and find the original fabrics, perhaps).
Right now I’m waiting for the swatches from Spoonflower to see if my designs will print the way I hope them to print.
I ordered them in different types of fabrics – Silk Crepe de Chine, Organic Cotton Sateen, Cotton Silk and Cotton Poplin just to see how the designs print on those different fabrics. I ruled out the quilting weight cottons, the sheers and the stretch fabrics from the beginning since they’re definitely not suitable for that kind of dress.
In case you’re interested, the collection with all my designs for the travel dress is available here on Spoonflower.
By now my Spoonflower swatches have arrived (yay!), and here are some photos. Note that I had compiled all my designs (dress, cloak, short cape and sleeves / cowl) into one design picture, then had that picture printed on Cotton Poplin, Crepe de Chine, Cotton Silk and Organic Cotton Sateen; just to be able to compare of how the outcome of a print of the very same design would be on those different materials – and I’m glad I did!
 Comparing the sheen of (clockwise, starting top left): Comparing the sheen of (clockwise, starting top left):Cotton Poplin-Crepe de Chine – Cotton Silk – Organic Cotton Sateen |
 Another sheen- and drape comparison. Clockwise (starting top left): Another sheen- and drape comparison. Clockwise (starting top left):Cotton Poplin-Crepe de Chine – Cotton Silk – Organic Cotton Sateen |
 Comparing the opacity / sheerness of the fabrics; laid out over a piece of other swatches. Comparing the opacity / sheerness of the fabrics; laid out over a piece of other swatches.Clockwise, starting top left: Organic Cotton Sateen – Crepe de Chine – Cotton Poplin – Cotton Silk |
 Comparing opacity / sheerness of the fabrics; this time laid out over Janet Arnold’s „Patterns of Fashion“. Comparing opacity / sheerness of the fabrics; this time laid out over Janet Arnold’s „Patterns of Fashion“.Clockwise, starting top left: Crepe de Chine – Cotton Silk -Cotton Poplin – Organic Cotton Sateen |
 Another comparison of (clockwise, starting top left:) Exhibit picture of the original dress; official picture of the original dress and, last not least, a photo of my reprint on the Organic Cotton Sateen fabric. Another comparison of (clockwise, starting top left:) Exhibit picture of the original dress; official picture of the original dress and, last not least, a photo of my reprint on the Organic Cotton Sateen fabric. |
|
 Another closeup of the Organic Cotton Sateen – this is what I’ll definitely use for the dress. Not only do the colors print brilliantly, but also the drape is perfect, and the fabric is not as sheer as, for example, the cotton silk. Another closeup of the Organic Cotton Sateen – this is what I’ll definitely use for the dress. Not only do the colors print brilliantly, but also the drape is perfect, and the fabric is not as sheer as, for example, the cotton silk.For the sleeves and cowl, however, I will use the Crepe de Chine, since the drape and sheen of that material is perfect for those items. |
|
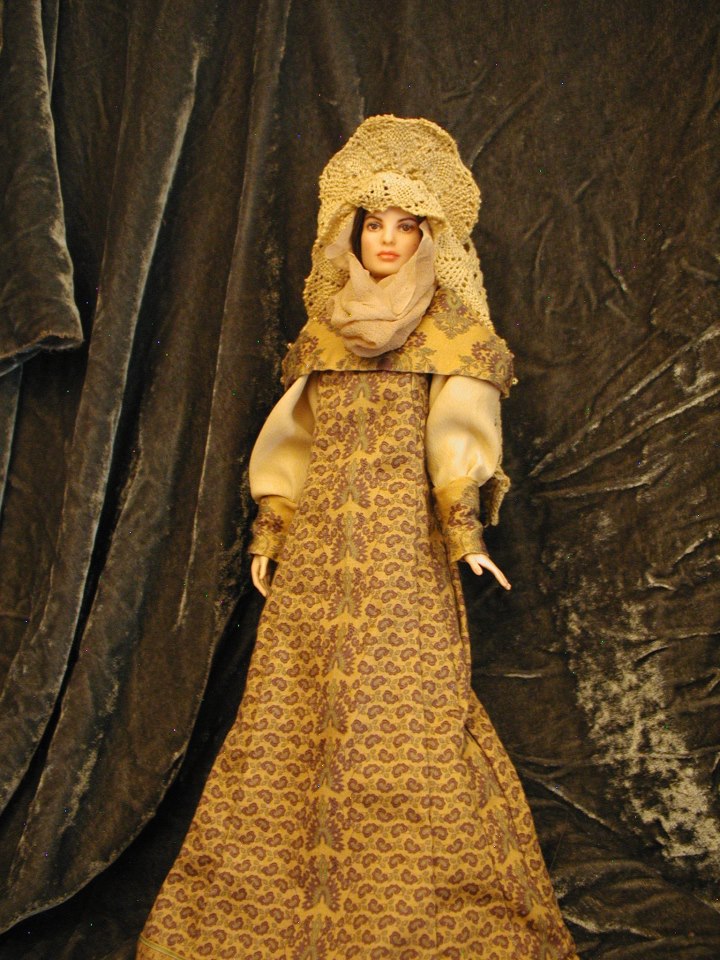
With a scaled down version of those fabrics (which I scaled down on request of her for a special order), Liz made this very pretty doll costume. Believe it or not, that doll is just Barbie (not Tonner!) size! Fabulous!
By now I’ve started to weave the metal headdress.
Yes, weave. I’m using paper rattail cords with a wire core to do this.
When I’ve finished the weave, I will drench it in epoxy resin so it will become stable, not to speak of lightweight. The metal effect is something that can easily be achieved with clever usage of paint; I’ll get to that part later.
A first picture of the weaving – and yes, it’s basically a mess of paper cords stretched over a cellophane-covered styrofoam base, on which I did insert a print of the original headdress as a guide for my weaving. The darker wires that you can see in the picture won’t be used in the weave; they’re just there so I can temporarily attach the paper rattail cords to, well, something.

A bit more of the weaving process – all warp threads laid out, weaving of one side of the ‚halo‘ finished save for the ‚outlines‘ – I will add those when both sides are finished:

Now I will drench that weave with just a bit of epoxy resin (to stabilize the weave but still leave it bendable) and, as soon as that has dried, I will continue to weave the ’side‘ part of the headdress.
Headdress after „epoxying“ the front halo; sides finished, front slowly shaping into a „skull cap“ – left side of picture shows the original headdress:

Yes, I definitely need to bend it into shape a bit; but otherwise, I think it’s not bad so far (for my first attempt of *weaving* a headdress it’s great, even! 😉 ).
More weaving – by now I’ve arrived at the backside of the ‚halo‘:

Weaving of the backside finished…:

…and starting on the overrlay decorations…:

More headdress progress. By now I’ve added a layer of thin woven fiberglass over the ‚cap‘ part – to smooth it out – and „sewn“ that layer down with thinner cotton threads than those which I used for the weaving. That will give the ‚wavy zigzag‘ appearance of the original headdress.
 Front of the headdress |
 Back of the headdress |
 Just in case you’re interested – the inside of the headdress so far |
|
After I epoxied everything (and also added a row of *bias tape* around the outer edge before doing so – sorry, forgot to take pics…) and, of course, after the epoxy resin had cured, I’ve started to paint the headdress.
First, a layer of glossy black paint:

I’ve used a rather thick paint to even out the threads; that’s why it’s considerably glossy all over now.
Note that I didn’t paint the entire inside of the headdress. That part will never be visible when I wear it (and also not if it’s displayed on a styrofoam head); so painting the inside completely isn’t necessary. In fact I’m afraid that black paint on the inside would rub off on the veil part when I wear it for hours, so I try to keep the amount of paint on the inside to a minimum.
Now for the *really* fun part – metallizing the headdress.
First I applied a layer of leaf adhesive. That stuff is white when it’s applied but within 20 minutes it becomes transparent (and sticky!).

After that had dried, I started applying the sheet copper (which is basically the same as leaf (or sheet-) gold or silver; just that it’s, well, copper).
When you lay out one of the leaf metal sheets on the headdress (which you should do CAREFULLY because they start to tear if you even just breathe on them; that’s how thin they are!), it looked like this:

As you can see, the leaf copper is just laying on top of the (irregular) surface of the woven headdress; also, it starts to tear because it doesn’t stretch. Never mind, no problem! Just keep going.

Start pushing the leaf metal down with a soft brush in a ‚dabbing‘ motion. More cracks will form. If those are large cracks, you can ‚fill‘ them with smaller torn off pieces of leaf metal.
Smaller cracks don’t need to be filled now; I’ll get to that in a moment.
When the leaf metal has ‚attached‘ to most of the surface, do a ’swirling‘ motion with your brush to brush off tiny pieces of leaf metal that didn’t stick to the surface.
Note that I’ve made the leaf gilding in 6 steps: First, I gilded the halo front, then the back, then the front cap, then the back cap, and then both ’sides‘. It’s really easier that way because if you would try to gilt (and therefore cover the headdress with the adhesive *completely*) in one step, you would end up with a super sticky headdress that would be difficult to handle – NOT what you would want, believe me.

To fill small cracks, I used a golden powder.
It’s used to easily gilt fimo (polymer clay) pieces; but since it doesn’t provide a surface as ’shiny metallic‘ as leaf gilding does, I only used it as an easy method to fill the small cracks.
Basically you just take some of the powder on the tip of a dry brush and ’swirl‘ it over the leaf gilded surface. It will stick to the cracks (where the headdress is still sticky!), but not so much to the leaf gilded parts.
Note that I used golden powder with the copper leaf metal I used. I did that to tone down the copper a bit – the original headdress is ‚bronze‘ toned, which is a color somewhere between gold and copper.

This is what the headdress (front halo; note that the cap isn’t gilded yet!) looked like after I leaf-coppered and gold-powdered it. As you can see most of the ‚black‘ part has now disappeared; and what I have is a nice metallic look.
Here’s what the finished leaf coppered (I refuse to use the term ‚leaf gilded‘ because that would apply to something that uses leaf gold, not copper 😉 ) looks like:
 |
 |
 |
Now, the original headdress isn’t just metallic, it’s also tarnished. Which means it has a good amount of ‚black‘ in it; and only in places where it couldn’t be polished.
That means I had to paint a fake tarnish using black paint. Here’s how:
 Start by painting a black „outline“ inside all raised shapes. Start by painting a black „outline“ inside all raised shapes. |
 Add ‚dabs‘ of paint in the parts of the weave that aren’t raised. Add ‚dabs‘ of paint in the parts of the weave that aren’t raised. |
 Smudge with damp, then with dry cloth. Smudge with damp, then with dry cloth.Repeat for all shapes. |
 Just for the records: THIS is what I consider a ’small brush‘. Just for the records: THIS is what I consider a ’small brush‘. |
||
Here’s the difference between a ‚tarnished‘ and a ’not tarnished‘ headdress – I’ve tarnished half of it and took a pic to show the difference:

And here’s the completely black tarnished headdress:

Now, black tarnish alone won’t do for this headdress.
As you can clearly see in the following image of the original headdress, there are also spots, particularly – but not limited to! – along the part of the cap that borders to the halo where the metal has taken up a blueish / greenish tint.

For that I added more paint – this time a light turquoise metallic paint.

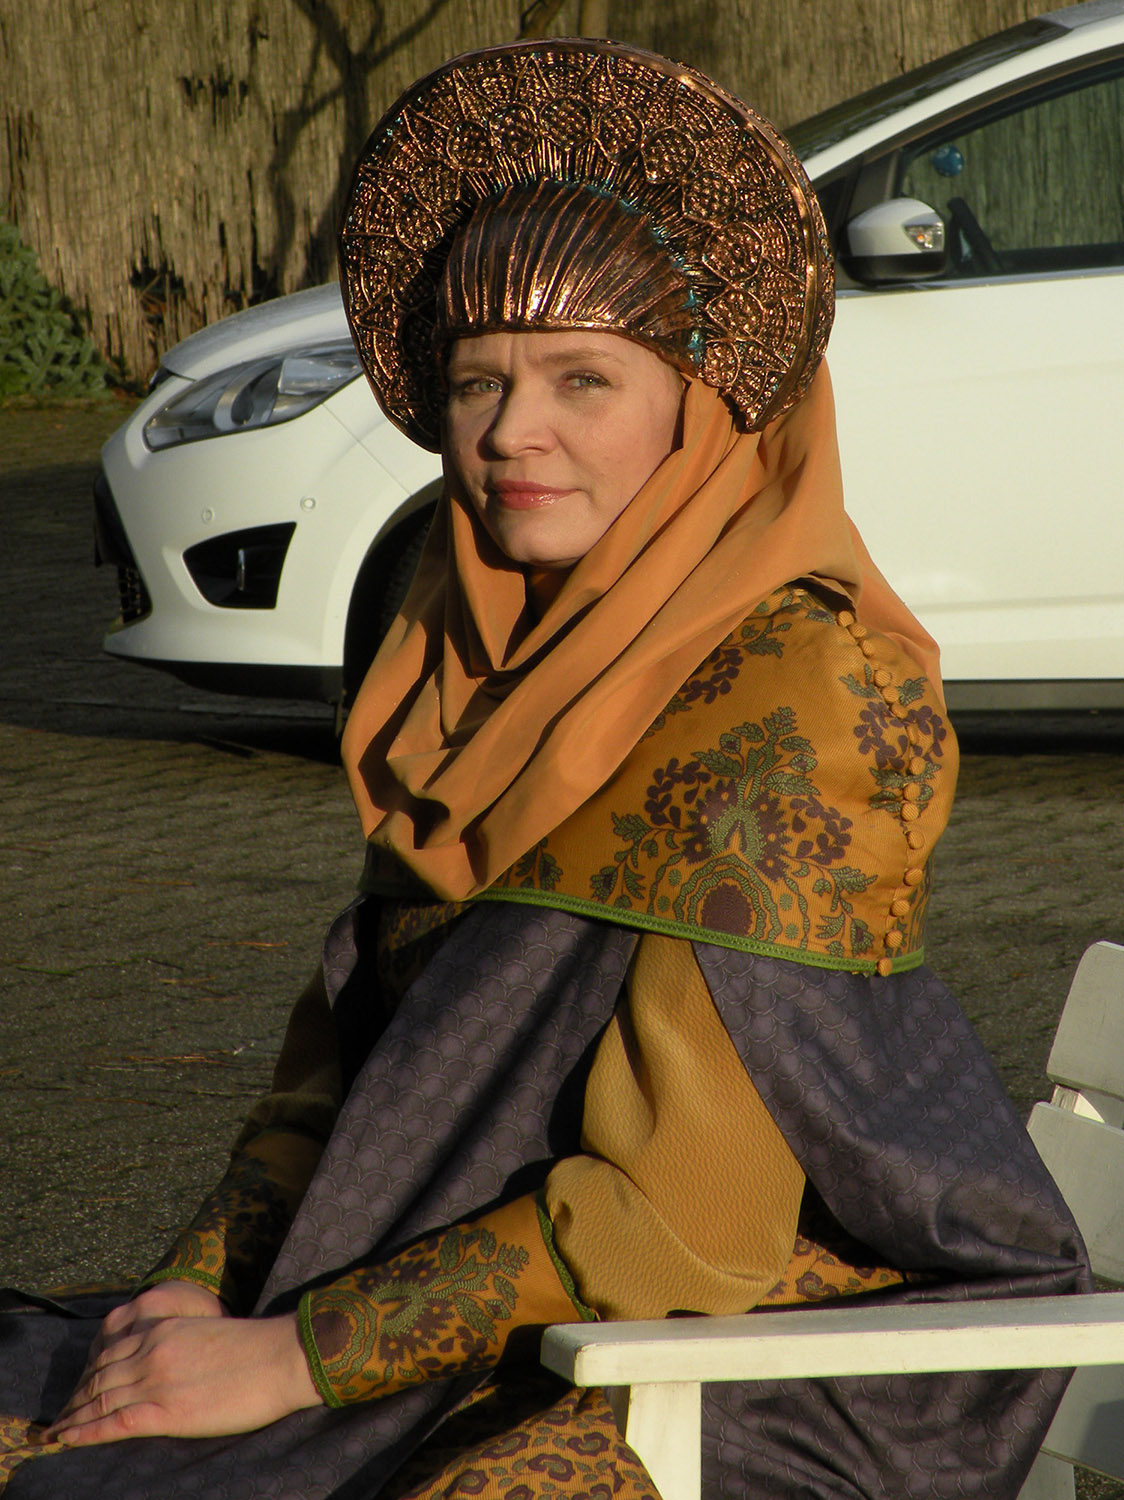
Now the headdress is finished 😀 – let’s compare it to the original headdress.
For the records, in the following image, the original headdress is shown in the pictures on the left side, while my reproduction is on the right side. Also keep in mind that the photos of the original headdress were probably taken under studio light, while I photographed mine on a cloudy day outside:

I’d say that while my headdress isn’t an absolutely perfect reproduction, it’s still (very!) recognizable.
By the way, the headdress weights 450 grams (15.873 oz). That’s very well tolerable, IMHO.
Also, again for the records, I started working on this headdress on October 30th, 2012 and was finished on the 3rd of December 2012 – with a considerable amount of breaks in between (during which I cured my epoxy allergy, waited for new materials etc.).
Here’s a quick picture I took of myself wearing the headdress. Never mind that I’m not wearing makeup and my hair is a mess 😉

My fabrics from Spoonflower have arrived! 
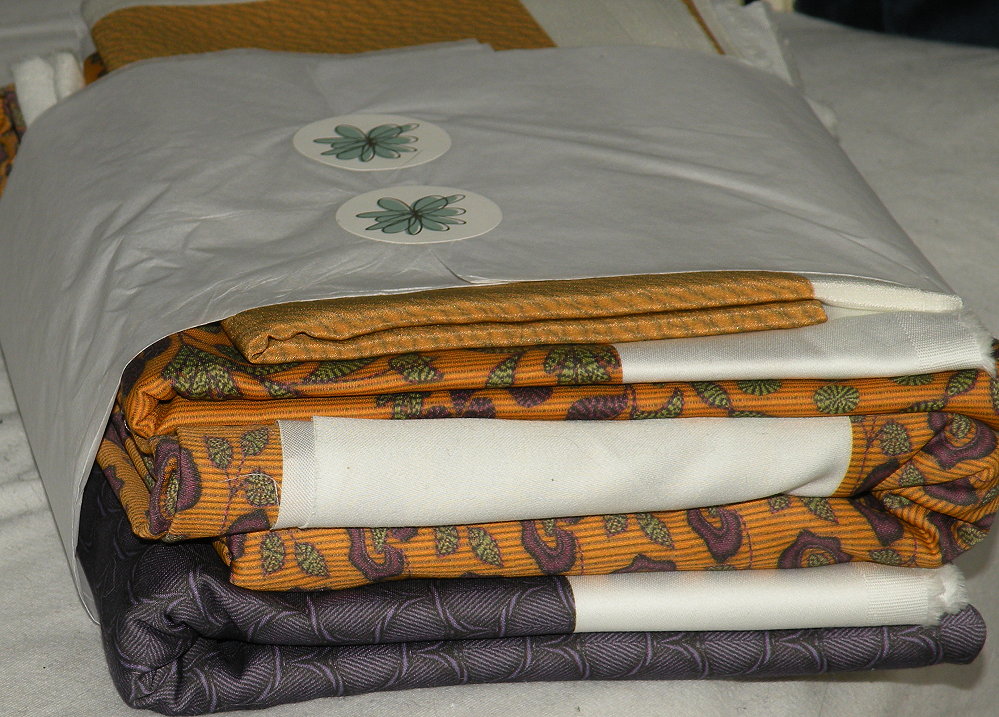
Immediately after they arrived (and after taking these photos!), I watered them – as in, I put them one by one in the bathtub and carefully rinsed them with a-bit-more-than-warm-but-not-too-hot water.
I’m not washing them in the machine, no matter how gentle the cycle and / or the detergent, because Spoonflower printed fabrics have the tendency to develop faded ‚folds‘ in the washing machine but STILL shrink if they’re washed.
Since I’m planning to have the finished dress dry cleaned, the ‚watered in the bathtub‘ method works well to preshrink them.
The fabrics now hang to dry; as soon as they’re mostly dry I’ll iron them with lotsa steam… and after that… I can finally start sewing 😀
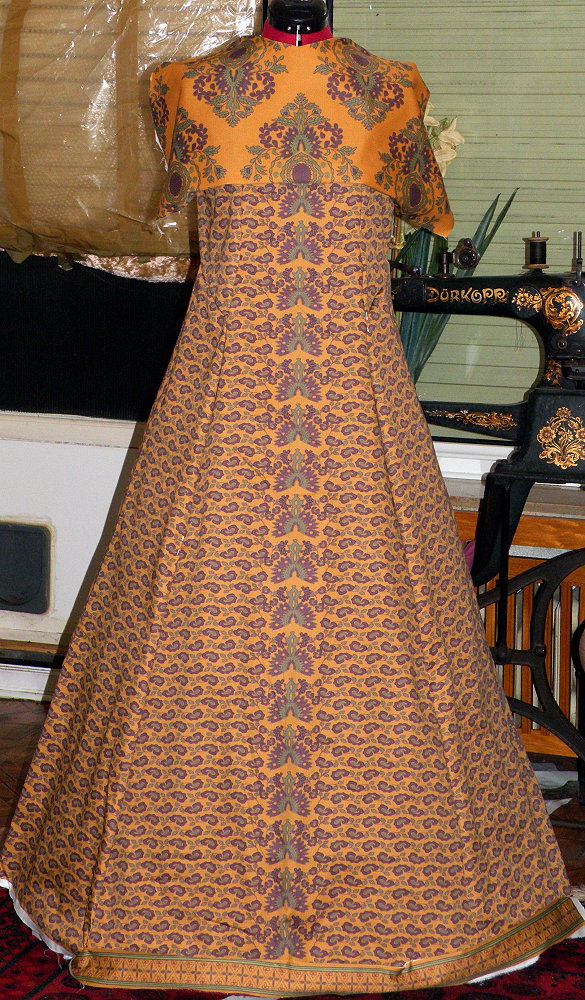
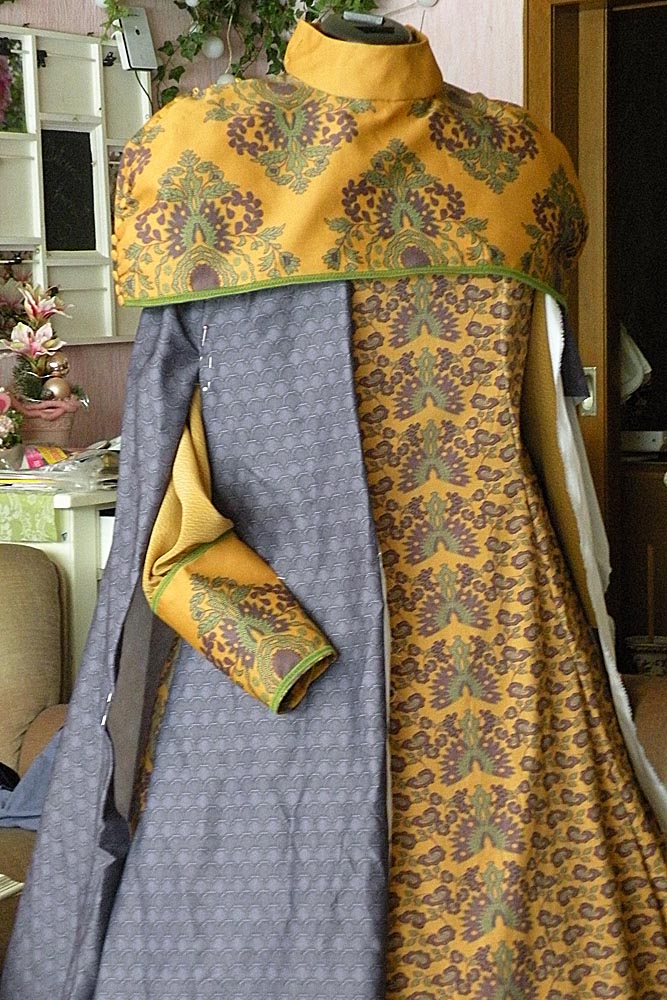
A few hours later I had ironed the fabrics, cut them according to the pattern which I made months ago (see above) – and here’s the result in form of those cut pattern pieces just pinned to my dress mannequin. It’s really just pinned and just the underdress front and the cape front; but I guess you can already see what it will look like when finished 🙂
The colors look a bit off now with the golden parts looking almost orange; sorry I took the pic late that evening with a flash.
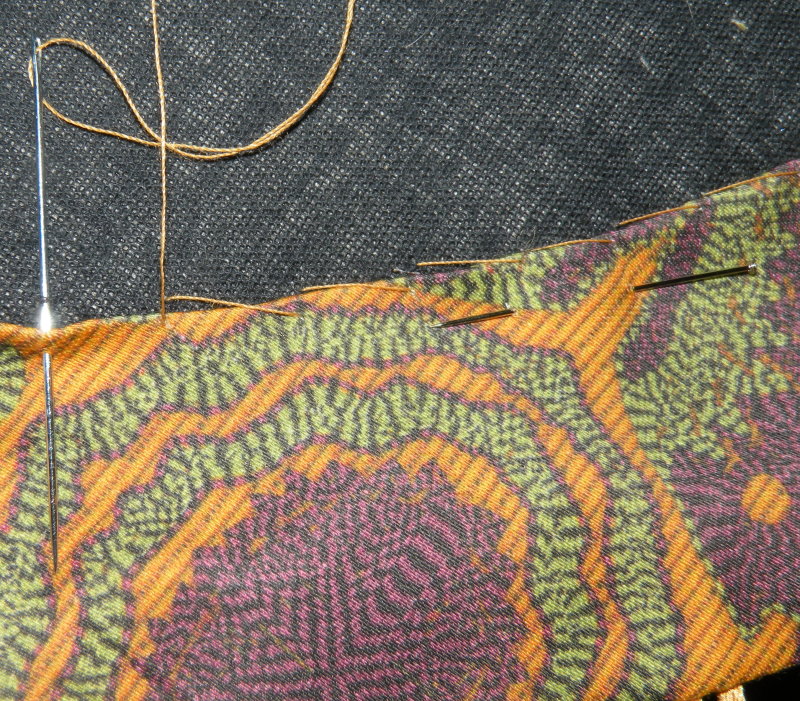
After sewing the dress up, I started working on the cape.
First I ironed the lower seam. Then I basically created three rows of tight zigzag stitching – one, 7mm wide, at the ‚center‘, then two 5mm each of which the center would run over the precise edges of the first 7mm row. After that was done, I added a decorative ‚diamond‘ stitch over the center of all three.
Here’s what it looked like when finished:

That trim at the bottom of the cape DOES have a purpose – it stiffens the hem immensely. It’s almost as if rigilene boning has been sewn into it after the zigzag rows have been added. It’s also on the original cape:
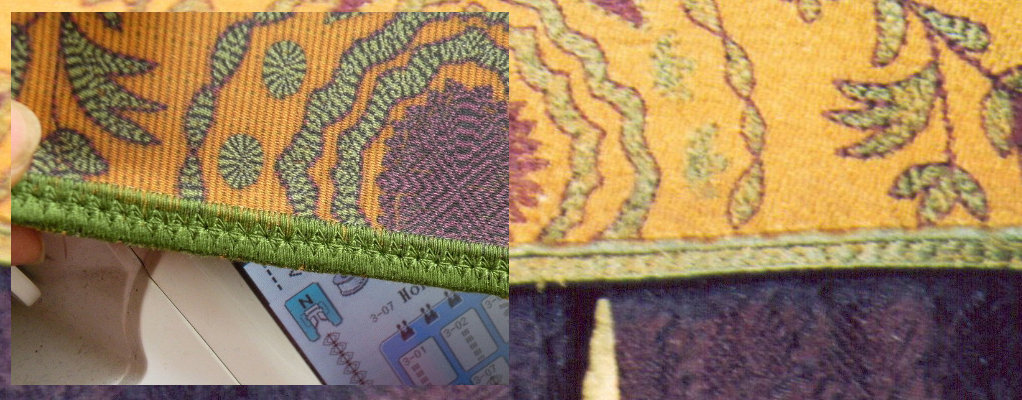 Left: My zigzagged trim; right: original trim
I’ve added the same kind of ‚zigzag trim‘ to the hem of the skirt – two rows of trims, to be precise; both bordering the ‚cross‘ trim at the bottom of the skirt.
Those stiffen the skirt’s hem the same way they do on the cape.
By the way; it took over 700 yards of thread to create these decorative zigzag trims on cape and skirt hem. And yes, I underestimated that and had to buy two additional spools of thread (in addition to the two I already had).
Also, I added the loops for the buttons to the cape front. Maybe I’ll write a tutorial for a very simple method to do so later.
 First picture shows how I’ve hand-sewn the facing of the cape sides to the lining of the cape; second picture shows the not-yet-sewn facing (so basically those pictures are in the wrong order) but it shows the loops very well.
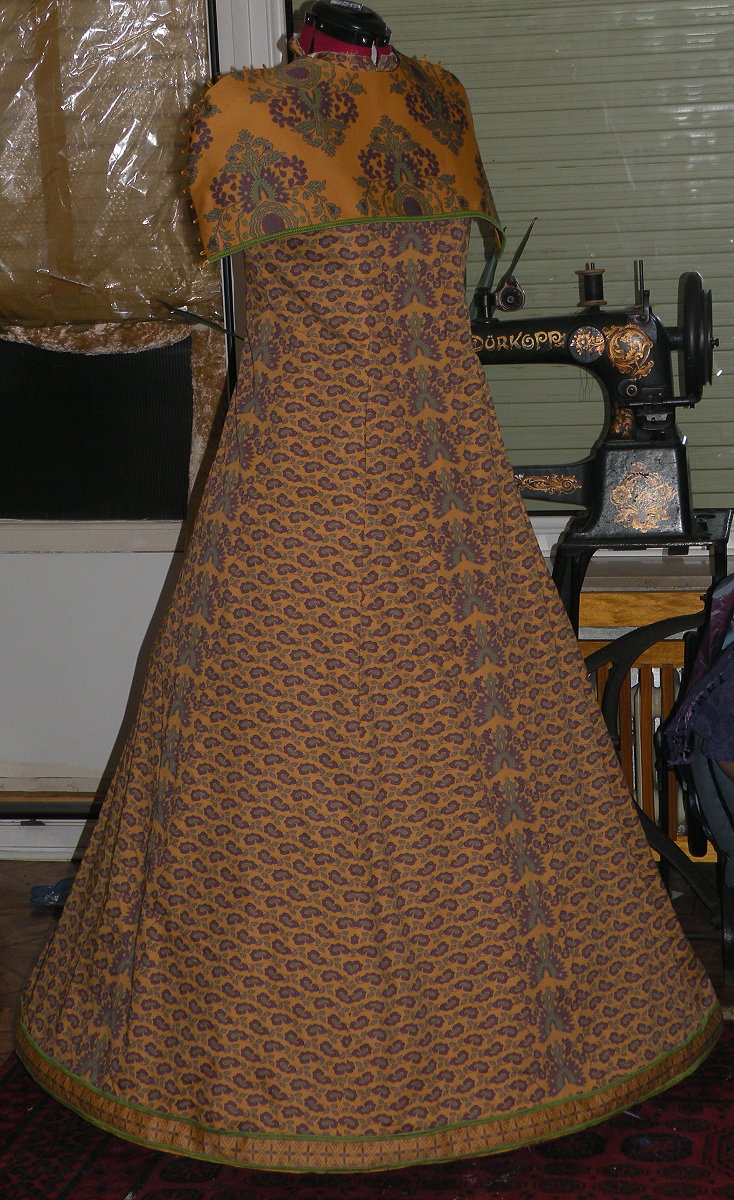
Here’s what the dress looks like now after I’ve sewn it together and added the ‚zigzag trim‘ to the skirt hem. The cape front is just pinned to the dress. You can probably see very well how much that zigzag ‚trim‘ stiffens its bottom hem – the sides of the cape, even if there are no shoulders on my dress mannequin, now „stand“ all by themselves. Compare that to the first picture of the ‚just pinned‘ dress (where the sides of the cape just kind of ‚flop down‘) and you’ll instantly see the difference.
In between, I started making the fabric-covered buttons for the cape. For that I bought coverable shanks.
Here’s how the button-covering works:
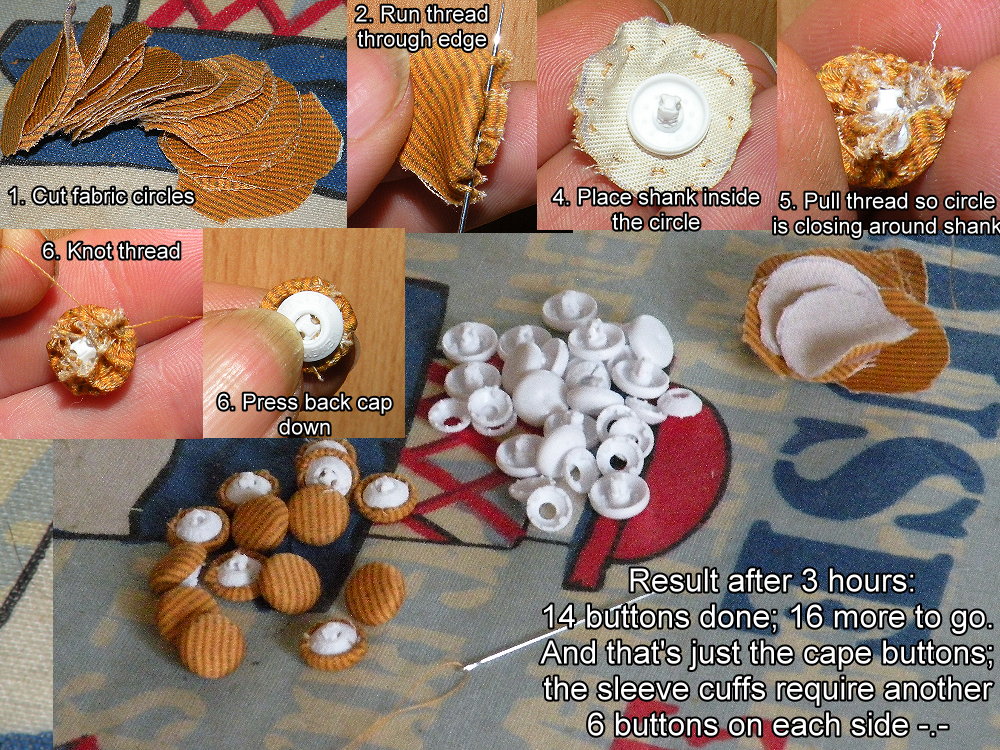
One day of work later….:
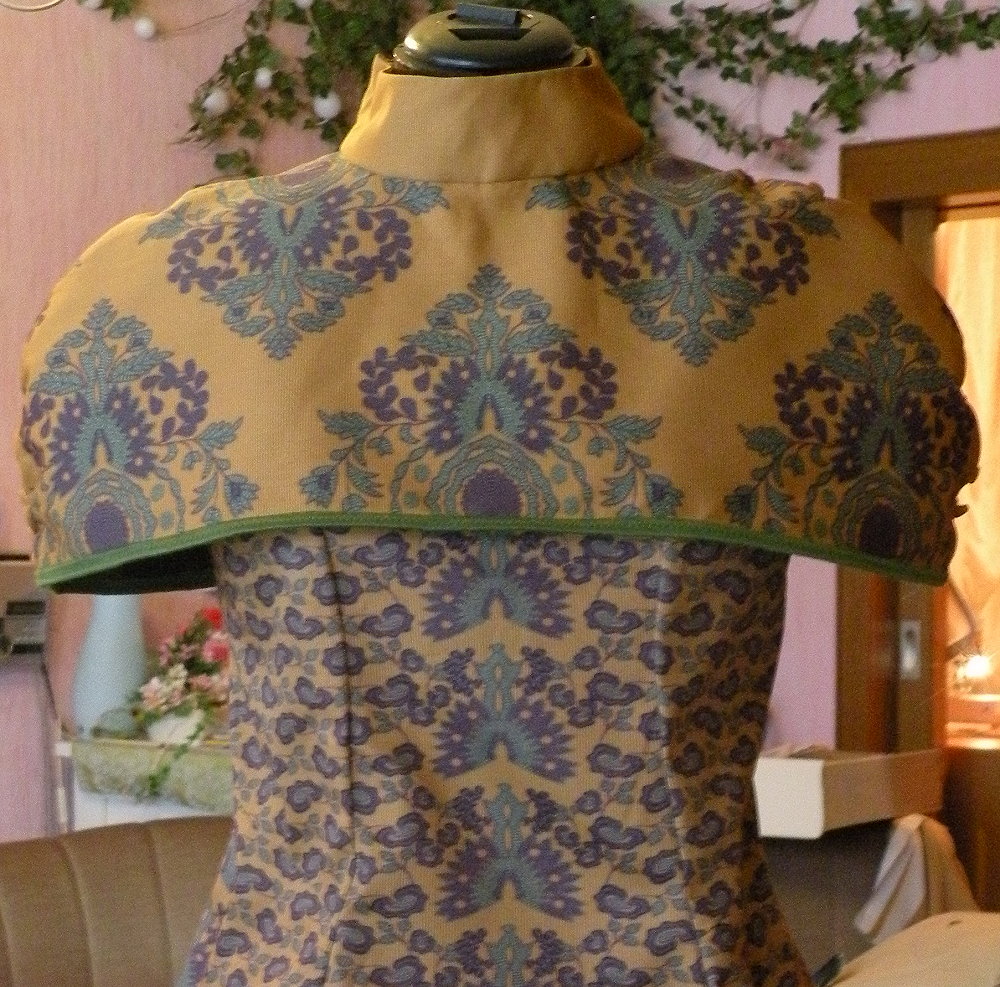
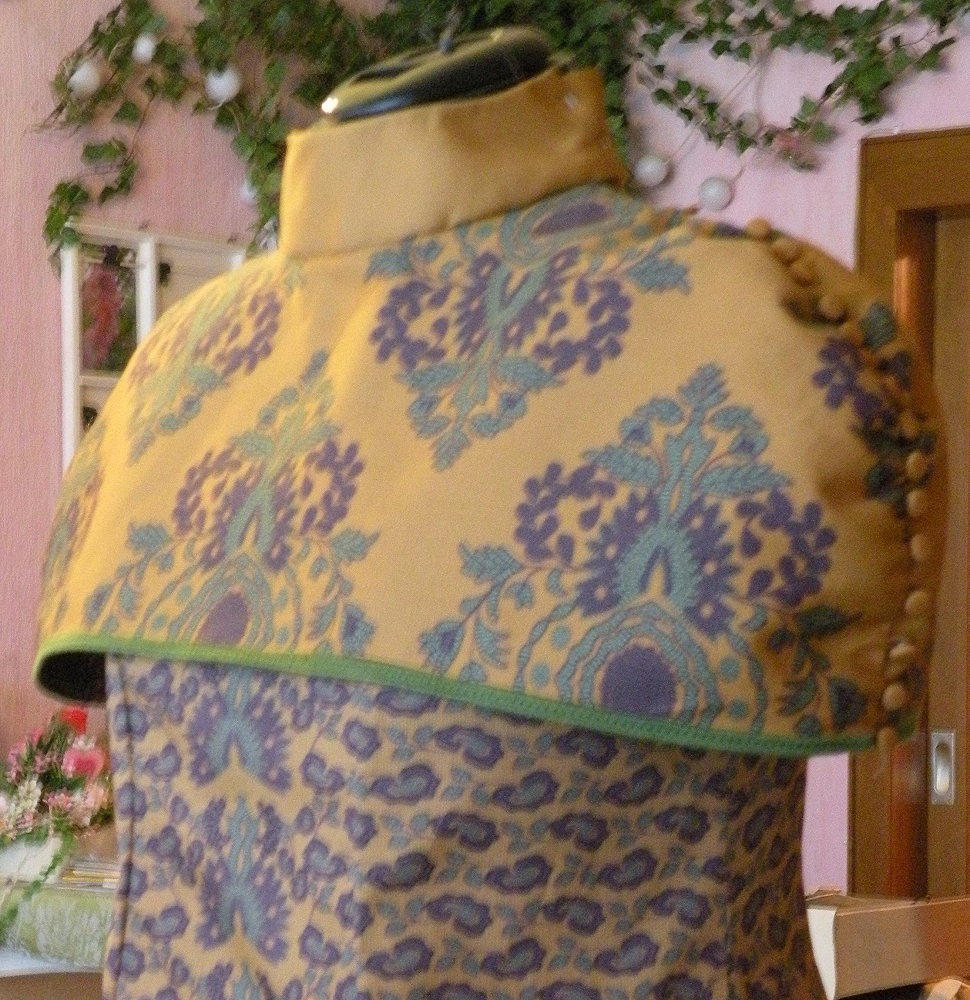
Next thing I did was to set the sleeves in. Here’s a first picture of both sleeves set in; but just one of them so far has the cuff attached:
Here’s the invisible zipper I’ve sewn into the back of the dress:
Also, I’ve taken a picture to, again, compare the printed fabrics to the original fabrics:
And as you can see, I’ve started draping the cloak 🙂 Note that this is really just draped and pinned; the shape is not final (and it doesn’t have the lining yet).
Another thing I’d like to share is the cowl pattern, since it’s not precisely something that I’d call ’simple‘. The original cowl has only two visible seams (to left and right of the backside ‚hairbag‘, to be precise); so we’ll want to avoid any more seams to show on our cowl as well.
Here’s the pattern I came up with:
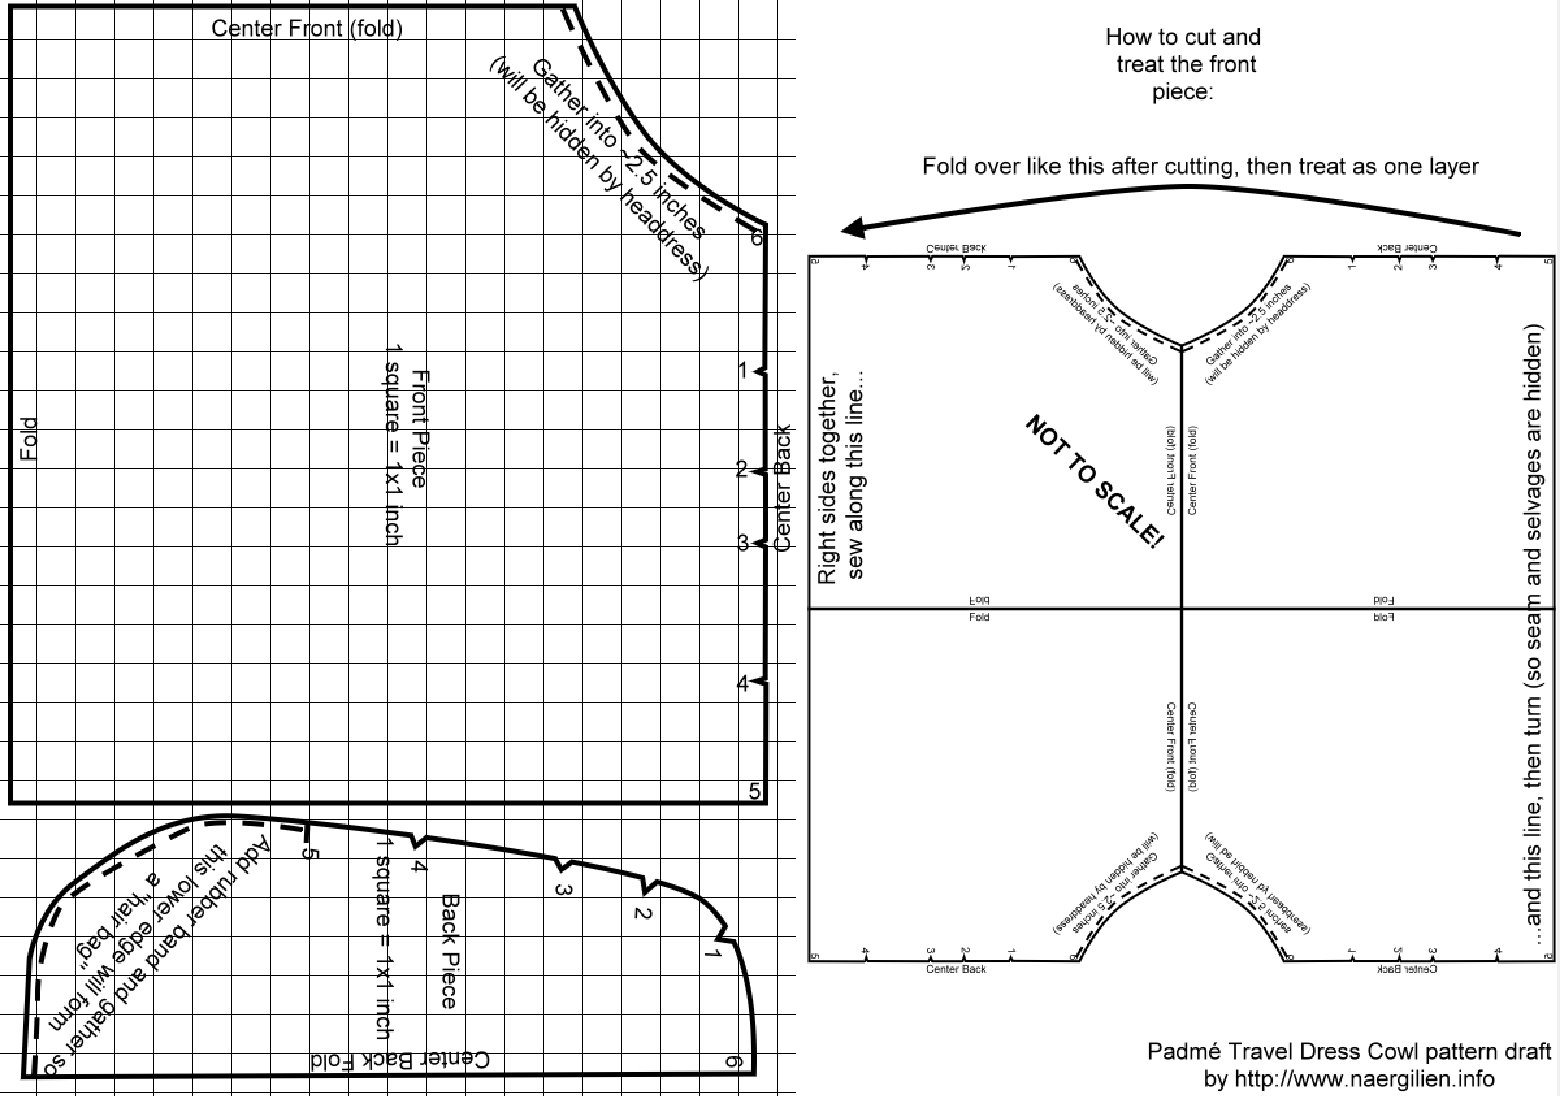
Let me explain.
The ‚left‘ side of that picture shows the actual pattern (with a 1 inch grid so it’s easier to draft). The ‚right‘ side shows how the ‚front‘ portion of the pattern on the left has to be laid out on two folds in order to cut it.
You first want to cut the ‚front‘ part as shown on the right side. This is really one piece, which basically has the pattern piece of the ‚front‘ part four times in it which is mirrored over two axis (aka, ‚cut on fold‘).
After cutting, fold that front part as shown in the picture along the ‚center front‘ line (right side of fabric facing right side), and close the (picture-wise) ‚top‘ and ‚bottom‘ seams (again, picture wise). Remember that what’s named ‚center front‘ will be the part that will go around your face in the end.
After folding and sewing, turn the ‚front‘ piece so you can’t see the selvages of the just sewn edges any more. IRON that sewn edge so it becomes smooth. From now on, treat the folded, sewn piece as one layer.
Then sew together the ‚top‘ edge (which says it has to be gathered). This part, if you wear the headdress, will sit ON TOP of your head and will NEVER be seen since it’s covered by the headdress. Sew first (remember, treat your folded piece as one layer; so just sew those small, curved edges together), then gather them. That top, gathered edge is curved towards the INSIDE in the pattern – that’s not a mistake. Your instinct will tell you that it SHOULD be curved towards the OUTSIDE, but that’s wrong; believe me.
When finished gathering, add the ‚back‘ piece. The numbers on notches and edges should meet those on the ‚front‘ piece.
Add an elastic rubber band in a small tunnel that you sew to the lower edge of the back piece. This should slightly gather the lower edge of that back piece. It then forms a ‚hair bag‘, in which you can hide a braid of your own hair (in case it’s long).
I STRONGLY suggest to make a test piece of that cowl first, so you can make sure that it fits. Also the pattern is REALLY weird with all its folds; a test piece will make sure that you understand how it works.
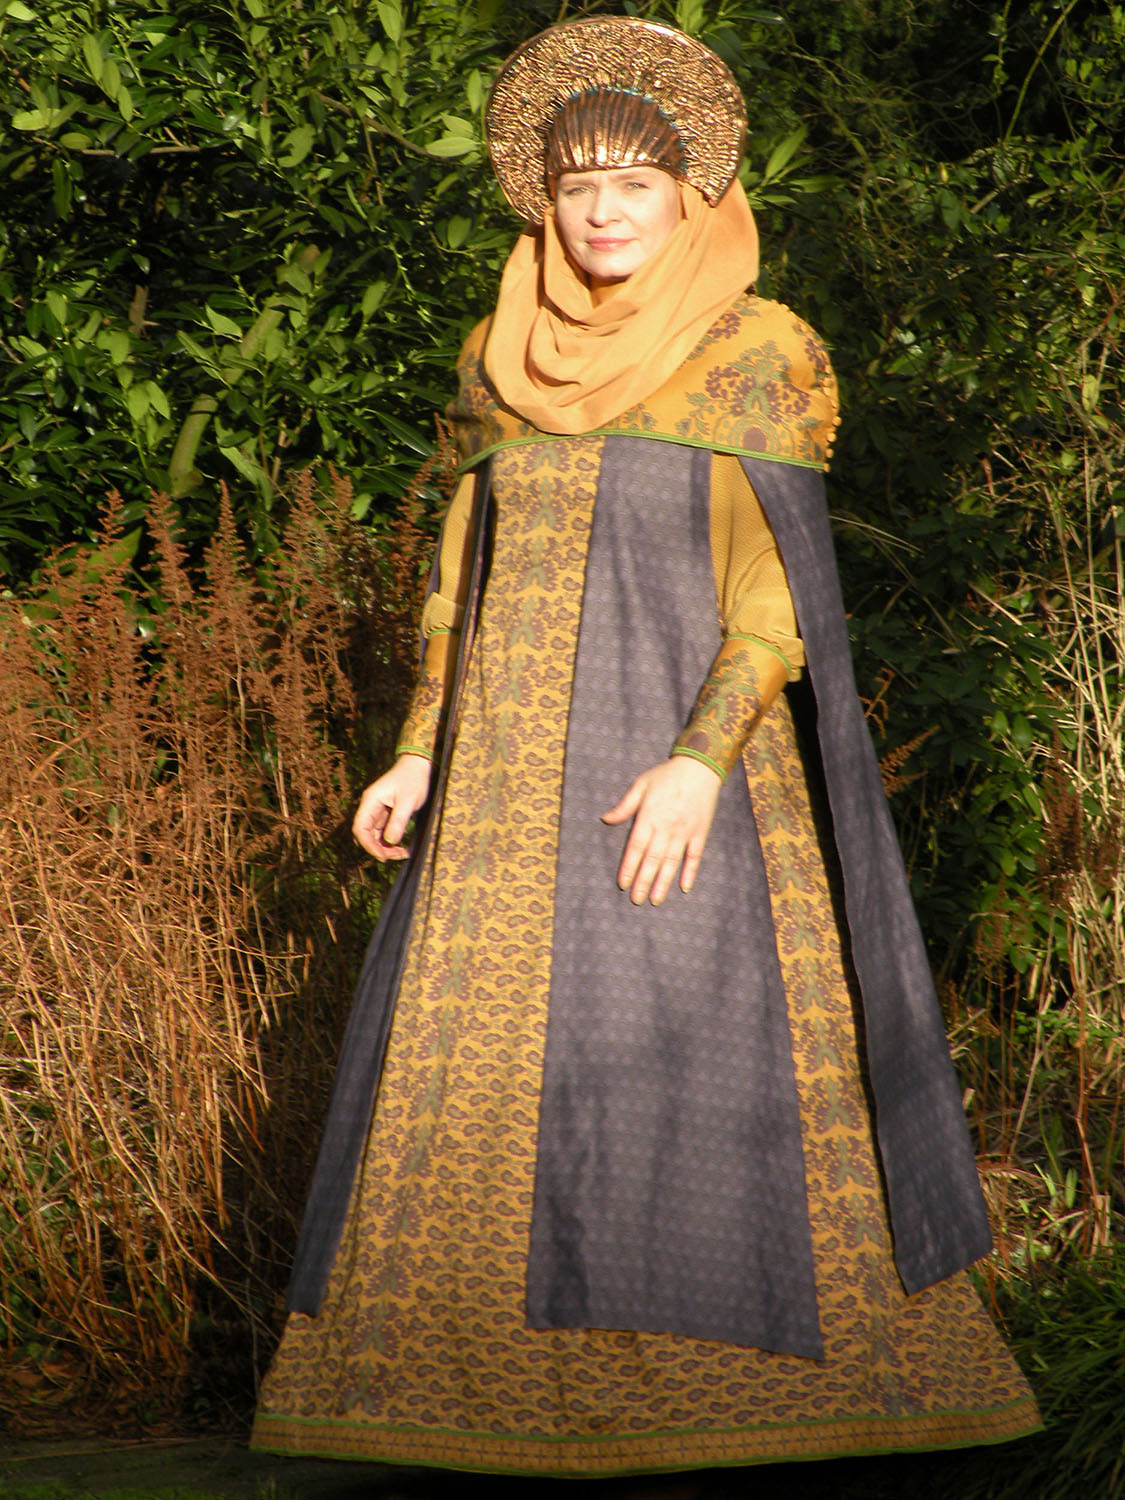
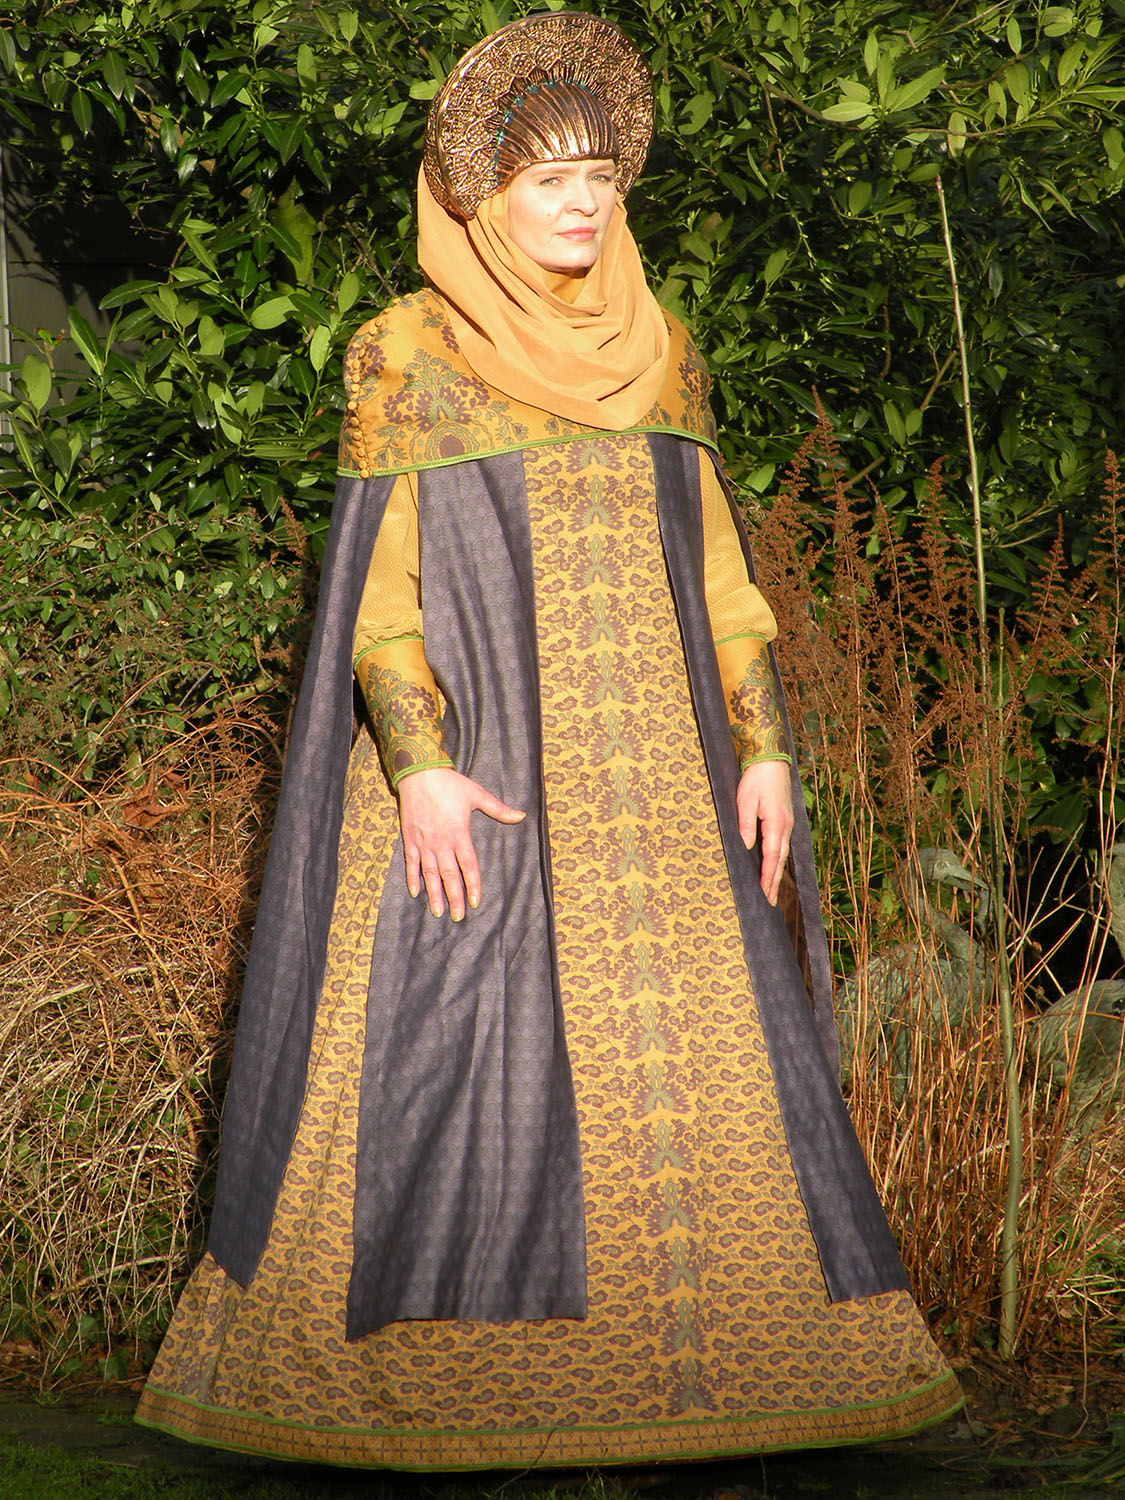
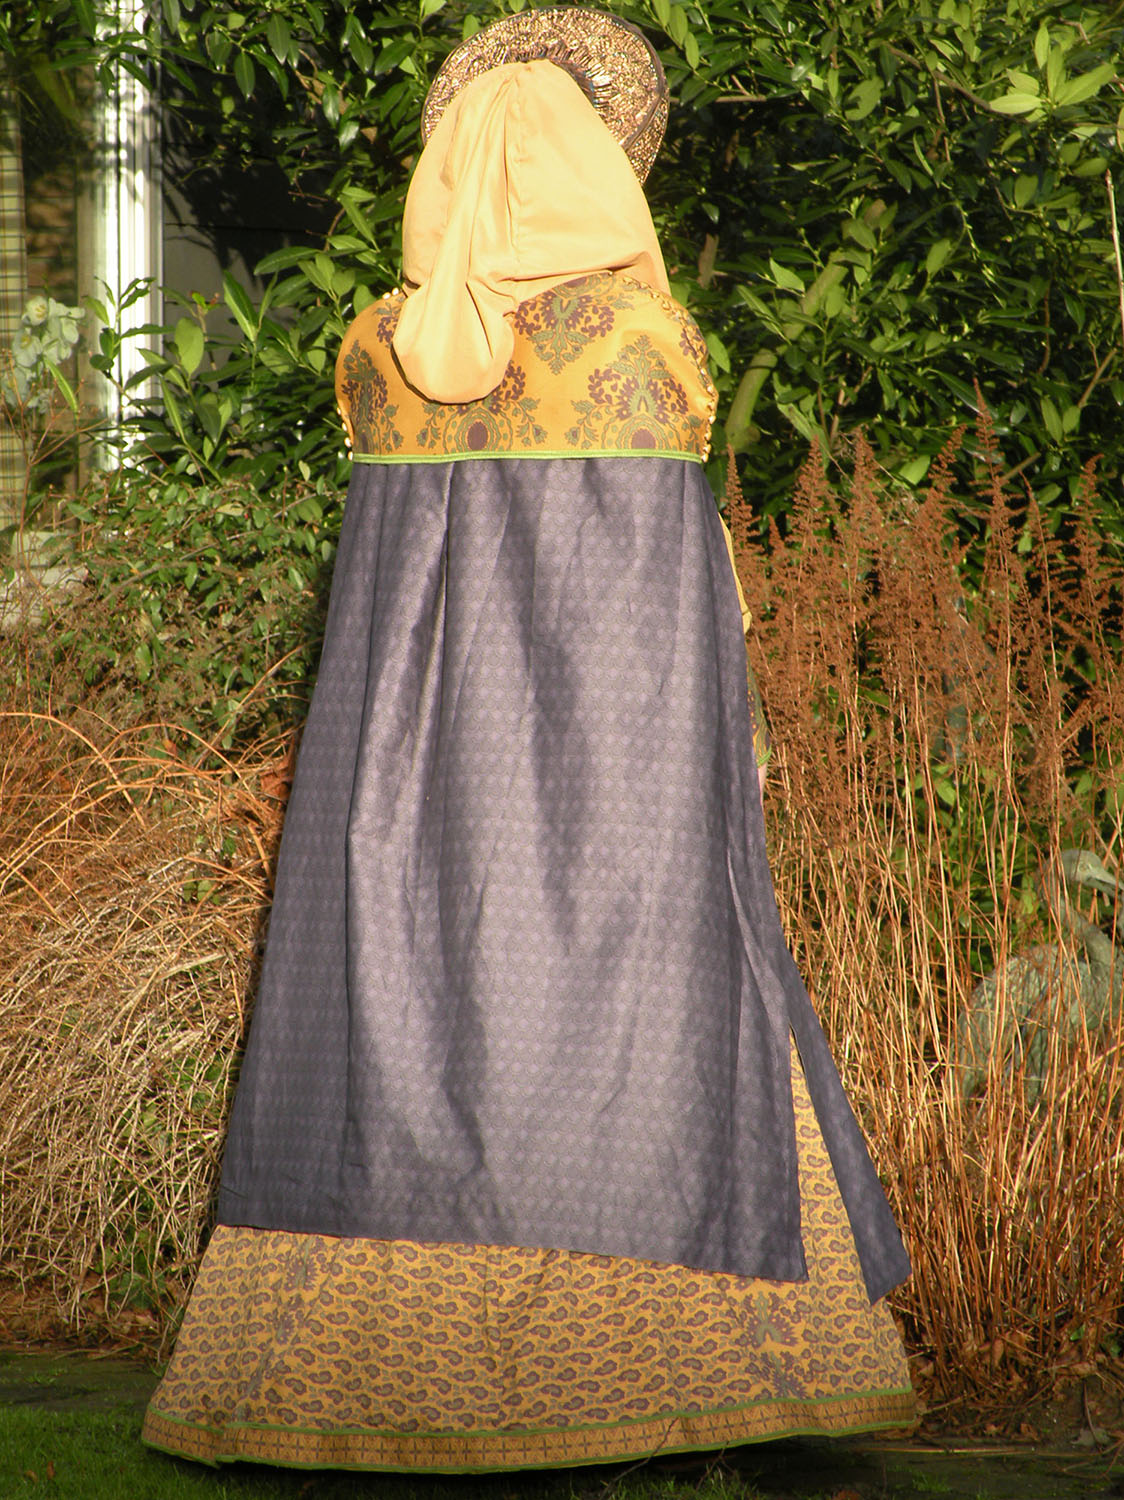
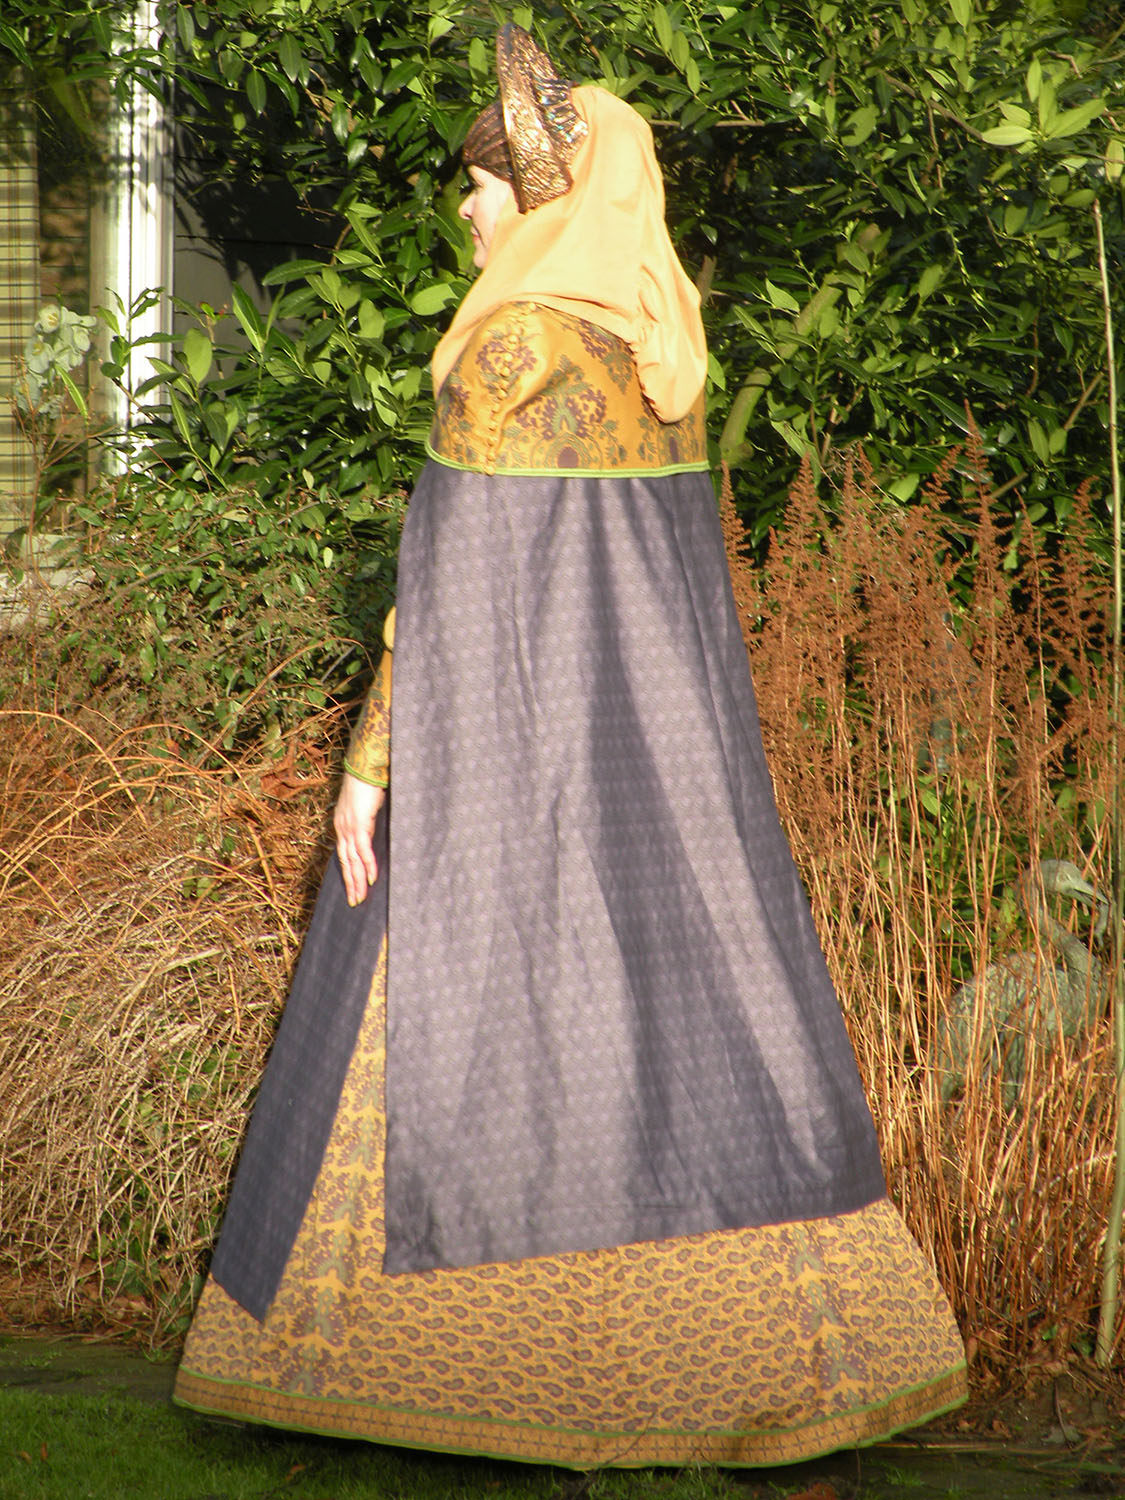
After some days of hand sewing (because a part on my sewing machine broke) the cloak and cowl, I’m finally finished! 🙂

~Please also have a look at my other Star Wars costume reproductions! ~
THANK YOUUUUUU! I have been in love with this dress and been trying to find the correct fabric for years!!!!! You are truly an angel to write this up and make everything available.
Your job is completely amazing !!!!! Congratulations !!!!! You are an artist with the fabrics !!! Do you make this wonderful cosplays for fans around the world ??? I study the history behind the costumes, I love these very much, and in Brazil it is so hard to find these fabrics so close to the originals.
Thanks and best regards !!!!
Thank you!
I do not create „cosplays“. „Cosplay“ is the art of wearing costumes and pretending to be the character. That is something you cannot „create“.
The only thing you can create is a „costume“ respectively „props“, which is what I do – for myself and occasionally for friends.
The printed fabrics are available on Spoonflower, and they ship worldwide 🙂
I love your site. Thank you for all the tips on the different parts of the refugee outfit. I am planning to make this dress for a masquerade party but I will do it much simpler, no need for perfection when half of the people there haven’t even seen the movies. My headpiece is based on a big paper easter egg… 🙂 and I will buy some printed fabric in green/gold/brown colors.
//Ingela, Sweden
Hello! I love your blog and am very appreciative of your excellent costuming! I create Star Wars costuming in 1:4 scale doll size and sites like this really help with the detailing. Thank you for sharing!
hi wow yr costumes are amazing! wish i could do as good as you 🙂
Thank you 🙂
Wow!! You have put so much work into making the fabric and dress authentic. The headdress is amazing! Stunning work. Will you wear it in a costume contest?
Thanks for sharing it!
Liz
Thank you 🙂
I’m not so much of a ‚contest‘ girl; I just love to make costumes – not for the sake of winning a prize but just for ‚proving that they can be made‘. So I’m not planning to wear it in a contest – just for ‚regular costuming‘.
I’m a member of the Rebel Legion; so I’ll have plenty of opportunities to wear it 😉
The headdress is amazing. If it is not perfect, it is really close! Beautiful job, just stunning.