Navigation for this costume:
Introduction – Materials – Smock – Farthingale – Petticoat – Bodice – Skirtings – Rolled Sleeves – Overskirt – Forepart – Ruffs – Partlet and Sleeves – Jewelry making: Headdress; Necklace; Pelican Jewel; Sleeveband; Girdle; Wristbands; Fan – Finished gown – Funny Comments – Miss Starkie – Quiz

The sleeveband. According to Janet Arnold’s „Queen Elizabeth’s Wardrobe unlock’d“, here she calls it an ‚armlet‘, this is a single piece of jewelry and in no way affiliated with or attached to the gown.
Sleeveband = headache.
How could I possibly create something that would neither entirely stop the blood flow between my shoulder and my hand nor take the first chance to slip down to my wrist? You have to know that my bicep is a well trained and expanding muscle, which always made it difficult for me to wear upper arm jewelry (this is why I could never follow that 80ies fashion of silver upper arm bands – I *so* envied other girls…).
In the end, I helped myself with a construction that had some elastic in it.
I’ve sewn a ring of 1 1/2 inches wide, strong black elastic belting. My upper arm circumfence is about 12 inch, so I made the elastic band ring11 1/2 inch long to make sure that it will neither slide down nor uncomfortable to wear.
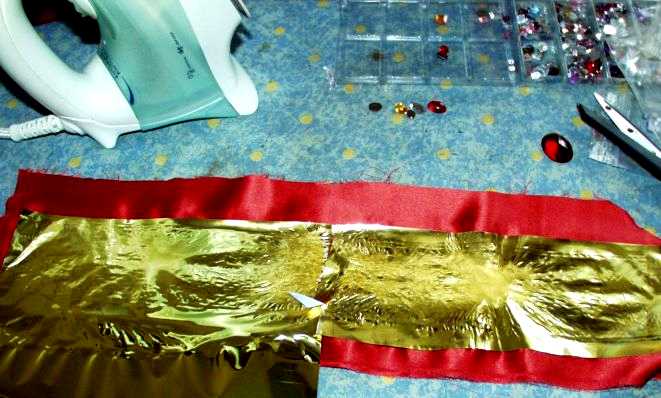
The visible outside of the sleeve band was made of a strip of red silk satin, four inches longer and one inch wider than the inner ring of elastic, backed with stiff fusible interfacing. I then carefully traced the designs of the original sleeveband, which seem to be at least vaguely repeating, on that piece of satin using a disappearing, non-permanent marker, then I outlined those designs with special crafts glue. The parts of the sleeveband of which I couldn’t determine the pattern I randomly filled with rounded lines.

The golden foil you see in the following picture is something I found in my crafts store – the ’special crafts glue‘ I mentioned before is actually part of this foil:
After you have made a design with the crafts glue on the fabric and let it dry, you can iron the metallic foil over it, which will stick everywhere it gets in contact with the crafts glue – but won’t stick to areas of fabric which are *not* covered with the glue.
This method leaves an actually *really metallic* looking design – something one could not achieve with a golden fabrics marker.
It’s much likely to using gold leaf – just on fabric. And the good thing is… it’s actually permanent, meaning, it can be washed etc without the golden foil coming off.
| Note: Since several people asked – this crafts foil and glue is sold here in Germany under the brand name ‚Signotex‘. I have no idea if something likely is sold in the US or other countries, but I would think that it is so. Here in the small country of Germany we have at least three companies selling such metallic foil / glue combinations – one is Signotex, the other Marabu, and the third I have forgotten – but the US are bigger, so I would venture a guess that there are also at *least* three companies selling the same stuff. Look in a crafts store near the Pop-up fabric liners – that’s where such a metallic foil and the according glue should be located. |

Here I have ironed the golden foil to the strip.
This process left me with a satin band that seems to have cut out, real golden filigree designs over it:

I filled the designs with gemstones, rhinestones, disks etc – until I had a very nicely decorated band. For the „white halos“ of glue around the rhinestones, please read my mini-tutorial on how to glue on rhinestones.


I then attached the finished and dried sleeveband with the rhinestones with zigzag stitching to the black elastic backing, stuffing it very firmly with fabric scraps.

…which, tested over an ordinary everyday shirt, looks like this with a flash:

…and like this outside in the sunshine (and, where have the „white halos“ around the rhinestones gone…? See, they are no more there…):

Then I decided that the edges of the sleeveband look somewhat empty, crumpled and not really neat.
So I beaded those edges with faceted jet beads, which made it look much better and more like the original band, which also has some black bead edging. I also added some pearl drops, because the original banding also has those pearl drops on the bottom side.
Pictures of this finished armlet will be shown with the finished gown.
The next and simple step is the making of the girdle.
Navigation for this costume:
Introduction – Materials – Smock – Farthingale – Petticoat – Bodice – Skirtings – Rolled Sleeves – Overskirt – Forepart – Ruffs – Partlet and Sleeves – Jewelry making: Headdress; Necklace; Pelican Jewel; Sleeveband; Girdle; Wristbands; Fan – Finished gown – Funny Comments – Miss Starkie – Quiz