– Edited to add:
During to a flood that hit my house, the fabrics and partially completed costume parts were destroyed.
So until I decide to actually redo everything with new fabrics, the pages for this gown only serve as a documentation and memory of what I made; not as a dress diary.
Studying the doublet carefully, I found that….
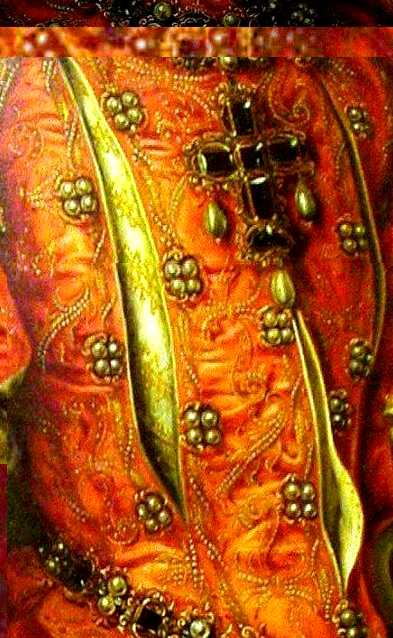
Looking at that image, you’ll see seams at the end of the slashes.
…it’s basically *not* slashed, but consists of several lined strips of fabric which were joined at top and bottom pattern piece. This is a very unusual layout for an Elizabethan doublet; though it of course makes the construction much easier as I actually have *hems* at the sides of the strips, which makes it easier to safely secure the possibly fraying edges of the slashes.
Well, having this said, I have to correct myself – this is not a slashed doublet, it’s a ’stripped‘ doublet, lol…
The original doublet has a slash (I’ll continue referring to the openings as ’slashes‘, as ‚opening between strips‘ reads somewhat strange…) on each front side plus the front middle ’slash‘, which presumably is not a slash (or two bordering strips) but the front opening. As the strips run relatively straight, I have to revise Margo’s pattern again – the doublet front of that pattern *has* two pieces (to make fitting easier), but they’re slightly curved.
There doesn’t seem to be any slashing under the armhole, which I welcome.
I will also have to think of a solution for the backside, which is not visible in the portrait. I think I’ll place a center slash and two side slashes on that backside, so the appearance of front- and backside will be even. Or perhaps just two side slashes (so I’ll have to embroider less strips; but then I would have to think about an embroidery layout for the back middle piece)…
I will also most definitely have to revise the collar pattern piece. On the original gown, the collar is *very* high (a little less high at the front than on the back, where it’s above ear level) and becomes broader at the top so it practically fans out…
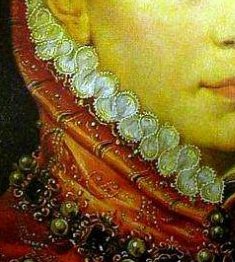
Collar curving along the neck
…but on Margo’s pattern it’s a straight, narrow strip of fabric.
I think I will have to come up with something that is slightly curved and will most definitely have a center back seam to accommodate the width. I can’t curve the top side of the collar, as it’s folded over and slashed on the original portrait.
Hmmm, I’d better cut all collar pieces on the bias so they will a) drape nicely, following the curve of my neck, and b) this way I could place the slashes also on the bias – which will prevent them from fraying.
I know that the portrait doesn’t really show if the collar itself and its slashed edge are one piece (they could also be several pieces – the collar and *lots* of narrow strips of fabric!), but I like the idea a lot to make them up as one piece, as this is a more demanding task.
I think I will also have to bone at least the back and sides of the collar, so that the collar will indeed ’stand‘ the way it does in the portrait. This also means that I will have to construct an interlining which will hold the boning in place, so that it’s not visible on either the outside fabric or the lining of the collar.
Oh, and as I have already said during my planning – this doublet will have to be larger than my usual size (as that will already be the size of the white ‚under‘ doublet). Considering that the ‚orange‘ doublet drapes quite loose in the portrait, I think I will make it three sizes larger – instead of a size 10, it will be size 16 – but only on the width, the length will be just one size larger (size 12, to be exact) so that the slashes have a possibility to open up the way they do in the portrait, instead of being pulled down and straight.
And now… to the making.
My fabric didn’t even have a 48-hours-rest from its oversea travel to my home when I started embroidering it.
I started with the two front side strip pattern pieces, which I traced to a piece of the fabric, then cut them out as a large rectangle, used a template to paint on my first repeat of the embroidery pattern…
 |
|
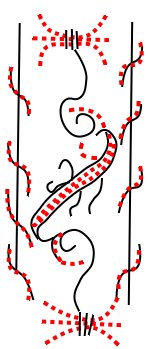
| Red = pearls, dark blue (almost black) = Silver embroidery, turquoise = silver cording | |
| This picture shows my first draft of the embroidery pattern, which I made some time ago when starting to plan the gown and also had shown on the „Studying“ page; but it was just a first draft. Comparing it to the final embroidery pattern on the right, it looks almost like a simplified version of the actual embroidery. I guess I will use it for the collar embroidery. |
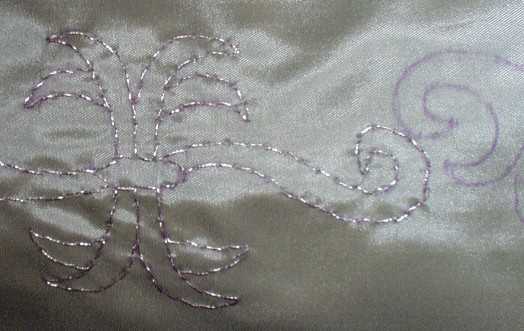
And this picture is the final embroidery pattern template, which I derived from a more careful and time consuming study of the original portrait (guess what I used the aforementioned 48 hours rest of my fabric for!). It shows two pattern repeats. Some of the pearls in this final template are a little bit misplaced or too widely spaced, but the overall shape of the embroidery should be correct (at least from what is visible in the portrait). |
…and then I, well, I just started embroidering.
| My embroidery thread is „Ophir“ by Coats Metz in silver color. It comes in tiny spools of 40 meters / about 44 yards length; it’s a little thicker than usual sewing – but much thinner than usual embroidery yarn. I’m curious how many of those spools, which are about $4 each, I am going to need until I have finished the embroidery (I’ll tell you when I have actually finished it – typing this, I have finished the collar, the two front middle panels and one and a half of the front side panels, and my first spool is about to come to an end; so I thought I’d mention the yarn before I forget about it). I think I will need five or six spools, resulting in about $24 – just for embroidery yarn. |
By the third pattern repeat, I guess, I had practice and took a look at the clock before I started on and after I had finished the fourth pattern repeat, which was already on the second of the two bodice front pieces.
Parts of one embroidery pattern repeat on the fabric.
Picture is slightly enhanced to make the silver embroidery on the (in reality) very pale blue fabric visible.
The ‚purplish‘ marks under an next to the embroidery are from the vanishing marker, which will disappear within a few days.
Conclusion so far:
It took about 45 minutes to hand embroider just one pattern repeat with a little practice – and, mind you, just in silver threads – I’ll add the pearls when I have finished all silver embroideries.
I calculated that I will have to embroider about 20 pattern repeats just on the doublet, perhaps five more for the skirting- and sleeve tabs, then about 20 more for both sleeves – and, of course, 14 for the skirt – about 7 on each front side’s opening.
This results in about 60 repeats of that embroidery pattern, which – according to the above mentioned embroidery time for one pattern repeat of 45 minutes – should take about 50 hours of work – *just* for the silver embroideries, and I think it’s safe to say that at least another 50 hours will go into adding the pearls, which, though there are less pearls to stitch on than silver threads, is a little more time consuming.
So I’m happily looking forward to spend at least 100 hours embroidering, probably more, before I can actually start assembling the whole gown… *sigh*
But that’s still less than I had first guessed; I thought I’d need about double the time. I will have to record my embroidery times carefully so that I can tell exactly how long I needed for them when I’m finished.
I think I could embroider up to four pattern repeats per day… not more, otherwise I’ll go insane. So the basic silver embroidery could be finished in a little more than two weeks – I said *COULD*, if I would really manage to embroider four pattern repeats per day, which I doubt – one or two are much more likely (Not planning on giving up yet, though!). I’m *trying* to embroider one pattern piece per day.
I’ll update this site with pictures of all the single pattern pieces that I have embroidered, until I’m done with the silver embroideries of the doublet; but I’m simultaneously working on the slashed sleeves. The list below already includes all pieces that will have to be embroidered; I’ll fill the list with pictures as soon as I have finished either of them.
While doing this, I’ll switch from time to time to the slashed sleeves construction and embroideries, which will be shown on a different page before I *then* do the silver embroideries and the slashing on the skirt – just to return back here and start on the pearls.
Silver embroideries progress:
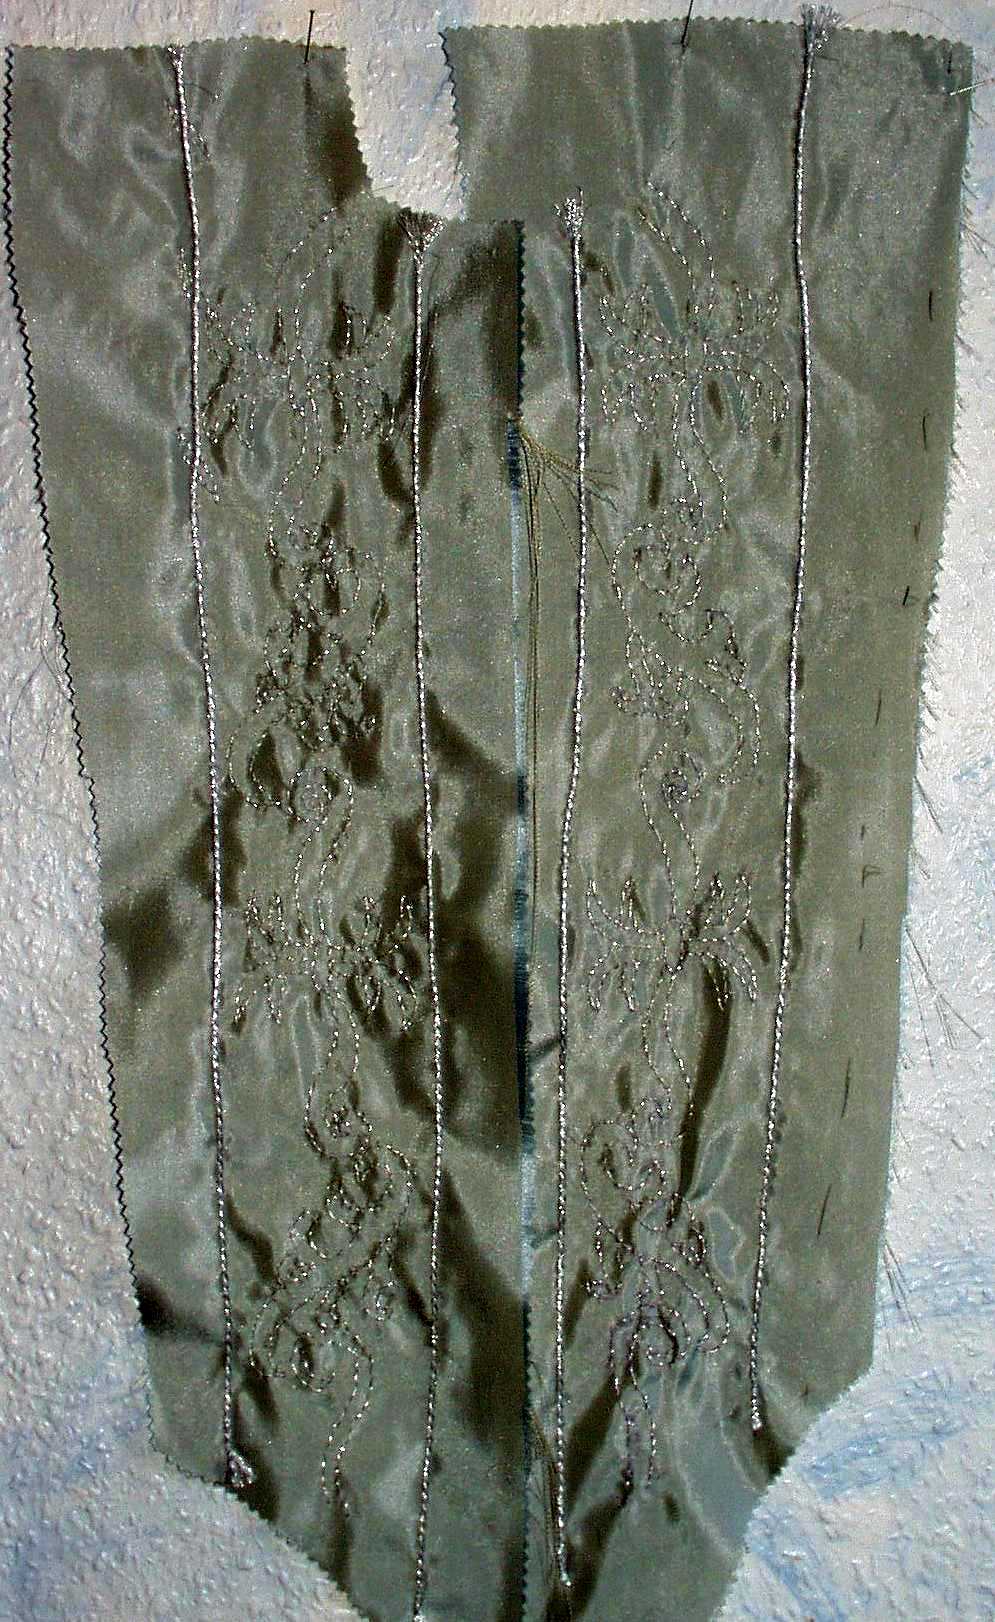
The two front middle panels
embroidered with silver thread and cording
(left picture was taken with a flash; right picture without. The right picture shows about the correct color of the fabric; but the left picture shows better how the embroidery threads are usually glittering.
In the middle of the right picture, between the two pattern pieces which I have pinned to a wall to photograph them, you can also see the fabric fraying, showing the aqua blue and, uhm, mushroom weft and warp threads.)
The two side front panels
The two back side panels
Back middle panel
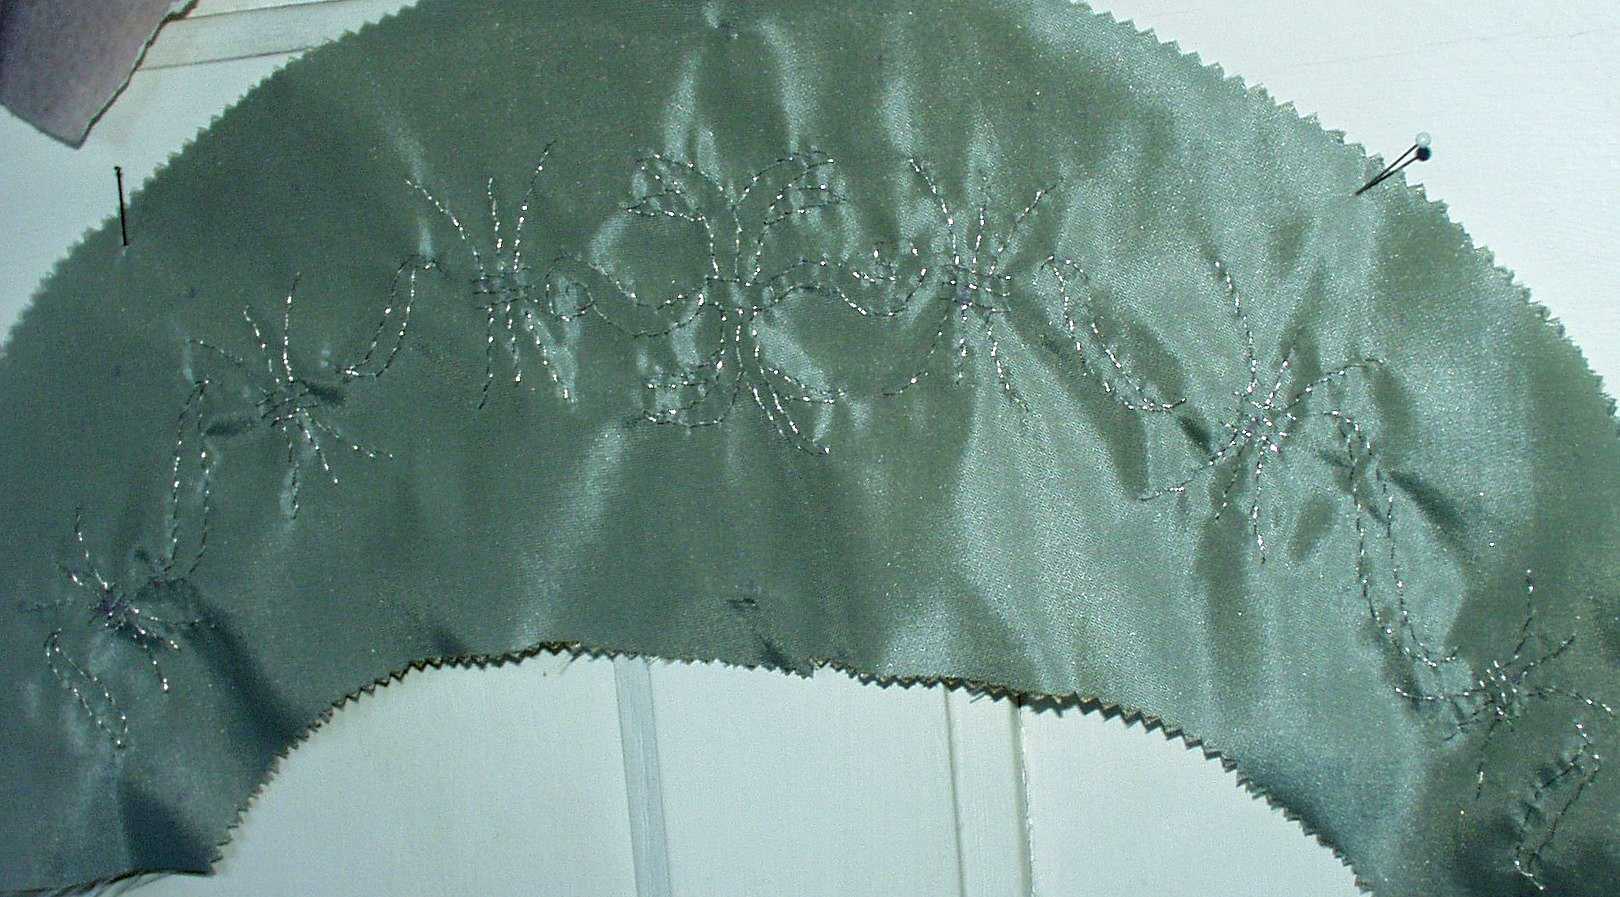
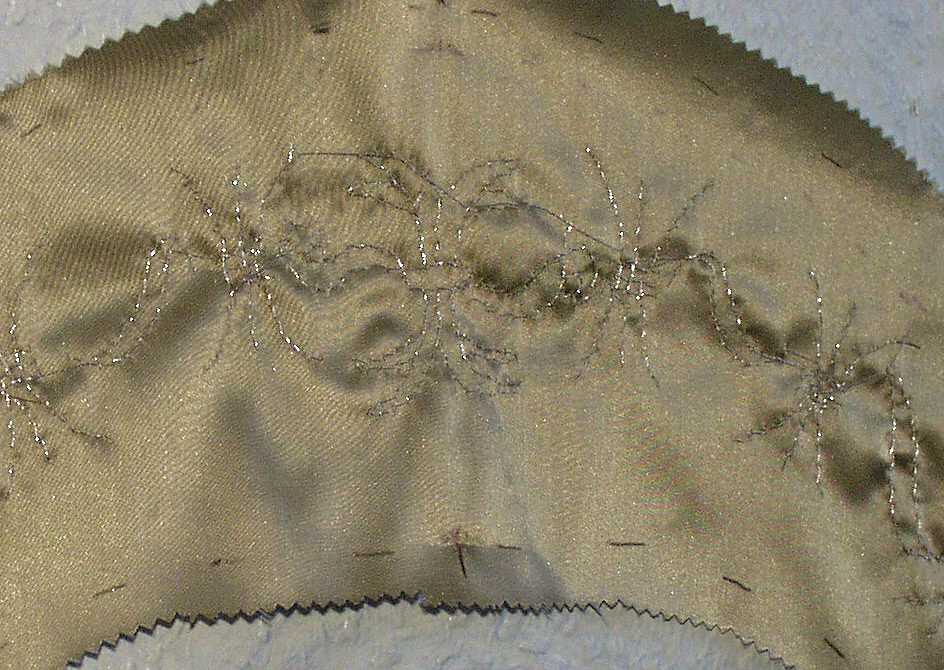
Collar
(right picture shows the backside of the embroidered fabric – I just wanted to show once how that embroidery looks from the back…)
The collar in the portrait has a simplified embroidery pattern; so I used the ‚first draft‘ embroidery pattern.
While first planning to cut the collar and its tabs as one piece, I have decided against it when I actually cut the collar out.
As it’s slightly curved, the construction will be much easier if I attach the tabs rather than cutting them from this pattern piece. The construction and embroidery of the tabs will also be much easier this way.
Collar tabs
made up as a strip of fabric, which will be cut into small pieces and then attached to the collar
Skirtings
Each skirting tab has to be embroidered individually and with a different pattern, though left and right side of the embroidery on the skirting tabs seem to be mirrored on either side of the doublet in the portrait.
Shoulder tabs
Go to the next page: Slashed sleeves construction and embroidery