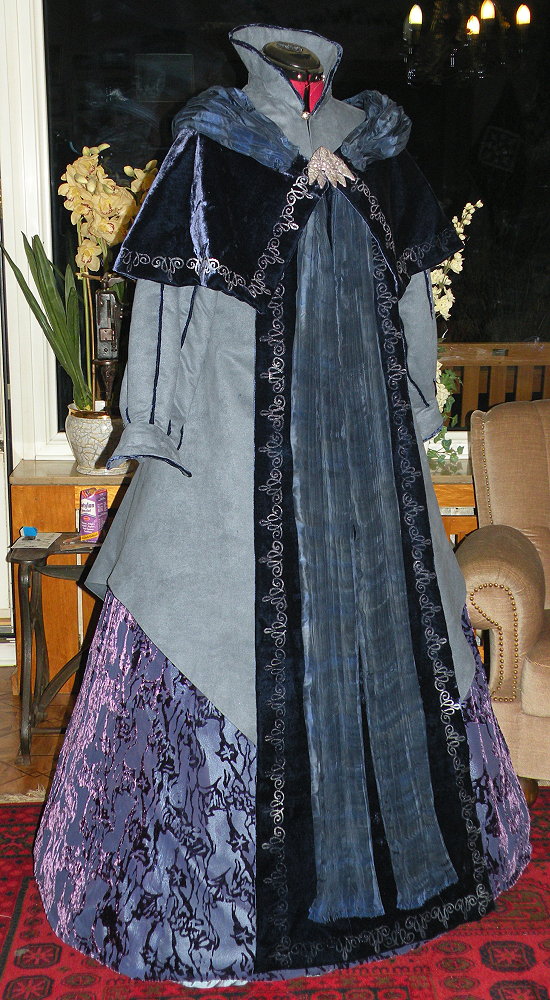
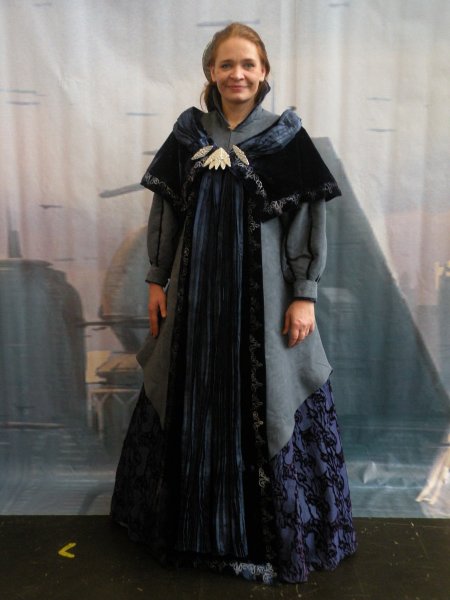
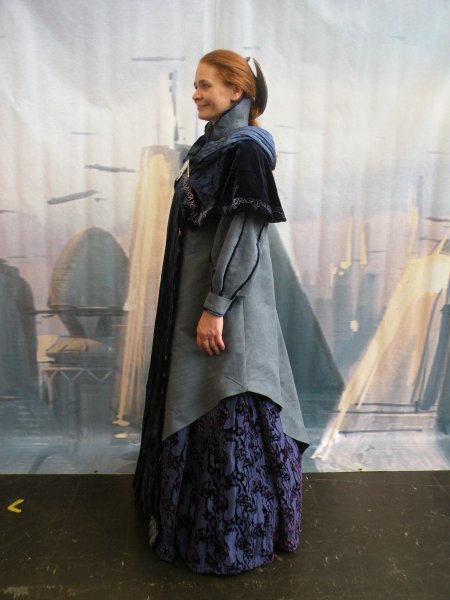
Episode 3: Padmé’s final Senate appearance – the purple ‚cape‘ gown
„So this is how liberty dies… with thunderous applause.“
– Lots of pictures (reference pictures, screenshots as well as exhibit photos) of this dress can be found at Padawansguide –

This costume wasn’t made in a rush – I started writing this dress diary at the beginning of December 2012.
However, I decided to actually make this dress diary public on my website only after Celebration Europe II has started, which will be on July 26th in Essen, Germany.
The reason behind this delay in publishing is that basically everyone knows that I’m going to make the Red Invasion gown, Padmé’s Travel gown as well as maybe Breha Organa for Celebration Europe; and I wanted ONE costume no one knew about beforehand 😉
There is one catch, though:
I’m working with an extremely limited budget for this dress.
As in, I can’t afford to spend more than EUR50 / US-$70 at max (planning to spend way less, though!) for everything that I don’t have at hand yet.
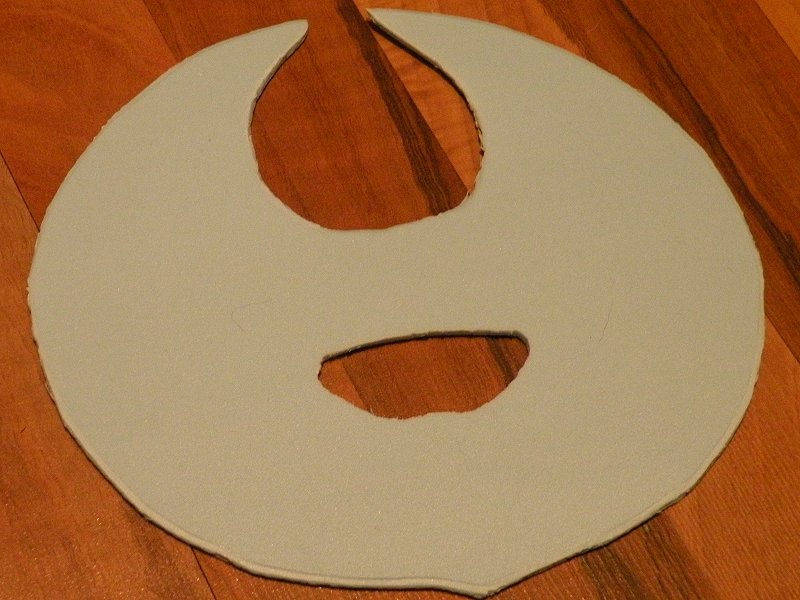
So… in December 2012 I started making this costume by burning out the velvet for the underskirt with the correct pattern.
For that I created and lifesize printed black and white templates first – one for center front / back piece and one for the two smaller side pieces:

The templates didn’t cost me anything but time, paper and glue which I already had at hand.
I then went ahead and started to burn out the silk/rayon velvet piece by piece.
Note that I’ve only burned out „what I need“ for what’s visible of the underskirt plus approximately 4 inches towards the top portion of the underskirt – everything else will be forever hidden behind the pointed overdress and I don’t see any point in burning out more silk velvet than I need.
Also note that this didn’t cost me anything in terms of money either:
For the skirt pieces I used a few larger scraps that I had left from previous projects (such as the many ‚Elven‘ gowns I made over time – hoarding all scraps DOES pay off! 😉 ).
And as for the burnout fluid, I still have approximately 600ml of that – also leftovers from previous projects. It’s old – I bought it in 2003! – but it still works. I used approximately 300ml of that burnout fluid for this skirt.
The first burned out side piece looked like this compared to an exhibit photo of the very same side piece on the original gown:

Granted, I missed some of the fine lines in the design.
Or rather, I didn’t miss them but my burnout fluid spread over them so they were removed too – that’s clearly a painting problem which I wouldn’t have if I would screen print the burnout fluid to the fabric.
That, however, would require a large screen printing frame which I don’t have and can’t afford with my limited budget – but I have brushes, a template and time (of which particularly the latter is relevant – painting the burnout fluid to even that smaller piece of the skirt fabric took two hours).
I still think it’s pretty close to the original velvet pattern; particularly if you wouldn’t have a side by side comparison with the original gown.

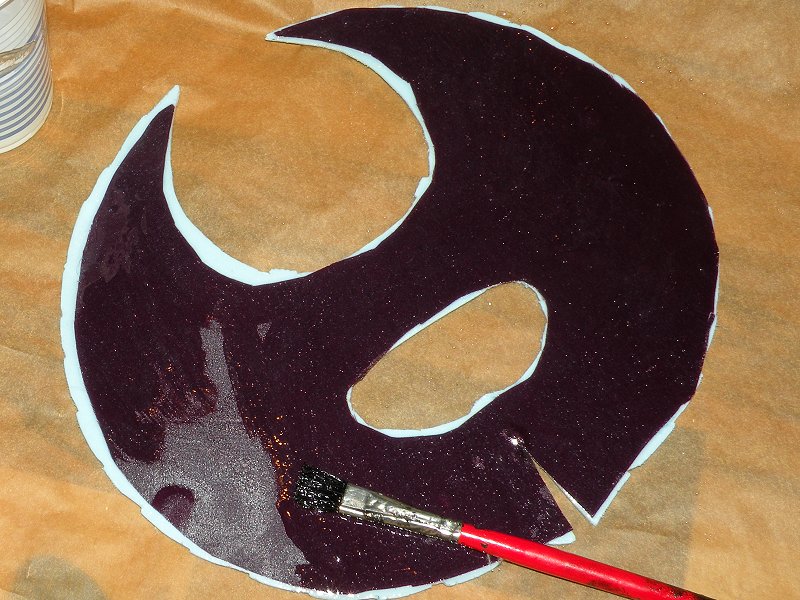
Here’s me painting endless rows of floral ‚ivy‘ pattern to silk velvet.
After spending 10 hours of time to paint the pattern to the velvet with the burnout fluid (or rather to paint the velvet avoiding said pattern 😉 ), I had four pieces of burned-out velvet for my skirt – one for the front, another one for the back, and two side pieces.
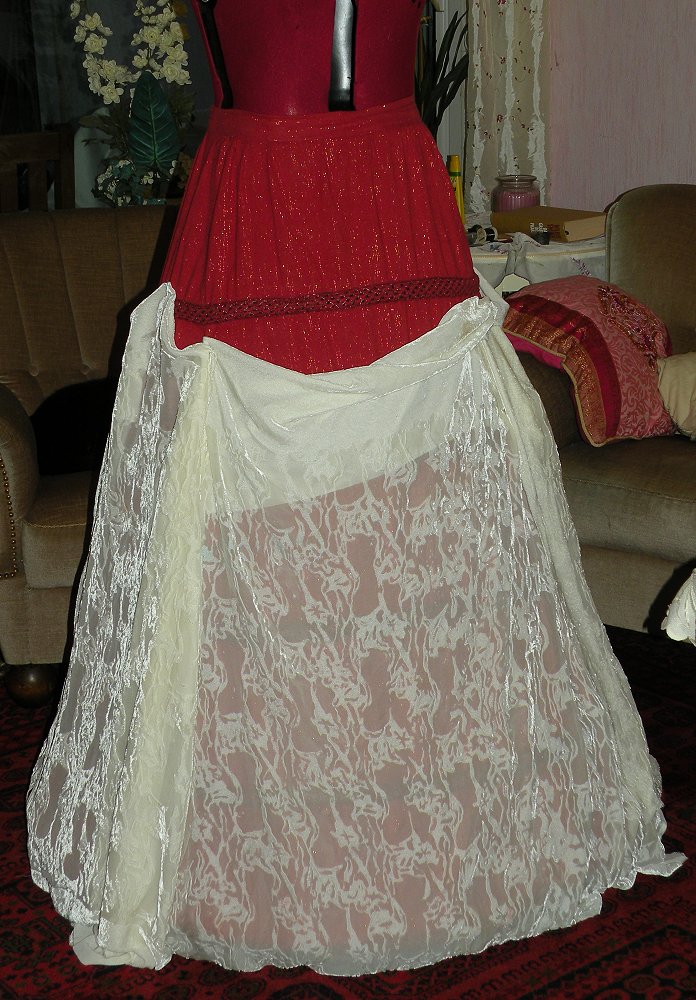
Now, beneath the burned out silk velvet, there’s a layer of a blue-pink iridescent taffeta in the skirt – you can see it through the burned out areas of the velvet in exhibit photos that show the skirt.
Here’s my first test draping of one of my burned out velvet pieces over that blue-pink taffeta; side by side with one of the exhibit pictures to compare.
Note that because my velvet isn’t dyed yet, its white color reflects more of the flash light than it would if it were dyed; so the iridescent taffeta beneath it doesn’t (yet) show as well as it would if it were dyed. That will change as soon as it, well, is dyed 😉

Hopefully you can see – particular from the part of my test draped skirt that isn’t covered with my burned out velvet – how similar it looks to what’s beneath the original burned out velvet skirt.
Shimmering, iridescent glory!
Here’s what all four pieces of burned out velvet look like if I drape them over my Elizabethan Farthingale:
The iridescent taffeta wasn’t something I already had at hand. Costs for 3.3m / 3.6 yards of iridescent taffeta: EUR 14.85 (yay for sales! :-D)
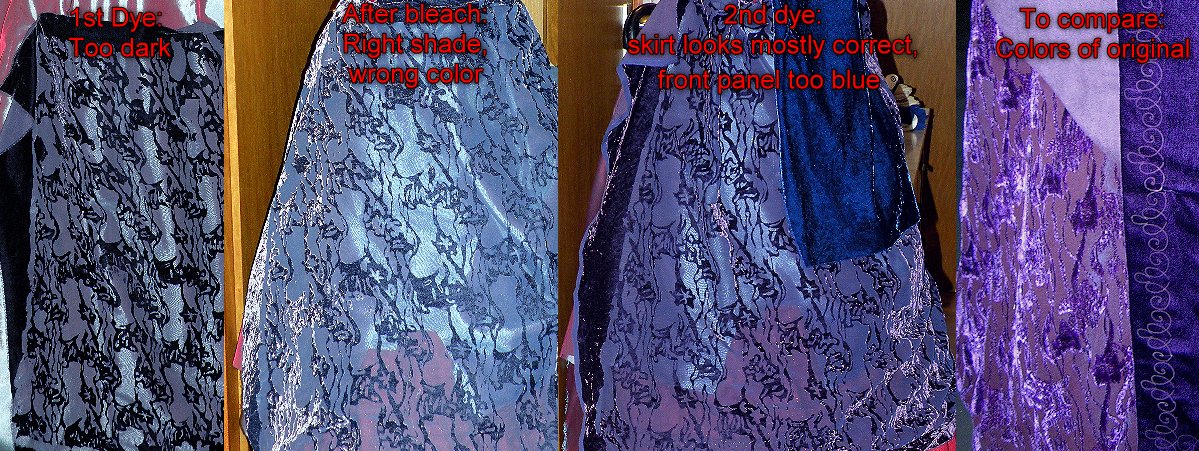
As for the dye of the white silk velvet, I did that in two steps.
First, I dyed all required silk velvet pieces (cape, long center front piece, skirt pieces and some additional pieces reserved for the piping of the sleeves and collar of the overdress) together with some cotton twill and cotton-rayon satin (both for lining and stabilizing) in a dye bath that consisted of three different colors:
Navy blue, purple and cobalt blue – the precise dyes I used were „Simplicol Echtfarben 1553-Marineblau (1/2 package), 1504 – Lila (1 package) and 1520 – Kobaltblau (1 package)“.
Note that those are German brand dyes. They’re supposed to not dye silk well; but they DO work well on rayon, cotton and linen.
After that first dye bath, I dyed the burned out skirt pieces again – in Simplicol Textilfarbe 2617 – Pink. That particular dye does dye silk very well.
Since the silk backing of the burned out velvet had taken up a lighter shade of blueish purple than the rayon pile in the previous dye bath (with the other fabric dye), overdyeing it with pink silk dye desulted in a dark magenta shade for the silk backing.
And yeah, the navy dye in that mix turned out to be a mistake – the fabric was WAY too dark after that.
So I bleached it carefully – just a bit! – and after that, it was lighter than before. Right shade, but wrong color.
A second dye bath – lavender for just the skirt parts; cobalt blue just for cloak / panel / piping parts – brought almost the correct color for the skirt (maybe a shade too dark!), but on the panel / cape parts, it became too blue.
See my dye odyssey in this picture:
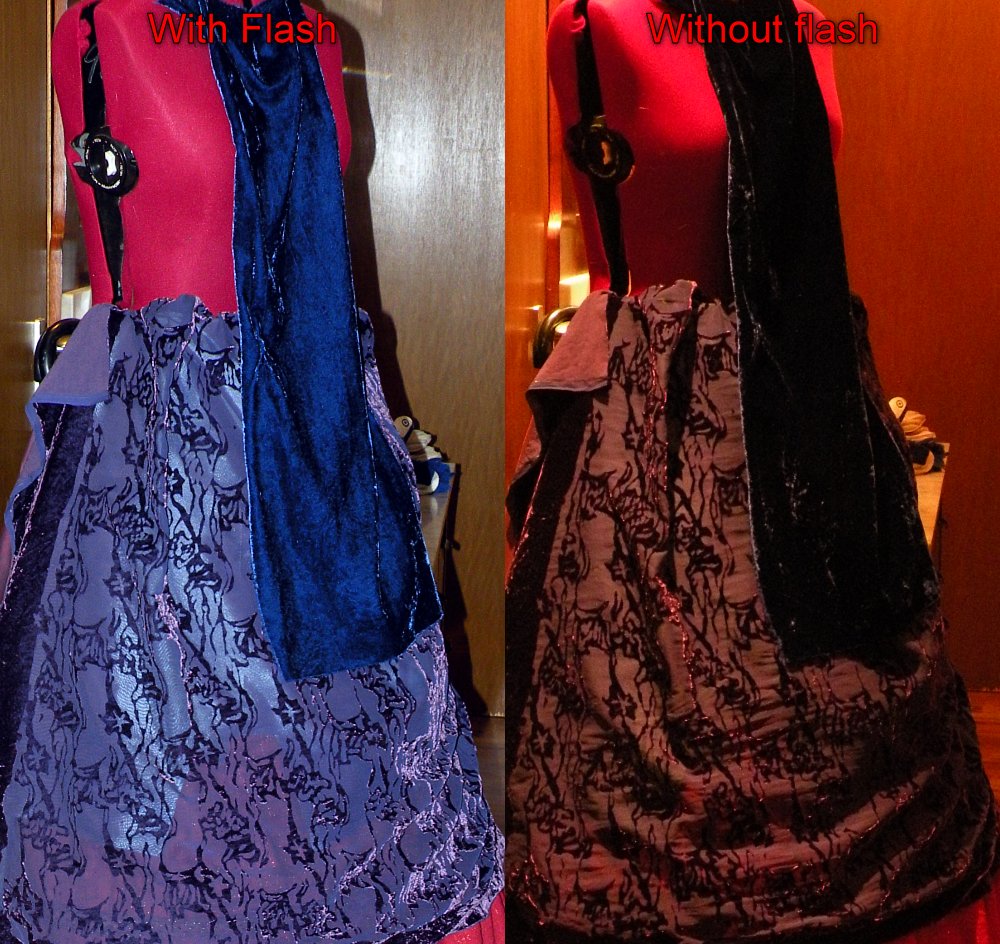
And just for the records – silk velvet looks different if photographed with (or without!) flash. That explains the difference of what we see in the promotional pictures (where the dress seems VERY dark!) – those were taken without a flash – and the exhibit photos, where it seems much lighter (those were taken WITH a flashlight).
Just because pictures show it better than words, here’s mine – one picture taken with flash, the other without:
Here’s a picture of the finished skirt, photographed under four different light conditions:
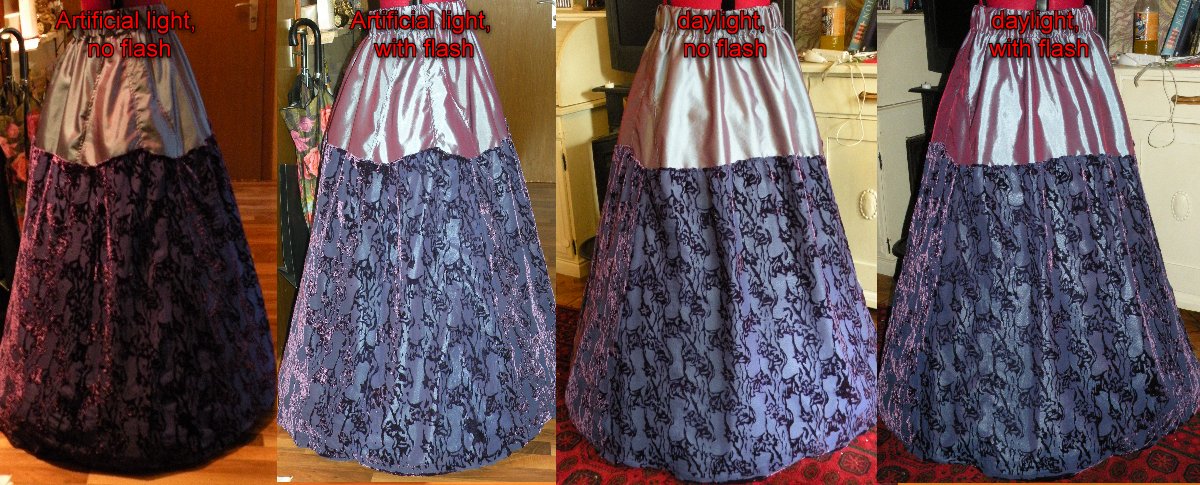 Funny thing is, the ’see through‘ part of the fabric looks way more purple in person – like in the first of these photos.
Also, the ‚lining fabric‘, which is also visible at the ‚top‘ portion of the skirt, is more blue than pink in person. This just proves that irridescent fabrics don’t photograph well, no matter what light conditions.
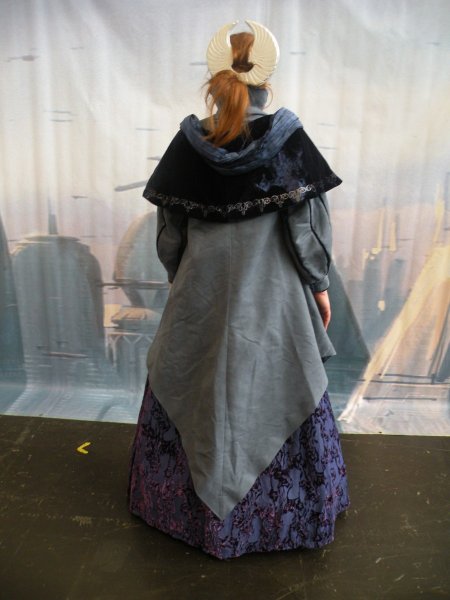
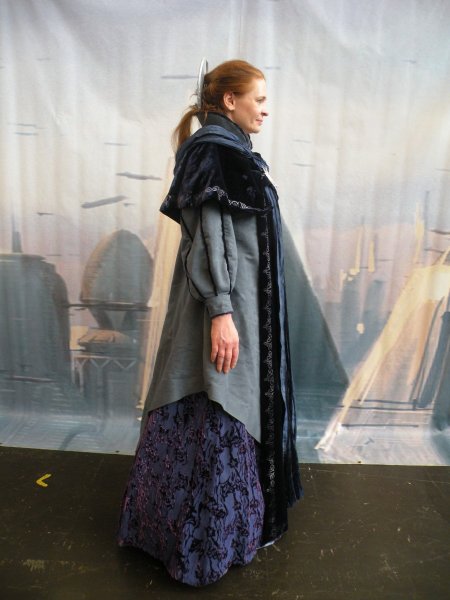
Here’s a picture showing the finished skirt, overdress, cape, tabard and pleated decorations:
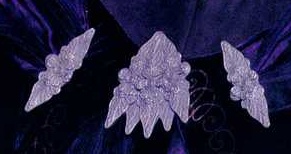
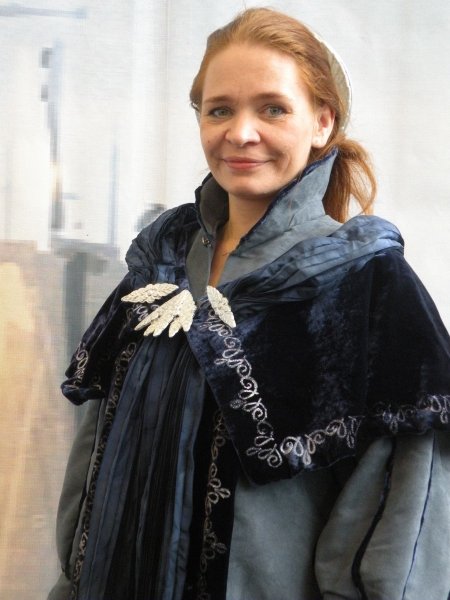
About the brooch making
Padmé wears several brooches with this gown; they are all based on the very same base shape – the center brooch is just five of them at once:
I made those brooches like this:
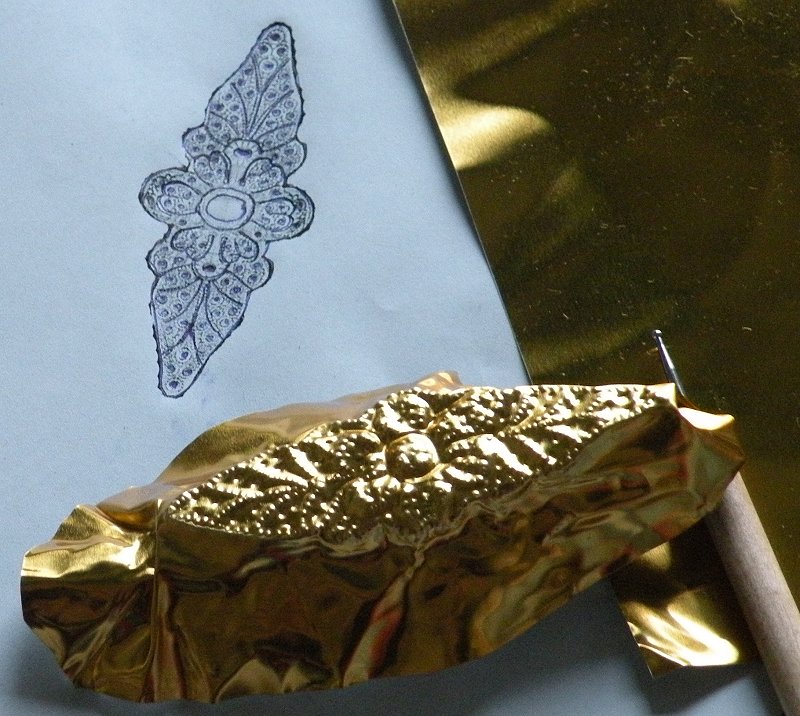 |
First I made the brooch from pressed metal. To do so I, well, pressed sheet metal using a tool with a ballpoint and a printed template of the original brooch. |
| I then filled the inside of the resulting ‚metal mold‘ with epoxy resin. Here’s a trick to exactly know how much epoxy resin you’ll need when working with such rather small molds: Pour water into your mold until it’s filled the way it should be filled with epoxy. Then measure the amount of water (in my case that was 5.5ml). Afterwards I mixed precisely that amount of epoxy resin from resin and hardener and poured it into the mold. Result: No epoxy resin wasted, mold perfectly filled 🙂 |
 |
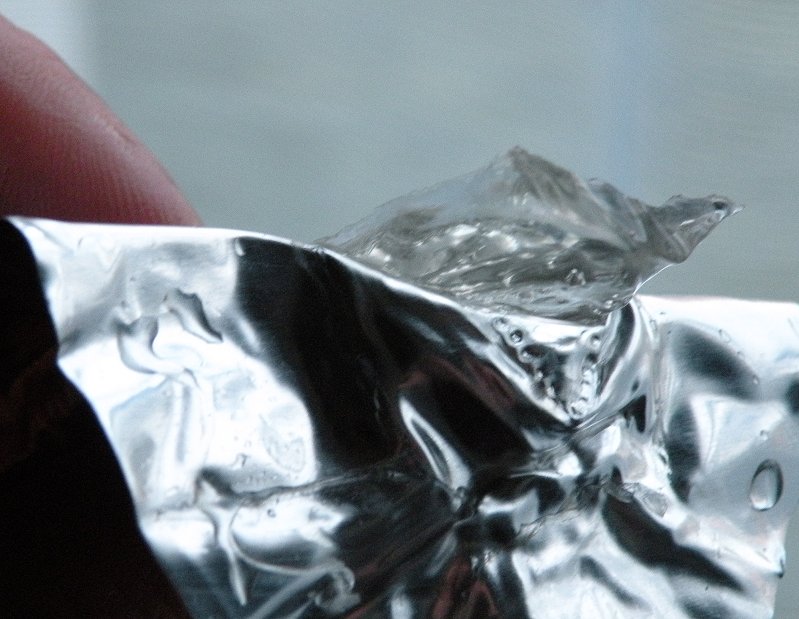 |
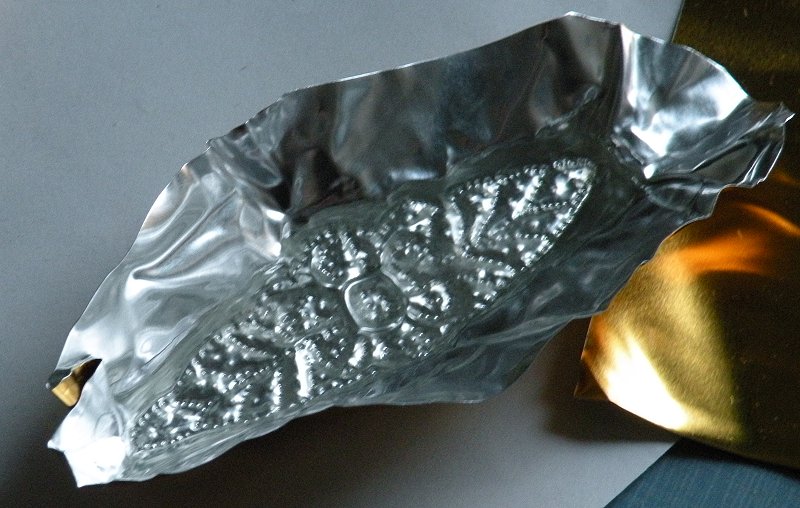
After the epoxy resin had cured (and after half an hour in the freezer) I could peel the cured epoxy resin from the sheet metal mold without problems. The mold, on the other hand, was completely destroyed in that process. |
| Here’s the resulting ‚positive‘ epoxy brooch next to the destroyed mold. The epoxy brooch needs sanding since the sheet metal mold’s borders didn’t go up vertically. |
 |
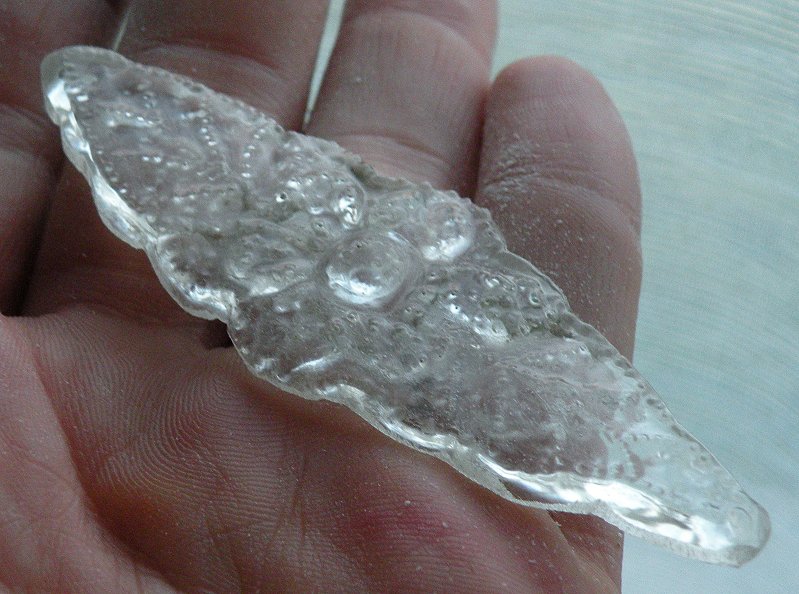 |
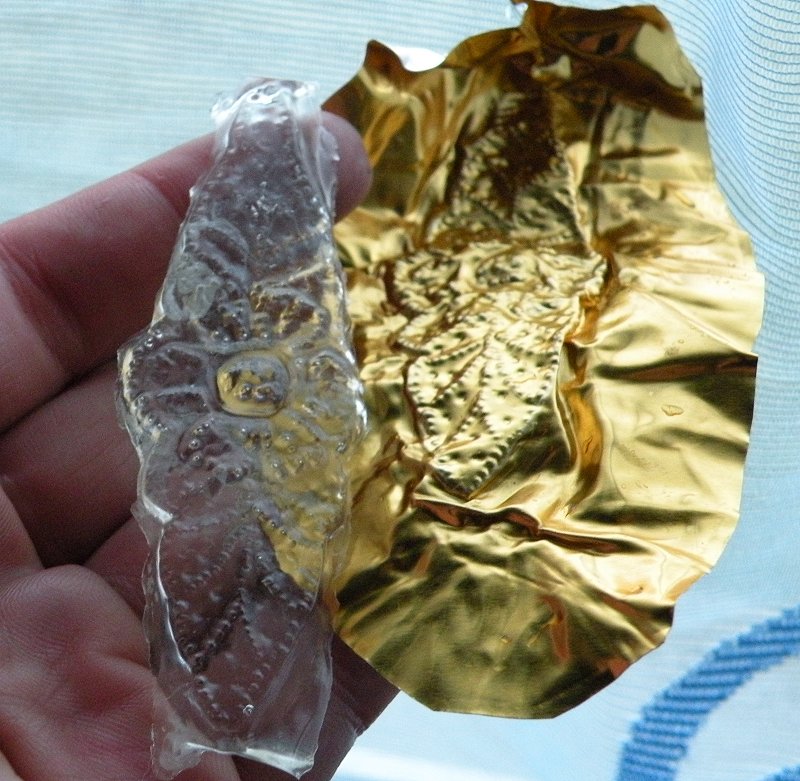
Here’s the sanded epoxy brooch. This will be my master in the following steps. |
| Since I don’t need just one but seven of those brooches, I then made another mold from molding silicone. For that I first made a frame from Lego stones (yes, you read that right!) and placed a clay base with the master brooch at the center of it. | |
| After that I poured the molding silicone over it until the frame was filled. | |
| After the silicone had cured I ended up with this durable, flexible mold (actually I made three of those). | |
| Using my silicone molds I could now make all the brooches I needed with epoxy resin. | |
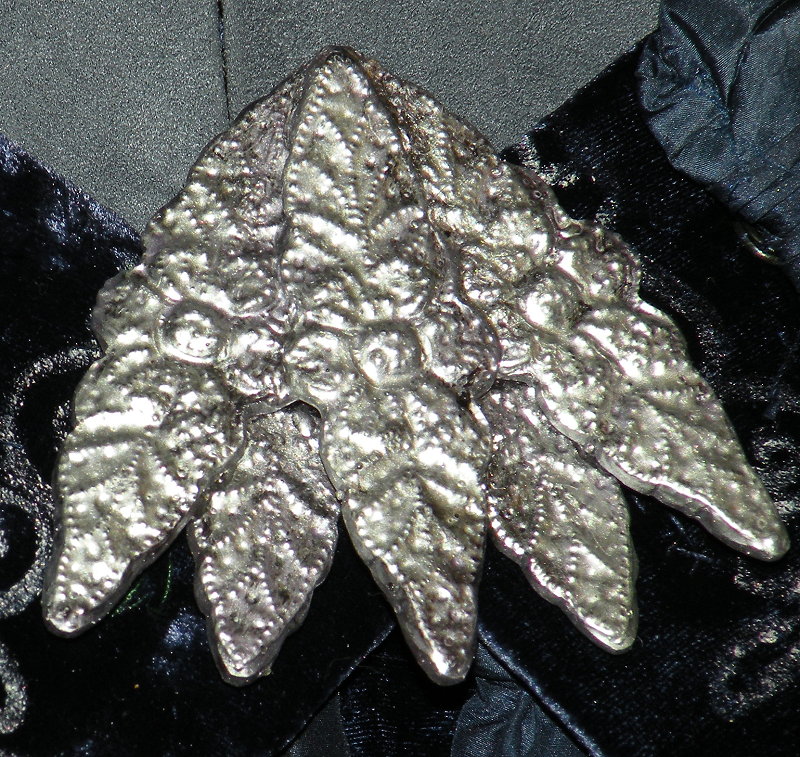
| Five of them I glued together (…with epoxy resin of course ;)) so they form the center brooch. Also, all three resulting brooches got safety pins on their backsides so I can safely pin them to the dress. |
|
| Since the epoxy resin brooches were still clear, I spray painted them silver. I could have leaf silvered (opposed to leaf gilded) them but since the original brooches have more of a matte silver appearance, spray painting was good enough. |
Here’s a picture of my finished center brooch on the dress:
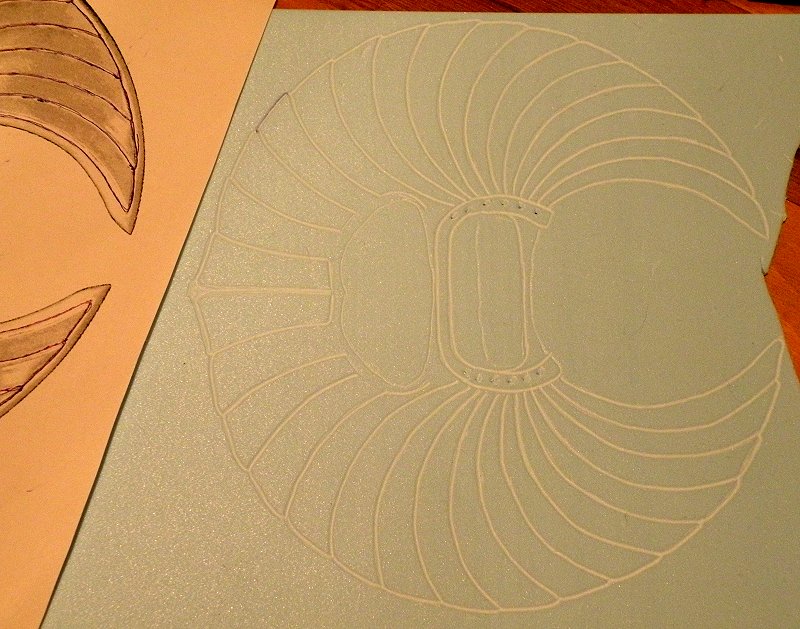
Making the hair ornament
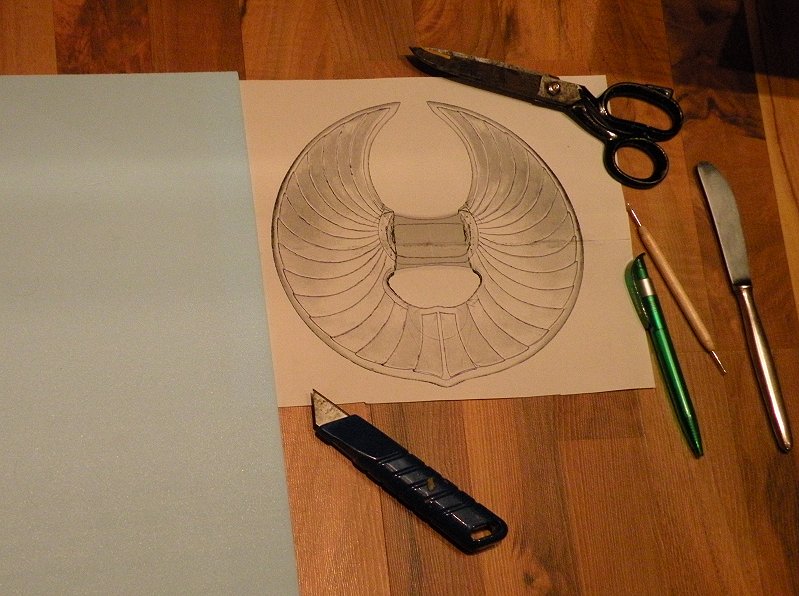 |
To make the hair ornament, I used a printed, lifesize template that I developed from the photos of the original hair ornament; ultra dense thin polystyrene sheets (2mm and 3mm thickness), scissors, ballpoint pen, metal pressing tool with ballpoint, a regular kitchen knife and a carpet knife. Also I also needed a scrap of the taffeta which I used for the skirt and epoxy resin. Note that you CAN’T substitute the epoxy resin with polyester resin in this case as polyester resin will dissolve the polystyrene while epoxy resin is safe to use with polystyrene! |
| I started by laying out my template on the polystyrene (the 2mm thickness) and carefully without using much pressure I traced the design on the template. Note that I’m NOT tracing along the OUTER edges of the template (I will do that later with a different piece of polystyrene!) but JUST around the WINGED shape, plus along the ‚feather‘ lines inside the winged shape. |
 |
 |
This is what the traced-through ‚winged‘ part of the template looks like on the polystyrene. |
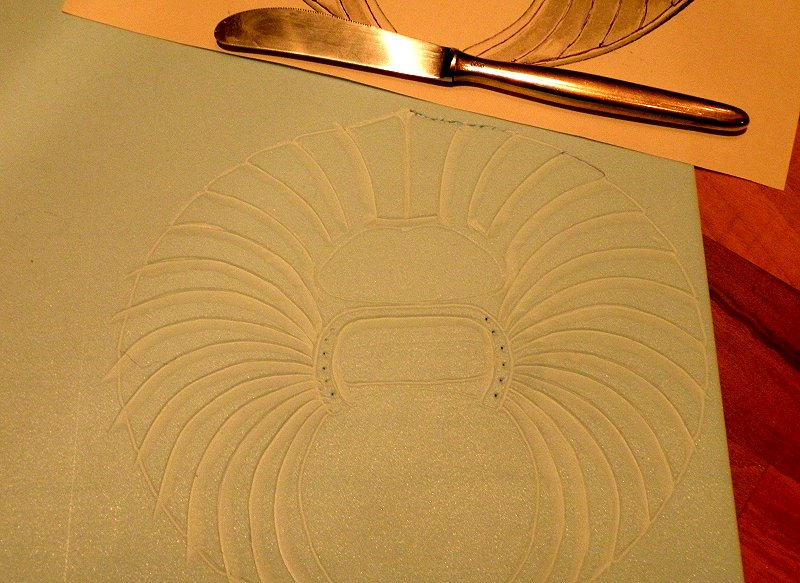
| I then used the metal pressing tool to deepen the traced ‚wings‘ on the polystyrene. | 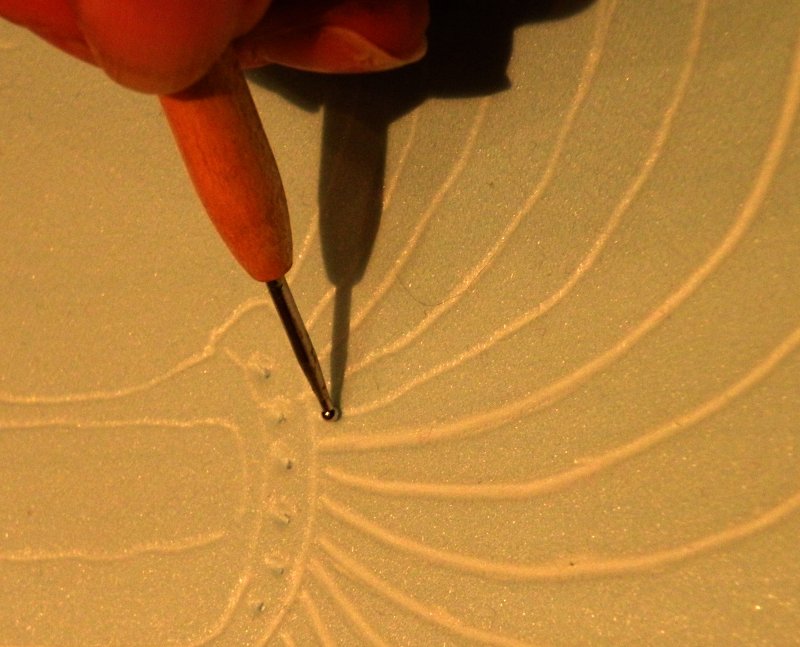 |
 |
…looked like this when I was finished. |
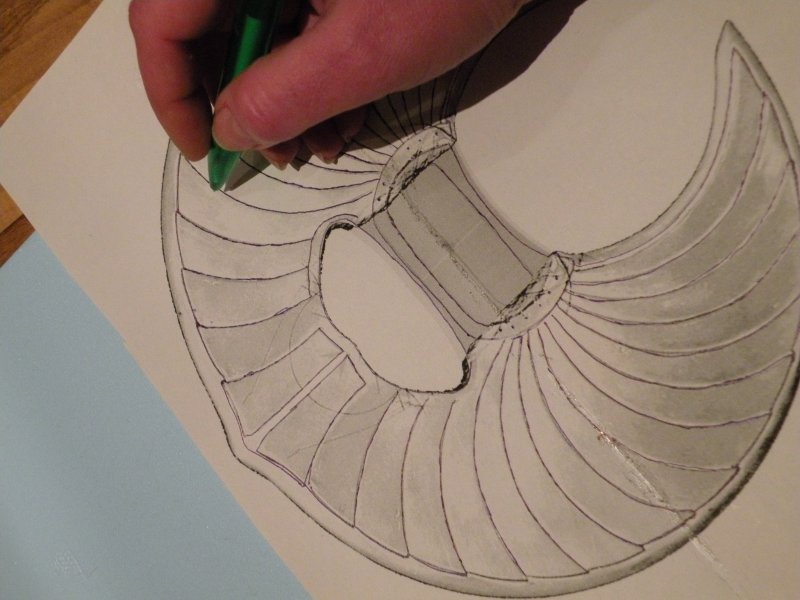
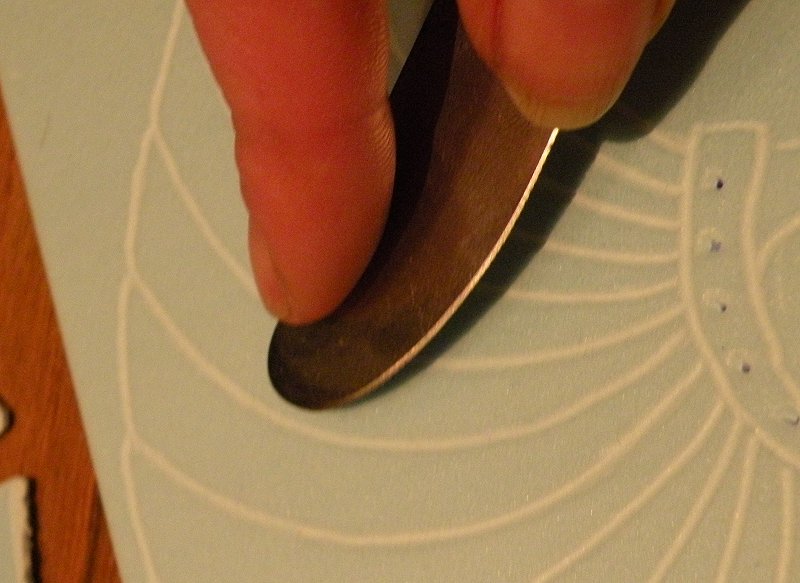
| Holding the kitchen knife at an angle and while applying more pressure, I then ‚wiped‘ along the ‚feathers‘ to press parts of them down. Use even pressure. Press lightly first to see how it works; maybe practice on a scrap piece. It’s ALWAYS easy to press deeper later, but it’s impossible to raise a design back after it has been pressed down. |
 |
 |
…looked like this when finished. |
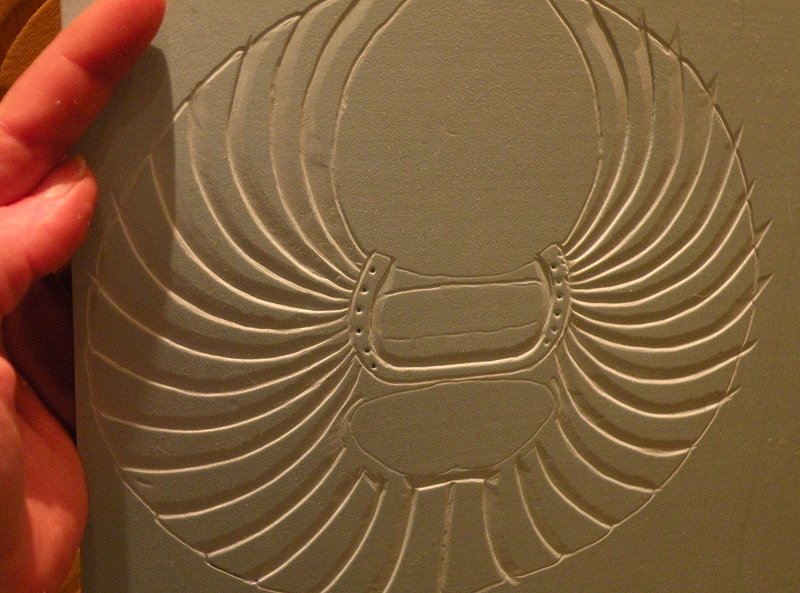
| For this photo I’ve flipped the polystyrene upwards so you can see the ’shading‘ of the wings that I developed with the knife. Holding it up against the light also helps to see which points may need more pressing and it also helps finding uneven pressings. |
 |
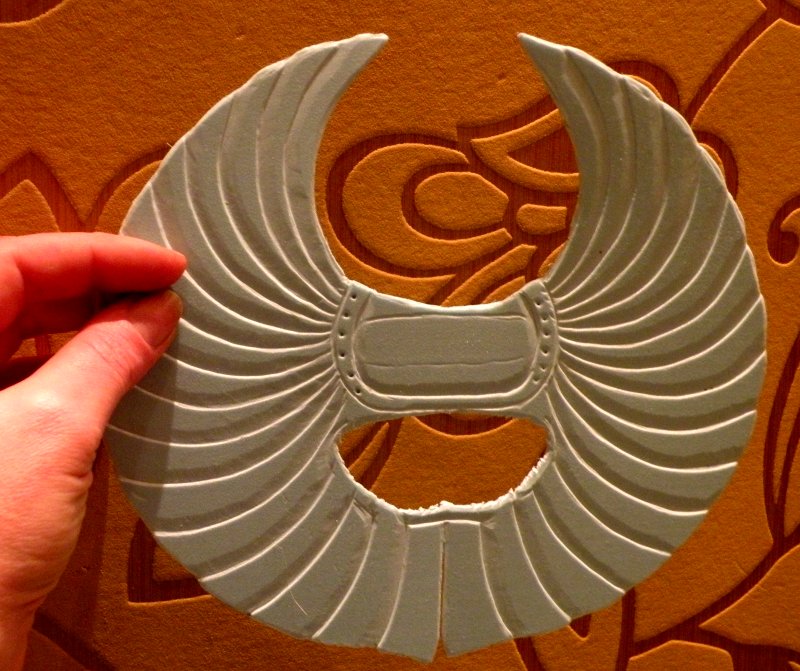 |
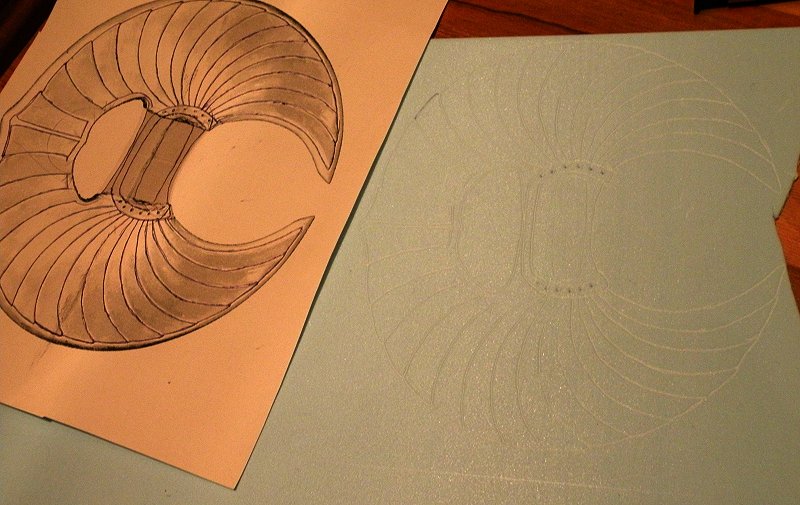
When I was finished I cut the design out using the scissors and the carpet knife. Since this is high density styrene, it’s prone to cracking, as you can see in the ‚hole‘. Those parts need to be sanded after cutting. For that purpose, a nail file works extremely well. |
| Repeat the last steps so you end up with two shapes. Note that on one of these I already did the filing while the other one still has the jagged edges. | 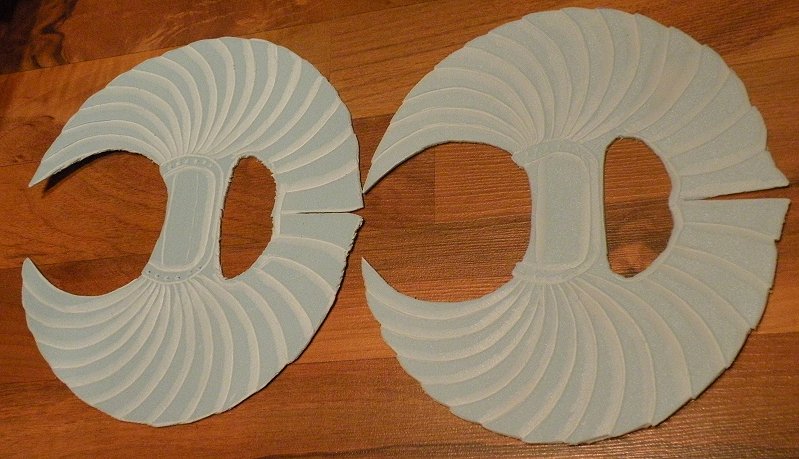 |
 |
Use the 3mm polystyrene to cut out the outer, slightly larger shape of the design. File all edges so they become rounded. |
| I then cut two pieces of the same taffeta that I used for the skirt. They are slightly smaller than the two ‚winged‘ shapes which I pressed / cut before. These shapes are required to stabilize the hair ornament. |
 |
 |
After cutting the taffeta shapes, I applied a layer of epoxy resin to the ‚left‘ (non-pressed) side of the ‚winged‘ (pressed) shapes. I then immediately laid one of the taffeta shapes out on that epoxy layer and applied yet another layer of epoxy so the taffeta was evenly drenched. I repeated that process for both winged shapes and also applied epoxy resin to both sides of the larger (non-pressed) thicker ‚center‘ part. Afterwards I basically stuck the two ‚winged‘ pressed shapes to the thicker non-pressed shape (one on each side). |
| I held the pieces in place with three pins which I pushed through all three shapes in places that will later be covered by my hair respectively in a place that I can later fill when applying another layer of epoxy. | 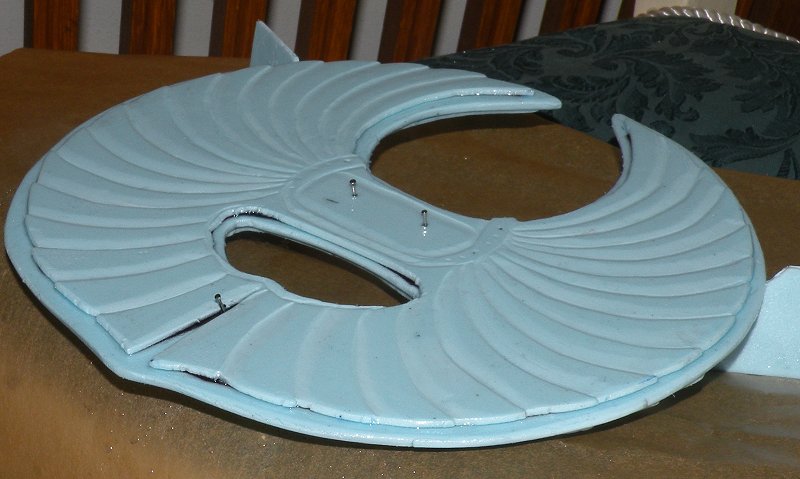 |
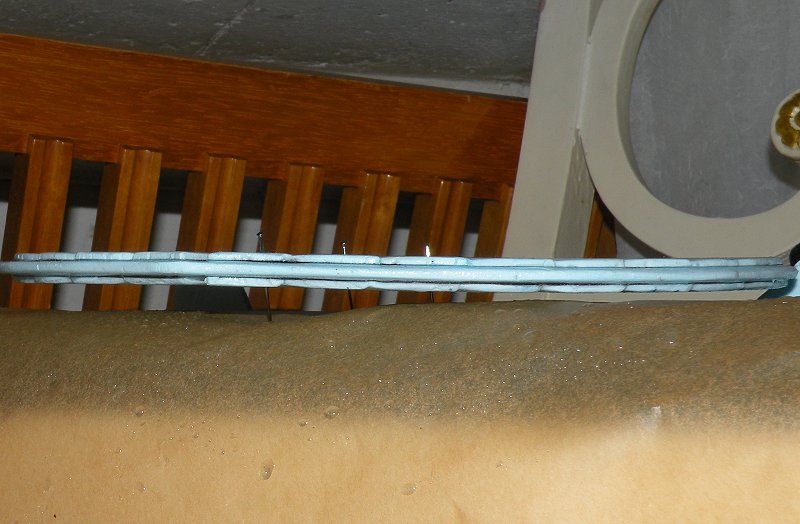 |
The three pins are also useful since I also coated the ‚outside‘ of my hair ornament on both sides with epoxy resin, and with the three pins I can put the hair ornament away for the epoxy resin to cure. Since I use 24 hours epoxy, that does take a while; and with the pins, no part of the surface of the hair ornament touches the ground while the resin cures (as you can hopefully see in this picture – the ornament is entirely resting on the tips of the pins). |
Me wearing the costume at Star Wars Celebration Europe II 2013 in Essen – sorry, my hair became a total mess; which I didn’t notice because it was so hot and I didn’t dare touching the back of my head.
 |
 |
|
 |
 |
 |