Navigation for this part of the page:
[catlist categorypage=yes]
Note:
In case you’d like to make Padmé’s Peacock gown but don’t want to burn out the velvet (and actually, not use burned-out velvet at all), you could always use a printed version of this fabric, which is available here.
Tracing the burnout velvet pattern
Padawansguide.com describes the burnout („Dévoré“) pattern of the velvet as a ‚peacock design‘ – this is a description to which I would like to object.
While the coloring might somehow resemble a peacock, the actual burnout design looks, well (desperately seeking for a better description!) – like sliced, tiled wood. Those are definitely not peacock feathers, but more something like what you can see in the grain of, for example, pine wood.
As I will mention below, the black dots have nothing to do with the actual burnout pattern of the velvet – even if they are woven to the fabric. I’ll get back to them at the end of this page, after tracing the burnout velvet pattern.
The burnout velvet pattern
To trace the burnout velvet pattern directly from the original fabric, I first made a template from existing images of the original gown which show the pattern repeat best.
I found that there’s an obvious repeat, which can easily be seen if one considers those „heart shaped dots“ (sorry, I have no idea how to describe them better – in the animation below, they are almost in the corners of the image) being the corners of a repeating rectangle.
Then I traced each and every teal shape within a little more than one pattern repeat (meaning… not the rust ones…) in a picture editing program, having the original pattern repeat as a template in the background. While doing this I totally ignored the black dots, as they are irregularly spaced / placed on the velvet.
When I was finished tracing one pattern repeat, I doubled my black shapes several times and laid them out in the picture so that several pattern repeats were covered.
I then hid the original background template, colored my black shapes in rust and the white background in teal.
Then I marked the exact pattern repeat, and – Voilà – I had exactly one pattern repeat, which I could then tile to get several pattern repeats.
Here’s an animation showing the above described steps. It’s perfect – except of the fact that I filled the pattern during the coloring with the wrong colors – I filled the ‚rust‘ areas with teal and vice versa (might take some time to load if you have a slow connection):

Here’s the result: One pattern repeat in black and white, which can be tiled… (you can test the tiling by saving the image to your hard disk and then use it temporarily as a tiled image for your desktop’s background, given your operating system is Windows – I recommend it just temporarily, as constant looking at a pattern that strongly resembles a Zebra is *not* mild on the eyes!)
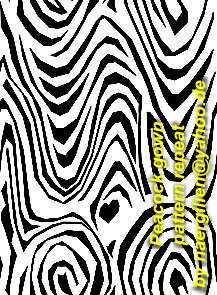
…and here’s one result in colors that resemble vaguely the original coloring, side by side with an image of the original fabric showing exactly the same repeats (ignore the black dots, they have nothing to do with the burnout pattern!):
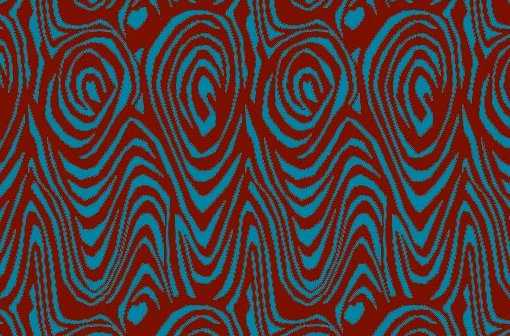
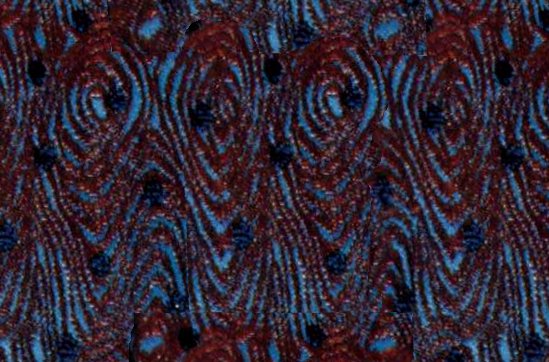
Looks good, doesn’t it?
To find out about the original size of one pattern repeat, I used the ‚Vanity Fair‘ picture in which the ‚heart-shaped dots‘ can be seen (or at least guessed) from shoulder to floor over the entire coat.
I then guessed that Nathalie Portman has a shoulder-to-ground measure of approximately 145cm / 57 inch. This guess came from my own shoulder-to-ground measure. As I want to make the gown for myself, this will make sure that the pattern repeat will be just the right size for me.
After counting the pattern repeats of the dots, I came up with 20 repeats from shoulder to ground (as the coat doesn’t extend to the ground I had to guess the actual number by measuring the distance between two pattern repeats in the Vanity fair image and then dividing the shoulder to floor measure in that image by this pattern repeat size). I then subtracted one pattern repeat, as the alignment of the pattern repeats on the coat is at a slight angle, giving me a slightly greater distance than shoulder to ground – so I ended up with about 19 pattern repeats.
![]()
The Vanity Fair image marked with arrows which point at the pattern repeats. The yellow arrows directly point at the ‚heart-shaped dots‘ in the pattern; the pink arrows are just spaced at the same distance as the yellow ones, as they mark areas on coat or underdress in which I could not see the pattern repeat.
Dividing the 145cm / 57 inch from shoulder to floor by those 19 pattern repeats, I came up with a pattern repeat size of about 7,6cm / 3 inch height for one pattern repeat. The above shown black and white picture of the pattern repeat has this size.
I then learned a bit about silk screen printing because there was no way that I could ever have applied the burn out fluids by hand that regularly to achieve a continuous, regular pattern over yards and yards of silk/rayon velvet.
The silk screen printing is good to cover larger areas of fabric or paper regularly with a repeating, fine pattern. Of course it has to be said that it’s not the quickest and cheapest method, but it’s definitely the best method.
My silk screen printing efforts and the burnout process will be described and shown on the next page, which I will open as soon as I have finished the silk screen printing (and don’t hold your breath – that will take a while; getting the template for the pattern from a professional silk screen printing template maker might well take over a month, and after that, I still have to burn out the fabric!).
The black dots
The black dots have a different repeating pattern than the burnout velvet. After seeing a scan of a swatch of the original fabric, however, I had to change my mind about them (which I have written down on the last page); this is why I am rewriting the following paragraph.
As I just wrote I have seen a scan of the original burnout velvet that was used for the original gown. The black dots are in fact really woven into the fabric – Anna, who has the swatch, describes them as ‚made from a metallic fiber‘ which has a ‚rough feel to it‘.
For a long time I didn’t want to believe the concept of ‚woven dots‘, see my reasons below. When I saw the scan, however, I had to change my opinion. The dots are in fact woven into the silk velvet – before it was burned out – and they actually have regular repeats – just at a different size than the burnout pattern, and this is why the eye is easily confused that the pattern is not repeating.
This is the repeating dot pattern in its original size (about 11.5 x 6cm – read above about how I estimated that size!):
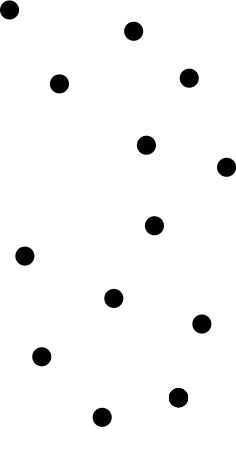
Yes, that’s a repeating pattern that can be tiled! See it here:
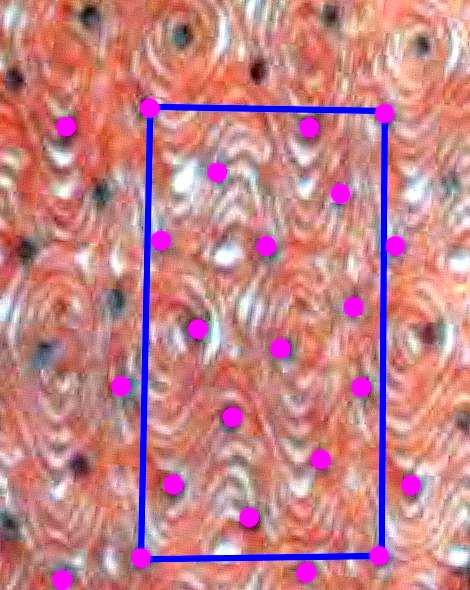
on the original fabric – black dots marked in pink; pattern repeat marked by a blue frame!
This picture here:
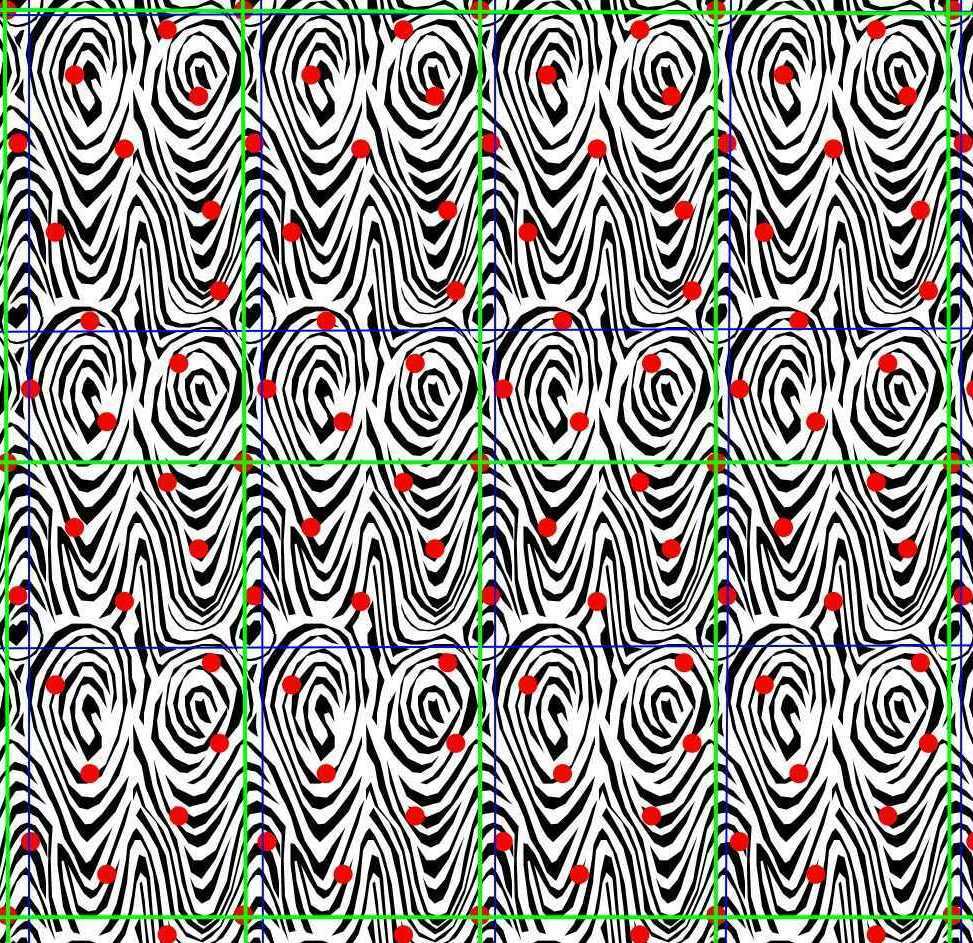
shows some of the dot pattern repeats (dots in red, pattern repeat for the dots marked by green lines; burnout pattern in black / white, pattern repeat for this marked by blue lines) over the burnout velvet pattern (again – look above for more information on this).
On the following page i have started tracing the embroidery patterns.
Navigation for this part of the page:
[catlist categorypage=yes]