How to construct a Cage Crinoline
Note:
These instructions are just for round cage crinolines. It’s practically impossible to ‚calculate‘ an elliptical cage crinoline this way.
Materials you will need:
- First, a good image of an existing crinoline. Doesn’t have to be a cage.
- A graphics program (I’m using PhotoImpact in this tutorial). Or a Xeroxing machine which will do some rescaling work for you.
- A good amount of some cotton fabric – 3-6 yards of 60“ wide fabric should be sufficient; please run all calculations before buying anything; you will need much! Alternative: A *really* large amount of approx-. 2“ wide twill tape; light enough to sew through.
- A *ton* of pins. And I really mean a *lot* of.
- A large amount of strong hoop steel. And I mean spring steel, not rigilene. Anything from 11mm wide should work; the wider and stronger, the better.
- A drawstring the size of your waist + ~1 yard / meter.
- A website or software that can calculate diameters and circumferences for you, if you don’t want to do that manually. I have used this German website; but here’s one capable of the same in English.
- Patience. Lots of it!
Preparation:
- Read this tutorial, do all necessary calculations and write the results down.
- From your hoop steel, cut the hoops in the lengths required (+ ~10cm / 4 inch – see tutorial).
- Cut your fabric to strips on the straight grainline. Each strip should be approximately 12cm / 5 inch wide. Fold them into half, so that they are just 6cm / 2.5 inch wide. Sew 5cm / 2 inch wide tunnels (this means you should sew the open sides of each strip together, with a seam allowance of 1cm / a bit less than 1/2 inch), turn tunnels. Lay aside. This tutorial will help you calculate how many strips, or rather, which length you will overall need; this is why I said you should do the calculations first.
- You start by taking two basic measurements of yours: 1. The waist circumference; second, the length from waist to floor with shoes minus approximately 10cm / 4 inch. I strongly suggest working with centimeters, this will make a lot easier.
For this example, we will use the following measurements (just because I’ve basically written this tutorial for a friend and those are *her* measurements…):
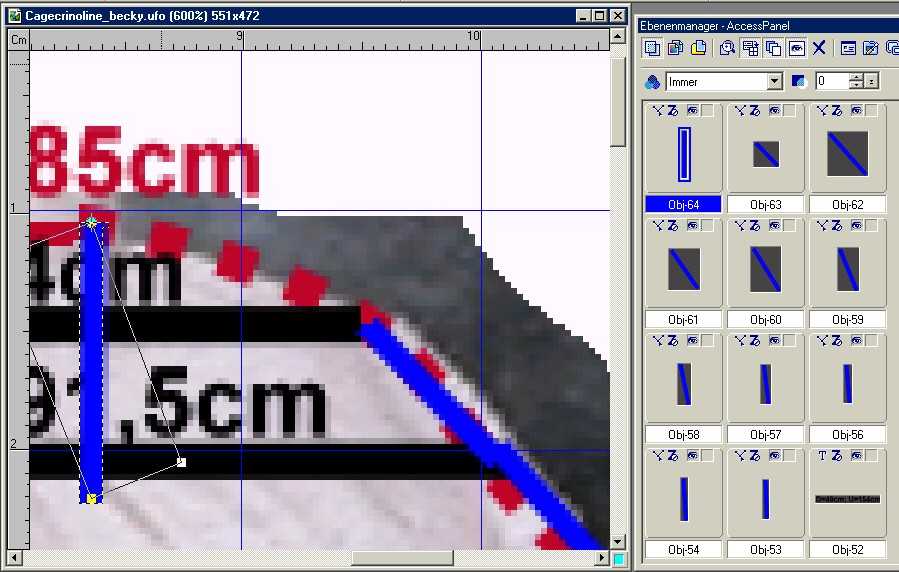
Waist: 85cm; waist-to-floor-minus-10cm: 100cm.
Then you will have to either use your graphics software or a Xeroxed, resized copy with a grid of the crinoline image you have in mind. Should look about like this…
Each square of the grid measures 10x10cm. The desired length of 100cm / 1m has been taken into consideration here, as you can see.
- The first two lines you will have to paint (either digitally or manually on your Xeroxed copy) are the waist- and bottom hem circumferences. For the waist, calculate the from the waist circumference (in this case, 85cm) the diameter with the help of your calculation of choice (website, software, manually; as described above). Write down near the line you have painted.
For the bottom hem circumference, you will have to paint a straight line at the bottom of your picture with the actual width of the crinoline-to-be. Measure that line in your software or on your copy, write measurement down, calculate the circumference of this diameter.
Your digital image or xeroxed copy should now look like this…:
„D“ stands for „Durchmesser“ (=Diameter in German); „U“ stands for „Umfang“ (=circumference in German). You should always write down both measurements, just to be sure.
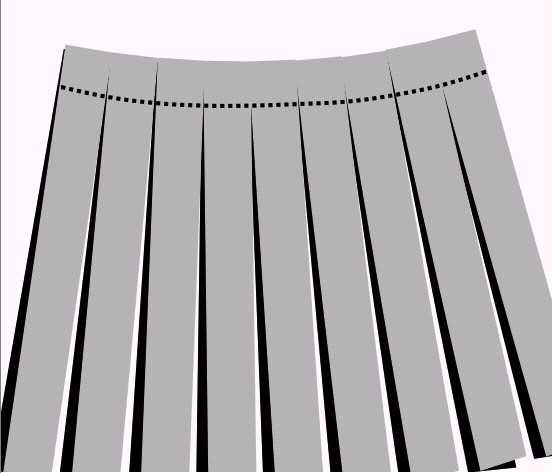
- For the next step, you need to paint the desired outline of your crinoline. This should look about like this…:

- In the next step, you will draw what will become the single hoops later. It’s a fairly good idea to not space them too widely. I have spaced the hoops-to-be by 10cm (from the side view – more on that later!) in this following image….:

As you can see, this resulted in a total of 11 hoops. The waist will *not* have a hoop, but the bottom hem will. You should paint these lines as exact as possible. Each should, of course, end at the side borders of the crinoline that you have painted in step #3.
You could also play around a bit… space the hoops closer to each other on top and wider on the bottom… but that’s just a question of look, not of functionality. However, if your crinoline is to support *very* heavy skirts, I would go for equally spaced hoops or even some that are closer spaced at the bottom.
Don’t make the mistake of spacing the hoops too wide; or your crinoline won’t be able to support anything! - If you’ve done that on a 1:10 scale Xeroxed copy (for centimeters; 1:8 would be the choice of scale for inches), you can now measure each hoop with a ruler (save the bottom hoop, which has already been measured and calculated in step #2).
If you’re doing this digitally, it’s simpler to align all hoops to one side of the digital picture and measure them with the help of the grid and / or ruler in your graphics software.
Should look like this…:
Write the result of diameter measurement for each hoop, then calculate the circumference for each.
Your digital or manual image should now look about like this…:
Now, what do we have here? Let’s calculate how much steel we will need all together and for each hoop by using the measurement from the example above….


-
Hoop Diameter Calculated circumference Steel to be cut (calculated circumference plus 10cm / 4 inch for overlapping) Hoop 1 (first hoop under waist) 49 cm 154 cm 164 cm Hoop 2 61 cm 191,5 cm 201,5 cm Hoop 3 78 cm 245 cm 255 cm Hoop 4 92 cm 289 cm 299 cm Hoop 5 106 cm 333 cm 343 cm Hoop 6 113 cm 355 cm 365 cm Hoop 7 119 cm 374 cm 384 cm Hoop 8 122,5 cm 384,5 cm 394,5 cm Hoop 9 125 cm 392 cm 402 cm Hoop 10 125 cm 392 cm 402 cm Hoop 11 (bottom hem) 127 cm 400 cm 410 cm Total amount of hoop steel required: 36,20 m
- So we have just calculated that we will need about 36,20m of hoop steel to cut the required hoops.
After calculating this, you should actually cut your hoops. Please do this *very* carefully.
Also mark at each steel beginning and end about 2 inch / 5cm where the hoop will overlap – those marks should be exactly overlapping when the hoops are taped or riveted together.
You should also give each hoop a number… just in case you get lost when putting them into place later 😉
Don’t rivet or tape the hoop ends together yet!
- In the next step we will calculate the length of our fabric-, twill tape or leather strips.
For this, we will have to paint small lines between the hoops along the outline of the crinoline picture, spacing by spacing between the hoops. It’s *very* important to do that space-ise…
…until we have something that resembles a line along the outline of the hoop, but if you look at the objects window (on the right) you will see that each spacing is actually a single object.
If you’re doing this on a xeroxed paper copy, you just need to use a ruler to paint straight lines between the sides of the hoops on one side of the crinoline.
Note that these lines need to be exactly straight, not curved – no matter what your original crinoline outline tells you.
This is what it should look like when finished:
- The next thing we need to do is measure each of the lines we’ve just drawn and write the results down for each of them.
On a xeroxed paper copy, we can do that with a ruler.
In a software we will have to put each single spacing into a horizontal or vertical (the latter is what I’m doing here) position, then compare the size to the ruler in the software. You should do that very carefully, with each line magnified to almost screen size, as shown here…:
Align the top of the line with one of the grid lines, so that you have a clear starting point to measure. Should about look like this…:

As you can see, the measurement here is quite exactly 1.5cm, and as this here is a 1:10 scale, it would be 15cm in reality. Write that measurement down and put the just measured line back in place. Should look like this now…:

Repeat this step for *each* of the lines you have just painted. When finished, it should look like this…:

- Time for another table of calculations… the spacing of the hoops, resulting in the length of the strips (tunnels of fabric, twill tape, leather banding – your choice…):


| Spacing… | |
| Between waist and hoop #1 | 15 cm |
| Between hoop #1 and #2 | 12 cm |
| Between hoop #2 and #3 | 13,5 cm |
| Between hoop #3 and #4 | 12 cm |
| Between hoop #4 and #5 | 12,5 cm |
| Between hoop #5 and #6 | 11,5 cm |
| Between hoop #6 and #7 | 10,5 cm |
| Between hoop #7 and #8 | 10 cm |
| Between hoop #8 and #9 | 10 cm |
| Between hoop #9 and #10 | 10 cm |
| Between hoop #10 and #11 | 10 cm |
| Length of strip…: | 127cm |
- In the last step, we have calculated a length of 127cm for each strip. However, just to be sure, we will add a bit more to that, so that we can hem the strips properly and such… 5cm / 2 inch should be sufficient. So the measurement we want to keep in mind is 133 cm. Just keep that in mind – don’t cut anything yet!
- The cage crinoline will actually be held together by *doubled* strips. This makes the actual construction easier. So the actual length required for each strip is not 133cm, but double that amount – 266cm.
- As each strip should be about 5cm wide, and we have a waist circumference of 85cm and none of the strips should actually overlap at the waist, we will need all together 17 strips, each 266cm long. This totals in an amount of 45,22m of required strips (I told you this would be much, right…?)
- Cut the strips from your banding. Fold them in half, so that you have doubled strips of the original length (133cm, in this case).
Align the folded over edges of the strips on a straight line.
Put a narrow strip of tape over the strips, about 5cm from the top, folded over edge. Sew a straight line over it. Now you should have a ‚banding line‘, the folded edges forming loops; about like this…:
You can pull your drawstring through the loops on top. Just let it hang loose, don’t pull it tight yet.
- Mark the spacings of the hoops on all strips, starting from the just sewn line. Should look like this…:

- Over and below the marks, put in some pins – two for each mark on each of the twill tapes.
The spacing between the pins should be a *bit* more than the breadth of your steel. For example, if you have 11mm steel, the spacing should be about 13mm. The pins should be equally spaced to the original markings, making sure that in the next step, the middle of all hoop steels runs exactly on the markings.
Do this for *all* hoop markings (I told you that you would need a *ton* of pins, right…?)
- Put the „pin / strips skirt“ on your dressmaking mannequin, pulling the drawstring tight.
Now carefully, starting with the top hoop, put the hoops into their ‚casings‘ (which are so far just pinned) by pushing the steels between the two folded over strip layers and between the pins.
This is probably the most painful thing in making this cage crinoline, as it takes much time.
The steels should also be temporarily attached at their ends, to be able to form hoops. Remember the overlapping marks at their ends!
To temporarily keep the ends in place over each other, you can use duct tape.
Take your time in this step to evenly distribute the strips around the hoops.
It *does* actually help a lot to mark the spacings for the strips on each hoop.
To do this, you have to do some more calculation… alright, you have 17 strips, so you have to divide the length of each hoop (minus the overlapping ends, of course!) by 17. The result is the distance between the strips on that hoop, which you can mark on the corresponding hoop with a permanent marker.
It might take long to do that on each hoop… but believe me, it takes longer to push around the strips *without* those markings.
When you’re finished successfully filling the hoops into the strip casings, you should just let your cage crinoline hang on the dress dummy for a day or overnight (the longer, the better). This will help the strips to hang out under the weight of the steels, and if they need to give, they will do so, enabling you on return to correct possible mistakes. - After the day (and / or night) of hanging, you should take a very close look at your crinoline. Is the spacing of all hoops correct from all side? If not, *now* is the perfect point of time (actually, this is the last chance you have…) to correct any possible misspacing that resulted from the strips giving in any way.
If something is wrong I recommend adjusting the spacing from top to bottom, never vice versa.
When you’re done… remove the steels from the strip casings again. Don’t pull out the pins (or mark where they would have been!). - Now comes the utterly booooring part… On all strips, in all places where the pins have been, sew the doubled tapes together, forming actual, double-layered casings for the hoops. This will take most of your time… and is utterly boring (as I’ve said).
For this crinoline here, for example, we have 17 strips x 11 hoops x 2 seams (over and under the steel), resulting in 374 little seams that have to be made (just so you’re prepared…). Considering that each little seam (which goes just over the 2-inch / 5cm breadth of the tapes…) will take about 20 seconds to make, and you take no break, then you would need about 3 1/2 hours to get them all finished.
I recommend taking a break at least every 30 minutes, so that your eyes and fingers can rest for a moment.
The bottom ends of each strip should be turned inwards, facing each other, then sewn close at the bottom. The space for the steel casing should go right over this seam. - When you’re finished, put the ’strips skirt‘ back on the dress mannequin and put the steels back in – this time you will make them into permanent hoops. For doing so, you can either rivet the overlapping ends together with two rivets… or you can tape them together with *strong* duct tape.
- That’s it! You’re finished with your cage crinoline!
- Suggestions? Feedback? Pictures of your crinoline that you have made using this tutorial? I’m open for anything! Just email me – my address is given at the bottom of each page.


Thank you so much~~ ♡♡♡♡♡♡♡♡♡♡♡♡♡♡
Thank you so~~~~~~~ very much~!!
Hello there, is it possible to get the instruction from Cage Crinoline in German?
It would be great!
Thanks and kind regards
Sabina
Sorry, no time to translate pages at the moment 😉
Hi there, If I attatch a picture of the kind of crinoline I want, could you do the calculations for me as I am useless with computers!
Kind Regards
Petrina
That would only work if I would have at least ONE corresponding measurement (as in, how high is the distance from waist to floor?). Without one base measurement, it’s impossible to properly calculate any measurement for a crinoline.
Thanks for very detailed instructions, I may have to give this a try!
Hi there, Sorry for the late reply, But.
Im actually confused! Because this is not a CAGE CRINOLINE, it is more of a Petticoat Crinoline, Because a Cage Crinoline doesn’t have Fabric around it!!
Uhm, the crinoline in the pictures is just an *illustration* how to calculate the circumferences of the single hoop rings of the cage crinoline.
If you had read the tutorial to the end, you would have seen that I’ve also included instructions how to calculate the length of the fabric *strips* that keep the single hoop rings together.
So… if you look at it and are confused by the picture in the background… just look at what I painted *in front* of that picture (black / blue / red lines) and, of course, read the text – that’s all you need for a cage crinoline 😉
Hi There, I don’t actually understand these Instructions. Could you please email me some more DETAILED DIAGRAMS??
I don’t know how much more I could possibly go into detail. Maybe you could tell me which part you didn’t understand and I could try to explain again from there?