How to enlarge original patterns
I am certain that most people who own books that contain original patterns which are resized, meaning smaller than the original patterns – such as the „Patterns of Fashion“ books, which contain all patterns in a scale of 1:8 – at some point of time have to take the task of enlarging them.
Well, unless you really want to enlarge them on one-inch-grid paper manually and afterwards find out that they won’t fit (because they were taken from actual garments which *rarely* have the size of the one enlarging them), you will either have to be *very* good at maths and with the handling of a ruler, or you decide to get yourself some rather old and therefore cheap graphics computer programs, a printer and scanner and have them do the work for you.
That’s at least how I am doing this 😉
Alright, here’s the how to.
You need (that’s what I am using; you might want to look for other programs which are capable of the steps described here):
- a scanner,
- your costuming books and the pattern you would like to enlarge (obviously!);
- a printer;
- I am using two programs: Ulead Photo Impact 7.0 (You can look for newer versions at local stores if you want to spend more money, or look on Ebay for this old version and less money…) or any program that is capable of working with objects or layers and
- Corel Draw 10 (or any program which is capable of printing enlarged pictures tiled over many papers);
- some basic measures of yours: Bust circumference, waist-to-floor, shoulder-to-floor (if you’re planning to wear a farthingale or hoopskirt, please don’t take these measures straight on your body but over the hoopskirt / farthingale!) and back-of-neck-to-waist (taken over the middle of the back).
- a *lot* of paper (the pattern I am describing here, for example, took 96 papers to print);
- paper glue;
- paper scissors.
Whatever pattern you want to resize – read the entire tutorial at least four times before you start *anything* and have it at hand when you actually do it.
Note:
As the patterns in this tutorial are taken from Janet Arnold’s „Patterns of Fashion“ and I don’t want to get into any copyright conflict, the screenshots in this tutorial are slightly distorted, just show tiny portions or are too small to make the patterns unusable for anyone just looking at this tutorial but not owning the books.
However, the screenshots are still useable if you can scan the pattern yourself and repeat the steps shown here with your own programs.
I first scan in the pattern I would like to enlarge (at 150 ppi) and save the picture.

(this is the kirtle pattern I used for the Jamillia gown)
Then I load that picture to Photo Impact. I mark each pattern piece with the lasso tool, copy it and paste it as an object into a new file (usual size: 1000×1000 pixels – that’s enough for most patterns; but you can still increase the size afterwards if you should find out that you don’t have enough space for all your pattern pieces), until I have *all* pattern pieces as objects in that new image file (which should, by the way, have a white background).
You have to be careful to have all pattern pieces with the upside up and downside down. If there are gores in skirts, you will want to turn them carefully to the side of the kirtle / skirt / whatever they belong to and temporarily group them.
If, for example, a bodice was cut on the bias, you’ll have to turn it until the front is straight. Same is valid for sleeves and the like.

Pattern piece being cut

Two pattern pieces in the new file
SAVE THE FILE in the *.ufo format which is Ulead Photo Impact’s own format and supports layers. This is important; if you should make any mistakes from now on you can still reload the saved file.
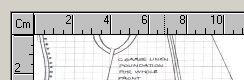
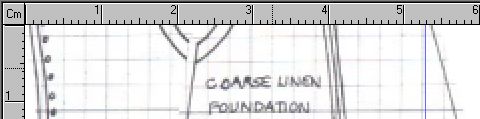
Then make the program show the ruler.
This will usually (in your case, because you’re probably work with inches) show inches. In my screenshots here, you will however see me working with centimeters – simply because I am used to this.
The usage of the centimeter ruler has another advantage. I simply need to resize all pattern pieces on a scale of 1:10, and won’t have to deal with giant file sizes (note: I consider any of these pattern enlarging files *UNDER* 40MB *NOT* to be of giant file size… I have seen some that had over 120MB, *those* were most definitely *large*). You will want to divide your own measures by 8 if you choose to work with inches, so you can work with a 1:8 scale.

I will make the program mark all objects (by clicking „Objects“ – „Mark all objects“). Then I chose the resizing tool (marked as „Verformwerkzeug“ in the next image), which will bring some markings around the objects that I can click and drag to resize them.
Also check the back-of-neck-to-waistline and waist-to-floor measurements in this step. If they – after resizing the pattern to the length desired – differ considerably to your own, please reconsider cutting the pieces apart.
Just don’t panic, you probably didn’t do anything wrong; perhaps you just have long (or short) legs and the original garment was constructed for someone who had the exact opposite. Or maybe your upper body is too long (or too short) while the original owner of the garment was the exact opposite. Whatever it is – it *might* lead to a printed out pattern that has the waist at *your* hips – which is definitely *not* a desirable place for the waist.
| Can you guess? This happened to me once…. and I noticed it *after* I had a) printed, b) cut the pattern, c) drawn the pattern to the fabric, d) cut the fabric *AND* e) was about to test fit the garment on my dressmaking mannequin… so… if I would have checked these measures *before* printing it, it would have saved me about 7 yards of fabric… *sigh*… |
So please check the measures, and if they differ more than about 2,5cm / 1 inch, then you might want to cut the single pattern pieces for (as in this example:) front and back gown pattern pieces (digitally by copying these pieces as separate objects) apart at the waist with a and resize them to the appropriate length separately. Use the measures of back-of-neck-to-waist for the upper portions and waist-to-floor for the bottom pieces when you resize them.
*IF* you do it this way, you want to resize the *LENGTH* of all pieces that belong to the ‚top‘ portion of the gown (such as sleeves, upper gown, collar etc) at once, and afterwards all pieces that belong to the ‚*bottom* of the gown. Be *VERY* careful that you don’t forget to resize one piece; you *CAN’T* simply re-do that later – you would never ever resize the missing piece(s) properly. This means that you have to start again from the point where you have *not* resized anything (you DID save your file after you had copied all pattern pieces into the new file, right?).
After successfully resizing the *length* of *all* pattern pieces, you will want to re-group or combine the cut pieces before you adjust the width of the pattern.
This, of course, also applies to patterns that have separate bodices and skirts.

Now, as we have the ruler, we can resize our pattern pieces. I have found that I would need a complete length of 195cm for my kirtle enlarged here, so I will enlarge the height of all pattern pieces until they have a length of 19.5 cm (remember, I’m aiming for an exact scale of 1:10).
Here you can perfectly see how I made a mistake:
Of course, my shoulder-to-floor height, even taking my highest heels *and* the flaring of the hem into consideration, is never ever 195cm – but much closer to about 155-160cm. I have absolutely no idea how I came up with 195cm!
I noticed this mistake – you can guess it – after I had printed that giant pattern – *Grrr*. As everything was about 35cm too long, I had to resize and print the pattern again before I could use it.
Anyway – I could have changed this tutorial in order to hide that mistake – but I didn’t, in order to let you know that the measures should be taken / guessed and, of course, applied while enlarging the pattern *VERY* carefully.
![]()
Afterwards you will want to resize the width of your pattern. To do so, bring front and back piece(s) (can be more than one, for example for a Victorian jacket or so…) right next to each other, until you have a more or less straight line of the bust line, which should be shortly below the armhole.
For separate skirts, I adjust all parts of the skirt width according to the waistband length, so that it will fit my own waist.
Again, mark *all* pattern objects and drag them to the desired width by first pulling one end of the pattern line to the left edge of your image, then carefully dragging the deformer points until the pattern shapes have the desired width. I have a bust width of 104cm, so for comfortable wear I need the garment to be 106cm wide…. but….
Be careful: only enlarge them to *half* your own bust measurement (plus about 1-2 inches for comfort)!
This is because usually you will only have half the pattern pieces for the circumference here – the other half you will receive by mirroring when cutting the fabric.
| I once forgot about that when enlarging a pattern for rococo stays – and that while a friend of mine was present. I didn’t even notice my mistake until I tried to test fit the printed, cut paper pattern shapes to the dress mannequin – ending up with half a pattern which would go completely around the dress mannequin…
The most funny thing was that I even didn’t note the mistake myself – Becky said: The embarrassment, |
So instead of choosing a width of 106cm, I will choose a width of 53 cm.
You can completely forget about the waist and hips measurements, because these can be fitted when the pattern pieces are cut from the fabric.
If you are not enlarging a complete gown, but for example a jacket, you want to use different measurements than waist to floor and shoulder to floor. Instead, you can for example use back shoulder to back waist.
Uhm – to get back to this pattern – here’s my resizing for the kirtle bust measurement. You will see that the grid in the pattern is now slightly deformed – from squares to rectangles. This happens during the resizing process and is a good indicator that the original pattern would never ever have fitted you if you had enlarged it by the means of one inch grid paper:
If you have enlarged all pattern pieces to your satisfaction, you should now place them in your image space in a way that you have possibly not very much white space around them. You can turn them, drag them, even mirror them; whatever you want – just keep in mind that you must not change their size any more.

(In this picture, you don’t just see the kirtle pattern, but also the pattern pieces for the loose gown – I have enlarged them both at once)
If you have reached a satisfying layout, you can save your image. It’s best to save it twice: Once in the program’s own format, *.ufo, which will also save the objects as objects (this way, if you ever have to resize the pattern for someone else, you don’t have to go through the process of making objects again…), and once in the space-saving *.jpg format, which can also be imported into other programs – you’ll need that for the next step.
Now you will want to open Corel Draw and import the image you have just saved.
Go to the ‚Print preview‘ (File – print preview).
Set up the options in a way that the printer will print tiled pages. Set the size of your pattern image, which will be (if you have worked with inches and followed my advise of dividing your measures by 8) to 800% and if you have worked with centimeters, set the size to 1000%. You will also want to make the pages overlap (I am usually letting them overlap for 5mm) plus you want to print the cutting marks. Of course my program is German, but if you also use Corel Draw you can compare your settings to mine here:

After leaving the options you should have a pattern covering several pages in the printing preview.

You can now either print the whole pattern in a batch or print each page separately by right-clicking it. It’s good enough for this kind of pattern printing to use some cheap paper and the simplest printer settings, so that you’ll save on ink or toner.
If you have a rather large pattern, as I have here, you will want to watch the printing, take the pattern from the printer each time a ‚row‘ of paper is finished and staple the paper rows alternating, so that later it is easier for you to glue them together.
After printing, you should have a nice staple. You will furthermore want to print out one paper with a resized small version of the whole pattern you have just printed – this will help you not to get lost while you glue the pattern pieces together, even if they are laid down in ‚rows‘.
Now you can start gluing. First glue all rows, then glue the rows together so that slowly but surely, the whole pattern comes together.

Rows glued

Whole pattern glued (this takes up the whole floor space of my kitchen)
Afterwards you will have a rather large paper pattern which you just need to cut apart. After using them you can keep the folded pattern pieces in plastic freezer bags in a closet, to be able to use them if you should need them again.
I guarantee that if you have followed and understood all steps in this tutorial, the pattern will almost fit perfectly now – though it might take some work on waist and hips.
This method worked for me for several different body shapes, be it my own, other people’s or even a doll’s body, such as Tyler or even Barbie – just look at my doll costumes which I have made just that way.. It’s a bit difficult at first – but if you get practice by doing it several times, you will ask yourself why you ever thought about grid paper….
Hi, I must admit to going to the nearest photocopy shop to upsize patterns. I measure me and put the measurements on the paper pattern, and ask the man to enlarge them that size. Obviously I still have to go through trying on the paper and re-cutting where necessary, then doing a toile and making small adjustments. But it does simplify one stage, especially when using bits of pattern from all sorts of places together.
Well, that’s a possibility too; though I doubt that many people who work in copyshops will know how to enlarge a pattern to certain measurements – particularly because they can (without editing the scaled, smaller pattern) only adjust to one width and one height measurement (like, for example, bust circumference and complete length of a dress – opposed to shoulder-to-waist and waist-to-floor as separate heights).
The method I described is way more accurate – I resize my patterns that way, and can instantly cut a toile with the resulting pattern – the only adjustment I have to make most of the time is to adjust the waist.
And by the way, I often use quite a few pattern pieces from different patterns too; then enlarge them all together as one pattern.
But after all it’s probably more or less a question of practice (with image editing software, in this case) and personal preference.
I been thinking of buying those books Patterns of fashion as well as Blue book of men’s tailoring(1907), and i waited to long cause i though it will be hard for me to understand how to make the patterns bigger, i am still super confused but i will try your tutorial, thanks so much for taking the time and share.
You’re welcome 🙂