Apr. 152011
| Navigation for this part of the page: |
|
[catlist categorypage=yes] |
Decoration with single pearls and half-sphere pearl caps
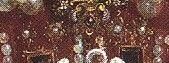
The portrait gown is further decorated with single pearls, which seem to be surrounded by tiny filigree golden disks.
For this decoration I used half-sphere, golden filigree pearl caps such as are used for the ends of pearl colliers.
I’ve first had bought 150 of them – five packages with 30 in each package, but quickly ran out, had to buy new ones and after that, I’ve lost track of the number.
Needed materials:

- Half-round pearl caps in gold, which are usually used for the ends of pearl necklaces and can be obtained in crafts shops. You should choose a size for pearls larger than the ones you want to use. For example, I used 3mm pearls – but pearl caps for 6mm pearls.
- Pearls… of course…
- a beading needle
- transparent strong sewing thread
- a marker
Attaching the pearls works like this…:
- Mark the places where you want to have the pearls. In my placement in the bottom picture, you will also see the marking for the Quadruple in the middle.

- Bring a well-knotted, double layered, strong thread from left to right side of the fabric in the place where you want to attach the pearl. I personally prefer invisible yarn – it’s strong, and most of all it’s invisible.

- Secure the thread by going back and forth through the fabric once or twice with needle and thread. If attaching more than one pearl, you needn’t do this on each pearl placement, just on every fifth or so.

- Add a filigree pearl cap by bringing the needle and thread through its middle hole. The cap should face to the outside.

- Add a pearl.

- Bring thread through the middle hole of the pearl cap back to left side of fabric.

- Repeat from step 2… If you’re working on double layers of fabric – as, for example, in this case, skirt fabric and velvet guars – take care only to bring your stitch through the top layer, not the bottom layer.

- Use the needle to *now* carefully bring the two drill holes of the last pearl you stitched to the sides so that they are not visible when looking at the pearl / cap combination straight.

- Repeat about a gazillion times in other places where you want that pearl/cap combination…. as I have said, after using 150 pearl caps I lost track of the actual number.

- If you are doing this with bigger pearls, it might be a good idea to do what I did with the Quadruples – instead of bringing the thread through the pearl hole and then go back through the cap, you can also add a small golden bead on one of the pearl holes and then go back – it will leave a nicer look than a big pearl with two also very big holes at its sides.


| Navigation for this part of the page: |
|
[catlist categorypage=yes] |