When making my Victorian day dress, I also had to decorate the gown with the puffed trims with which the original gown was decorated:

Puffed trimming shows along almost all flounce seams and along the neckline
Here’s how to make such puffed trimming. It’s inexpensive, easy and beautiful – just time consuming.
First you’ll need some yardage of bias tunnels.
To make those bias tunnels, first cut 2“ wide bias strips from your ‚fashion‘ fabric – blue satin in my case here – and a little less wide (perhaps 1 5/8 inch) bias strips from some slightly sturdy cotton muslin fabric. The colors of both should vaguely match.
Make yardage from both bias strips, then machine them together along the edges. As the ‚fashion fabric‘ bias strips are slightly wider, they will „buckle up“. That’s what we want.
Turn the entire bias strip tunnel, so that the seam allowances are inside the tunnel.

This is what the tunnel should look like when sewn and turned – fashion fabric on one, cotton muslin on the other side.
Now take your edge / line / seam along which you would like to place the puffed trimming. Mark every 1-2 inch or so, depending on how wide you would like your puffs to be.

Fabric marked every inch with chalk.
If you would like to place the puffed trimming around, let’s say, a neckline, it’s a good idea to start on one side of the bodice – left or right – mark to the center back seam, and then start again from the other side towards this center back seam. This makes sure that both sides of the neckline (the drapery, the skirt…) have a mirrored pattern of puffed trimming.
- Securely stitch a *strong* thread (and I mean strong. Transparent or nylon sewing yarn does a very good job here!) to one of the marks (preferably the first one if you’re beginning with the puffed trim decoration 😉 ). If you’re doing this along the seam of a bias cut flounce – as I did – catch a few thread of the flounce fabric as well; this will give a nice effect on the flounce.

- Secure a first spot of the bias tunnel to this mark.
- Stitch and knot several times to securely attach the bias strip in just the marked spot to the fabric.

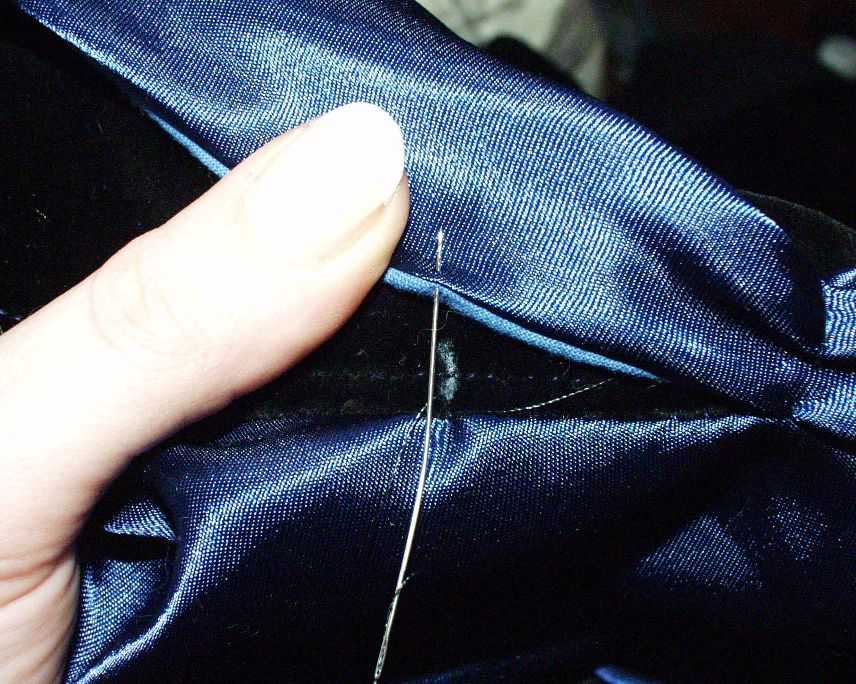
- „Weave“ vertically on a straight line through the bias strip. The best effect is achieved with three to five needle stitches, and most of the needle (and the following thread) should be on the outside of the fabric, as can be seen in the following picture:

- Stitch back into the fabric of the garment, placed maximally 1/2 inch (possibly less) and right above the mark you formerly secured the thread to.

- Turn right back into the bias strip and pull the thread up, …

- so that the tunnel fabric is gathered.

- Secure the thread with several stitches and knots. Move diagonally to the next mark, secure the thread…

- and start over with #1; but place the bias tunnel in a way that you can still stick a finger between the last sewn mark and the next:
The tunnel needs a little place to be able to puff up. It can also be a good idea to diagonally move the bias tunnel from the sewing line, so that its way is a little longer than the distance between two markings.
You’ll need about an hour for half a yard – depending on your practice – but it’s really worth the work and looks beautiful afterwards.