Navigation for these costumes:
My motivation – Connor Kenway – Aveline de Grandpré – George Washington
– in progress, so what you’re reading here is just my initial research plus a bit of the beginning of the making. I will add more over time as I make progress on the costumes!
Please also note that, as described on the „motivation“ page, I make these costumes for my son, myself and my father. I am NOT selling them.
If you „desperately need one“ – make it yourself. I guess I’m providing sufficient information on these pages to enable you to do so, if you’re willing to put a bit of effort, learning and work into the costume. –
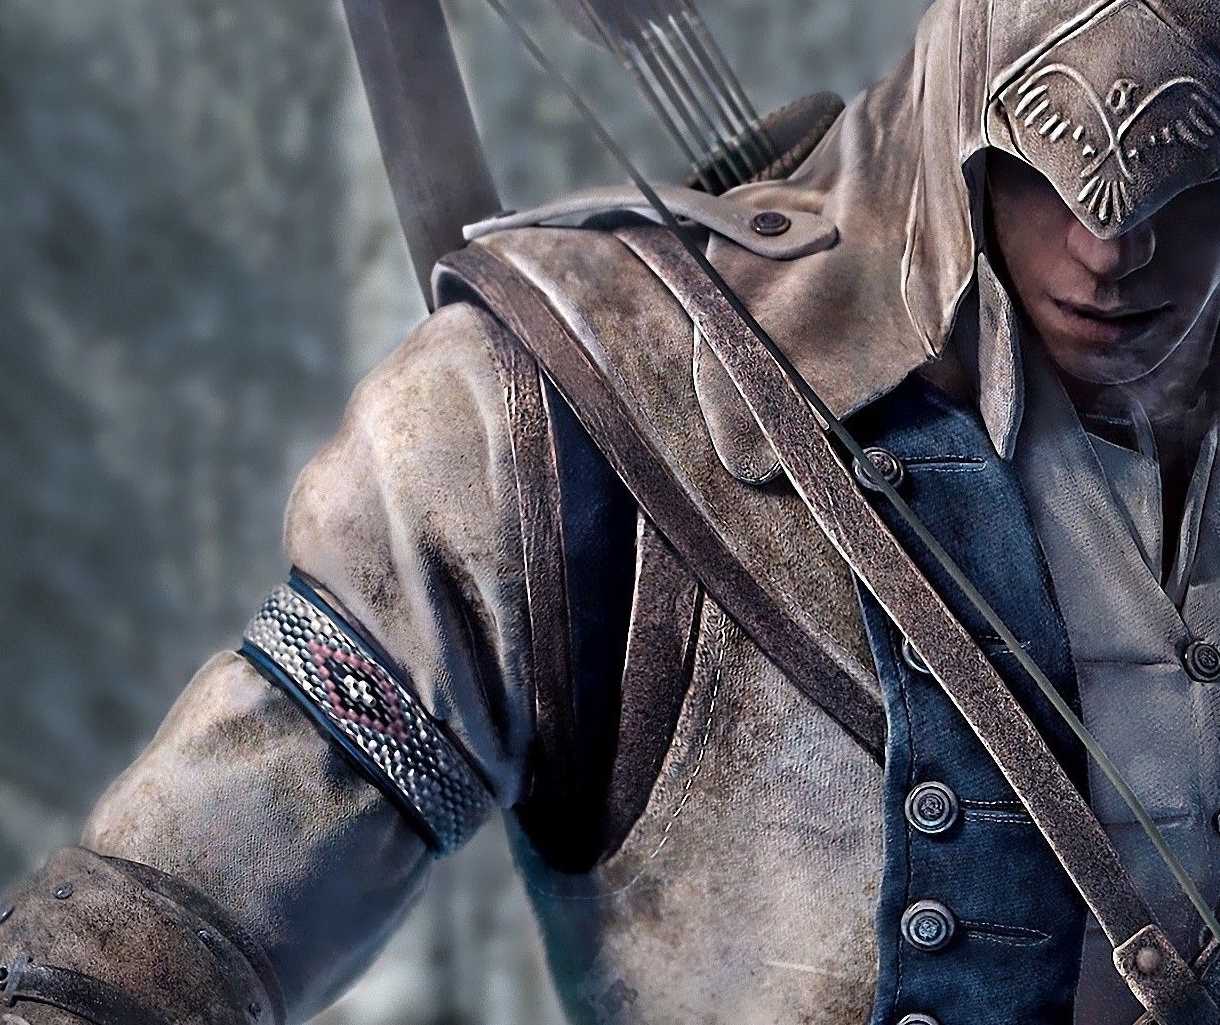
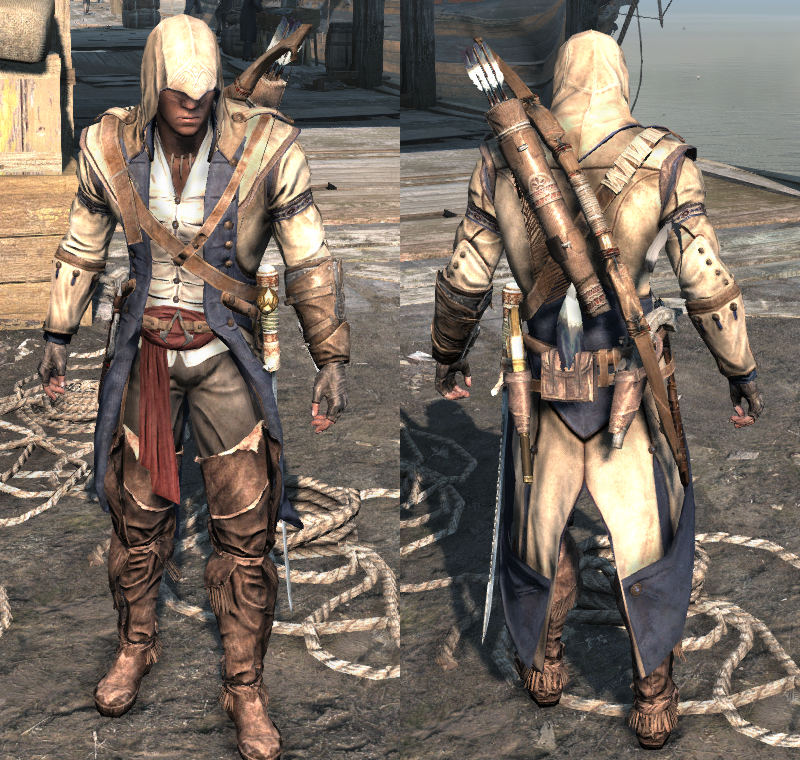
Assassin’s Creed III – Connor Kenway

The Jacket (or coat, if you want to call it that)
My research for Connor started with his jacket; and that was the sheer coincidence of me finding out that the jacket looks different in rendered promo images opposed to the actual in-game appearance in one point in particular:
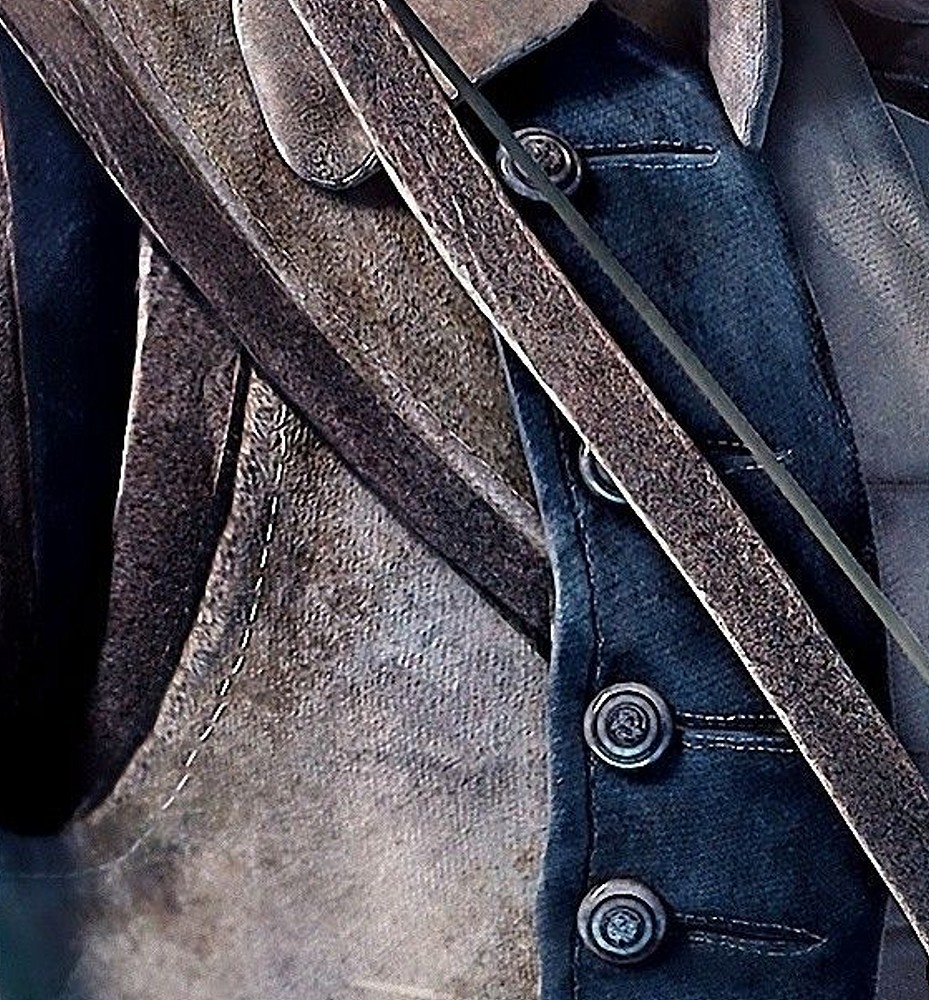
The Buttons
Here’s a comparison between the jacket (and vest) buttons as they appear in promo images as well as in-game; click to enlarge:
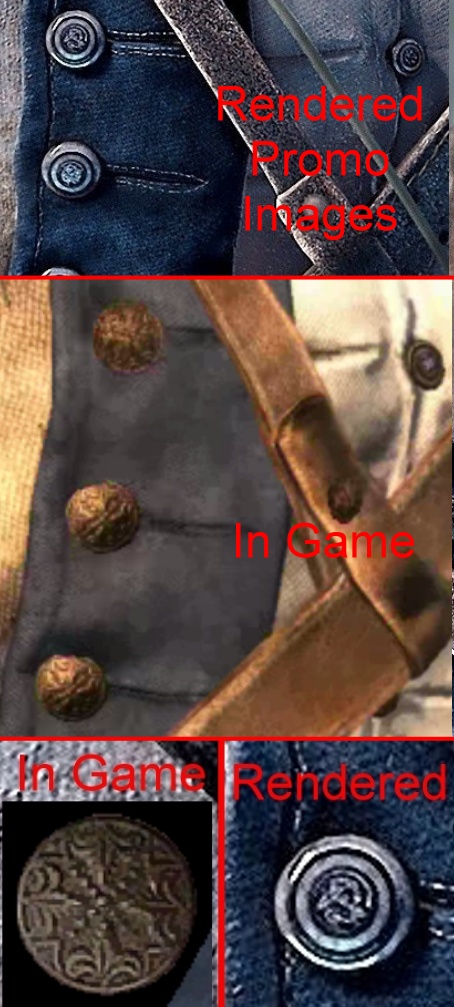
As you can probably see, the „rendered“ buttons clearly have a silver and not very elaborate appearance, while the in-game buttons are dark golden with an elaborate pattern of a cross with inwards-pointed Fleur-de-lys on them.
This pattern on the in-game buttons, as I have researched, is (how befittingly!) called „voided cross and fleurs“. Clicking the link will bring you to a Google image search for that term which will then teach you that this (again, interesting!) is a pattern that was used on coins. Some of the coins displayed there have a very similar pattern; on others, the pattern is not-so-similar, but you get the point 😉
I looked for buttons like those. I really did, but found none.
So I decided to make my own.
There are two possibilities for a person to re-create these buttons: Either by casting them in pewter or bronze, or by casting them in resin.
I would have LOVED to cast them in actual metal for the sheer proper weight, but doing so would have required me to obtain several things that I currently don’t own – heat resistant silicone for the molds, burner, pots, pewter, chemicals to age it… that would have been approximately $150 just for the buttons material and required tools. However… I already had non-heat resistant mold silicone and epoxy resin at hand, which also work for making them, so I decided for that method to make my buttons.
Here’s how:
How to make and cast buttons with epoxy resin (or poly resin) |
|
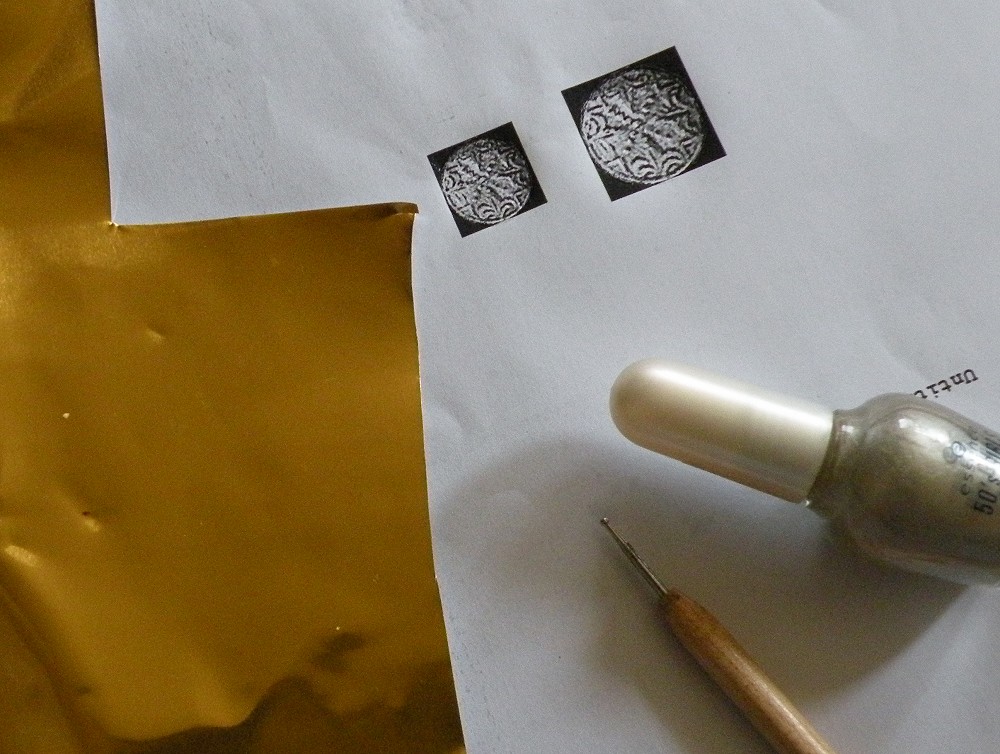
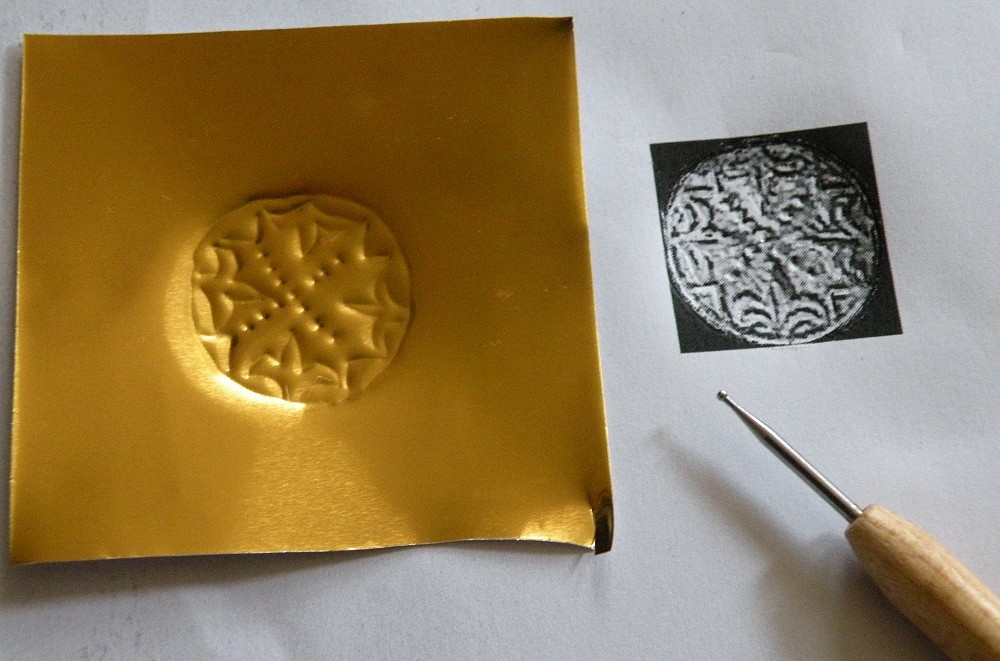
| Materials required: Thin sheet metal, a template printed to actual size, a small metal pressing tool (a ballpoint pen will do as well!) and a „small rounded object“, like, in this case, the lid of my nail paint 😉 |
 |
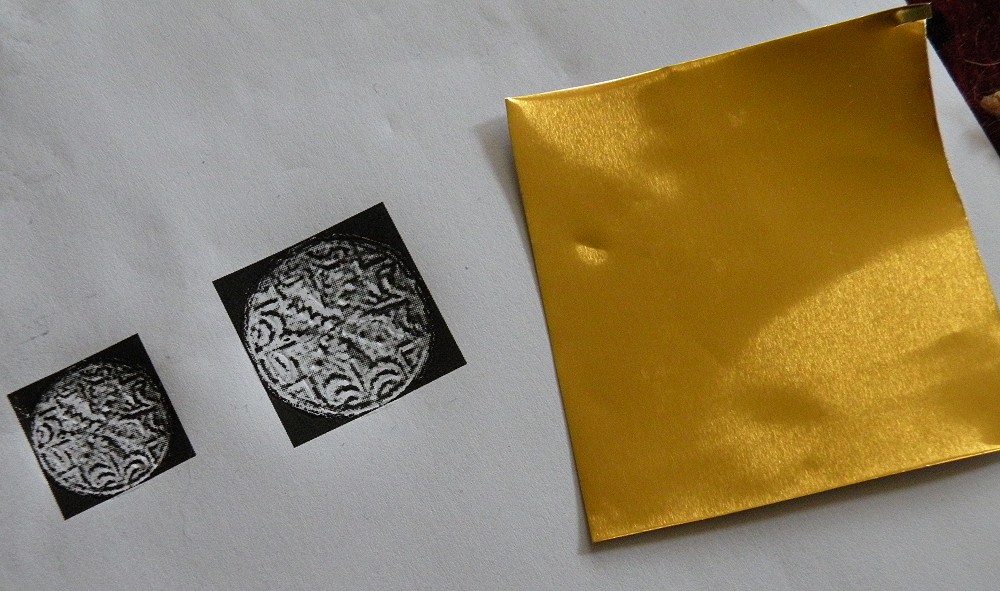 |
Cut out a piece from the sheet metal, slightly larger than your button-to-be (at least twice the size, to be precise). |
| Place the sheet metal piece precisely under your template, then start pressing the pattern with the pressing tool (or pen) into the metal. Don’t apply too much pressure yet; you just want the base pattern pressed through. | 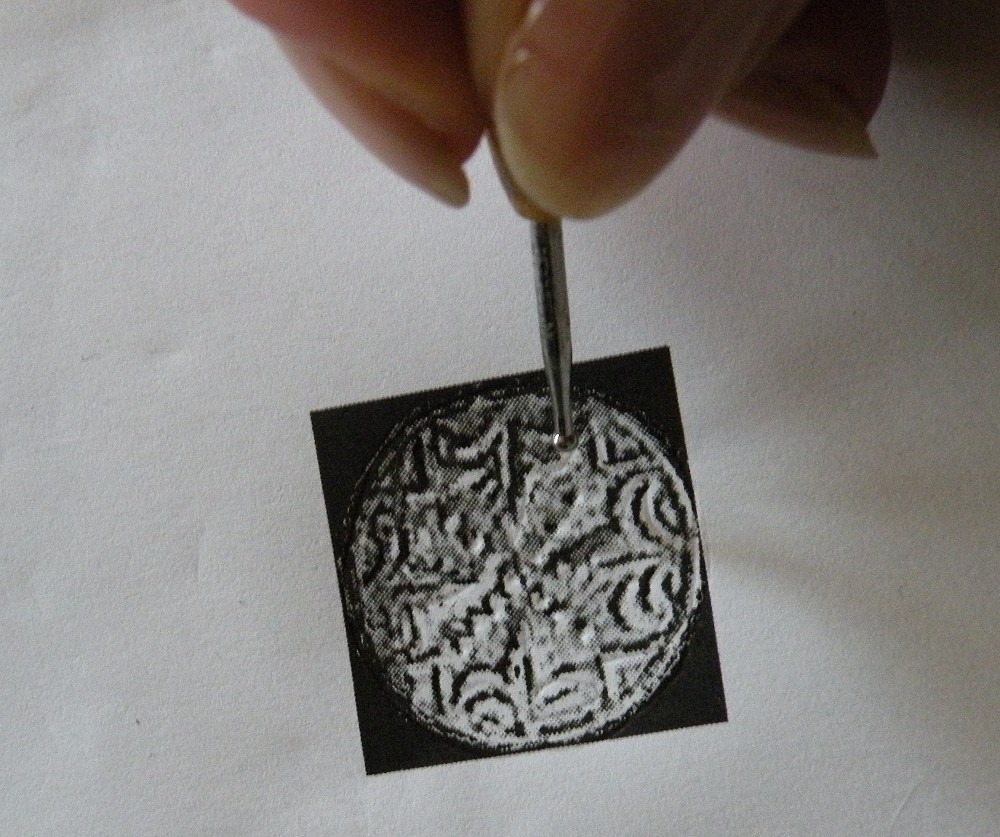 |
 |
When you’re finished, it should look like this. |
| Press the basic shape lines down just a bit more. |  |
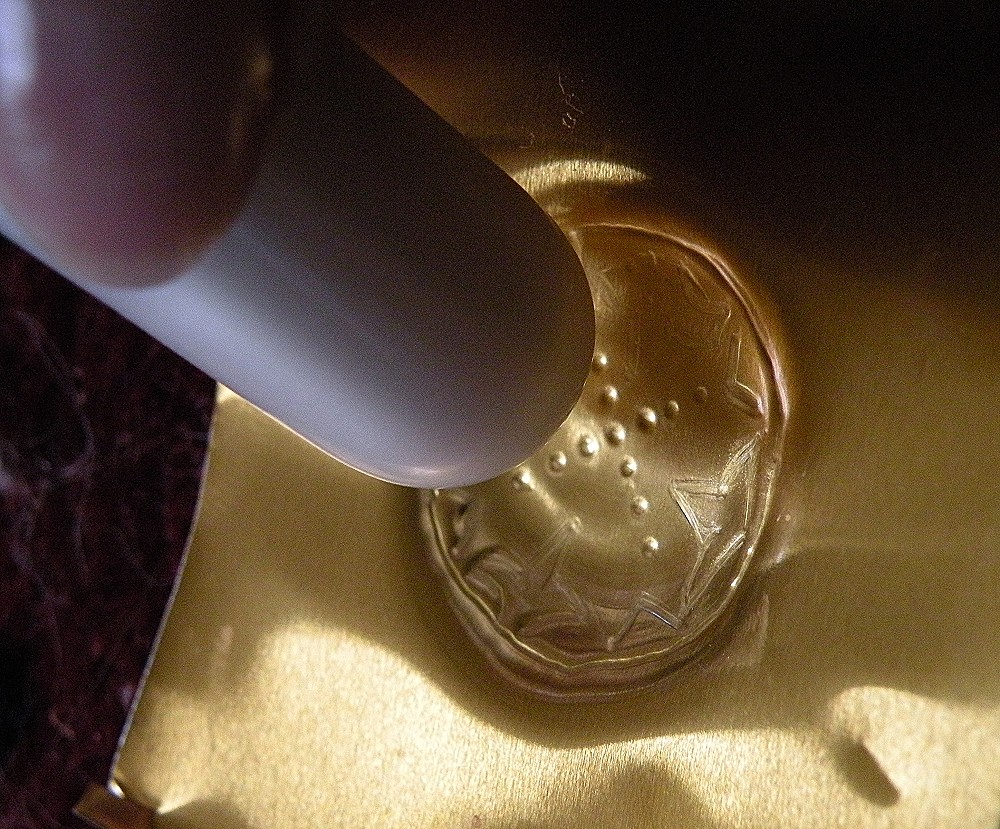 |
Now use the small rounded object to press the entire shape of the button down. Do so on a soft surface (I did it on my carpet). Also, do it carefully. Don’t press too much; you can always press more. |
| Should look like this when finished. As you can see, your base lines are almost gone, but still a tiny bit visible. | 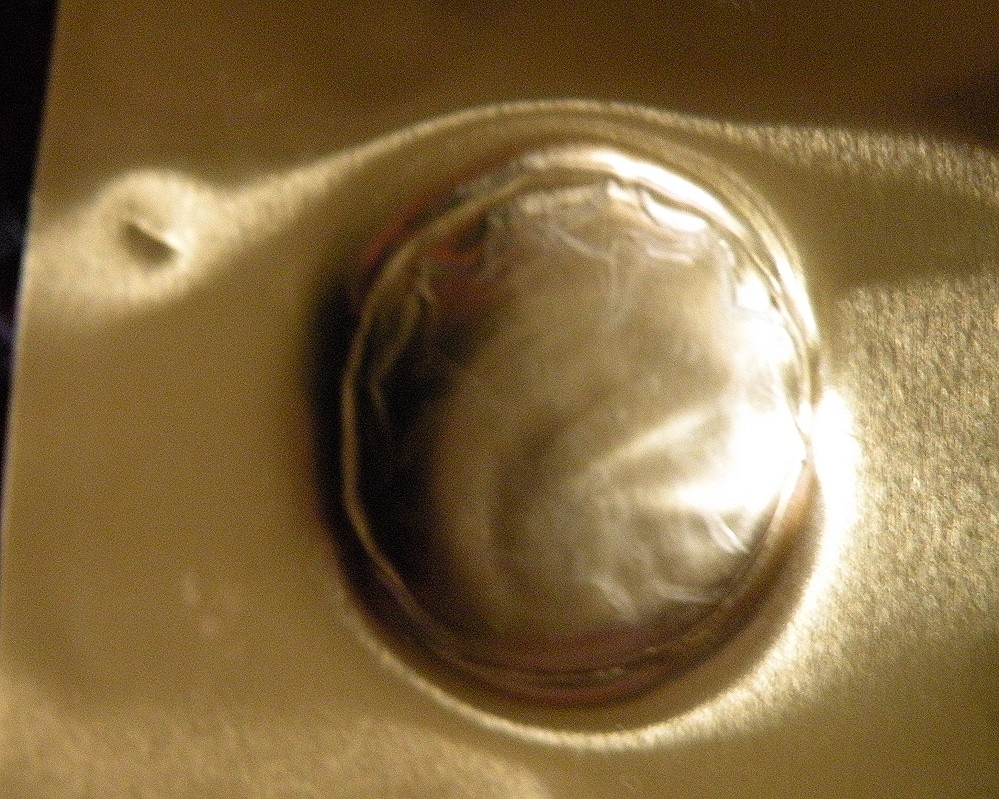 |
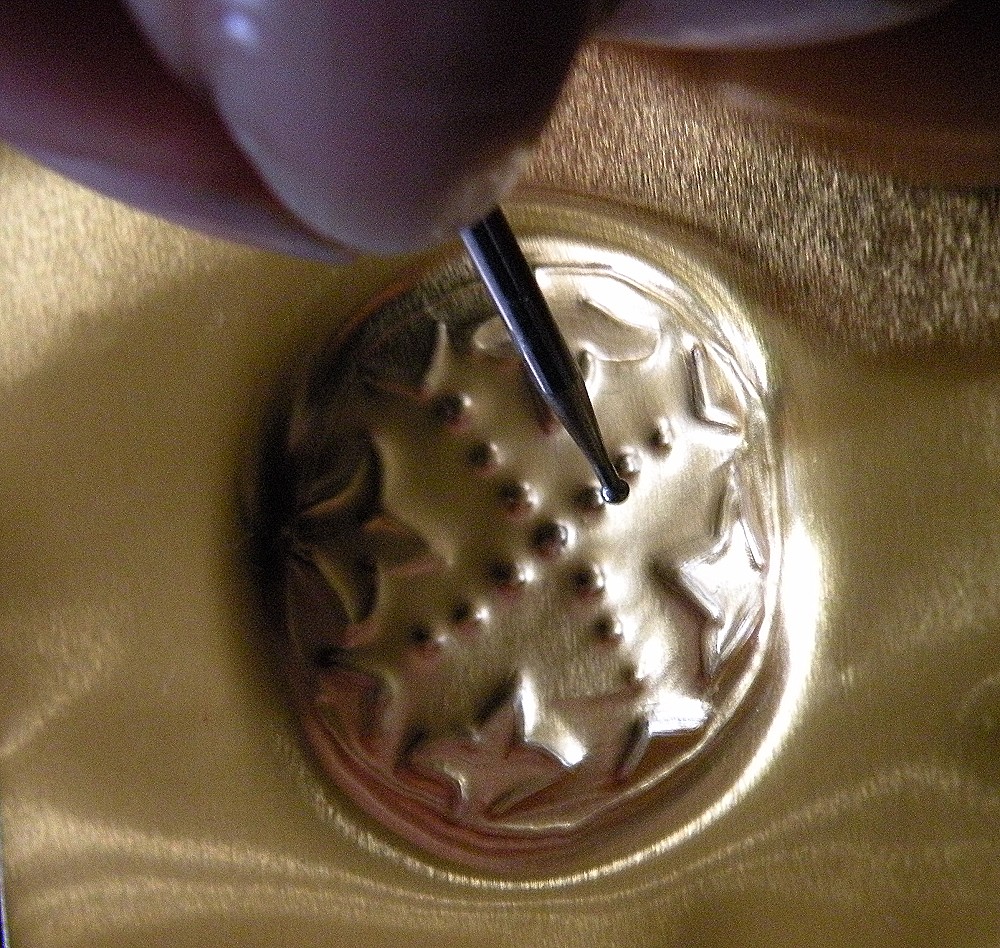 |
Back it is to the pressing tool (or pen). VERY carefully restore the imprints of the design lines. Do NOT apply too much pressure, or you may punch a hole into the metal. Guess who that happened twice to, and who then had to start over?) |
| Also do a bit of „pressing back“ from the outside of the button with your tool to make the imprinted design more clear. | 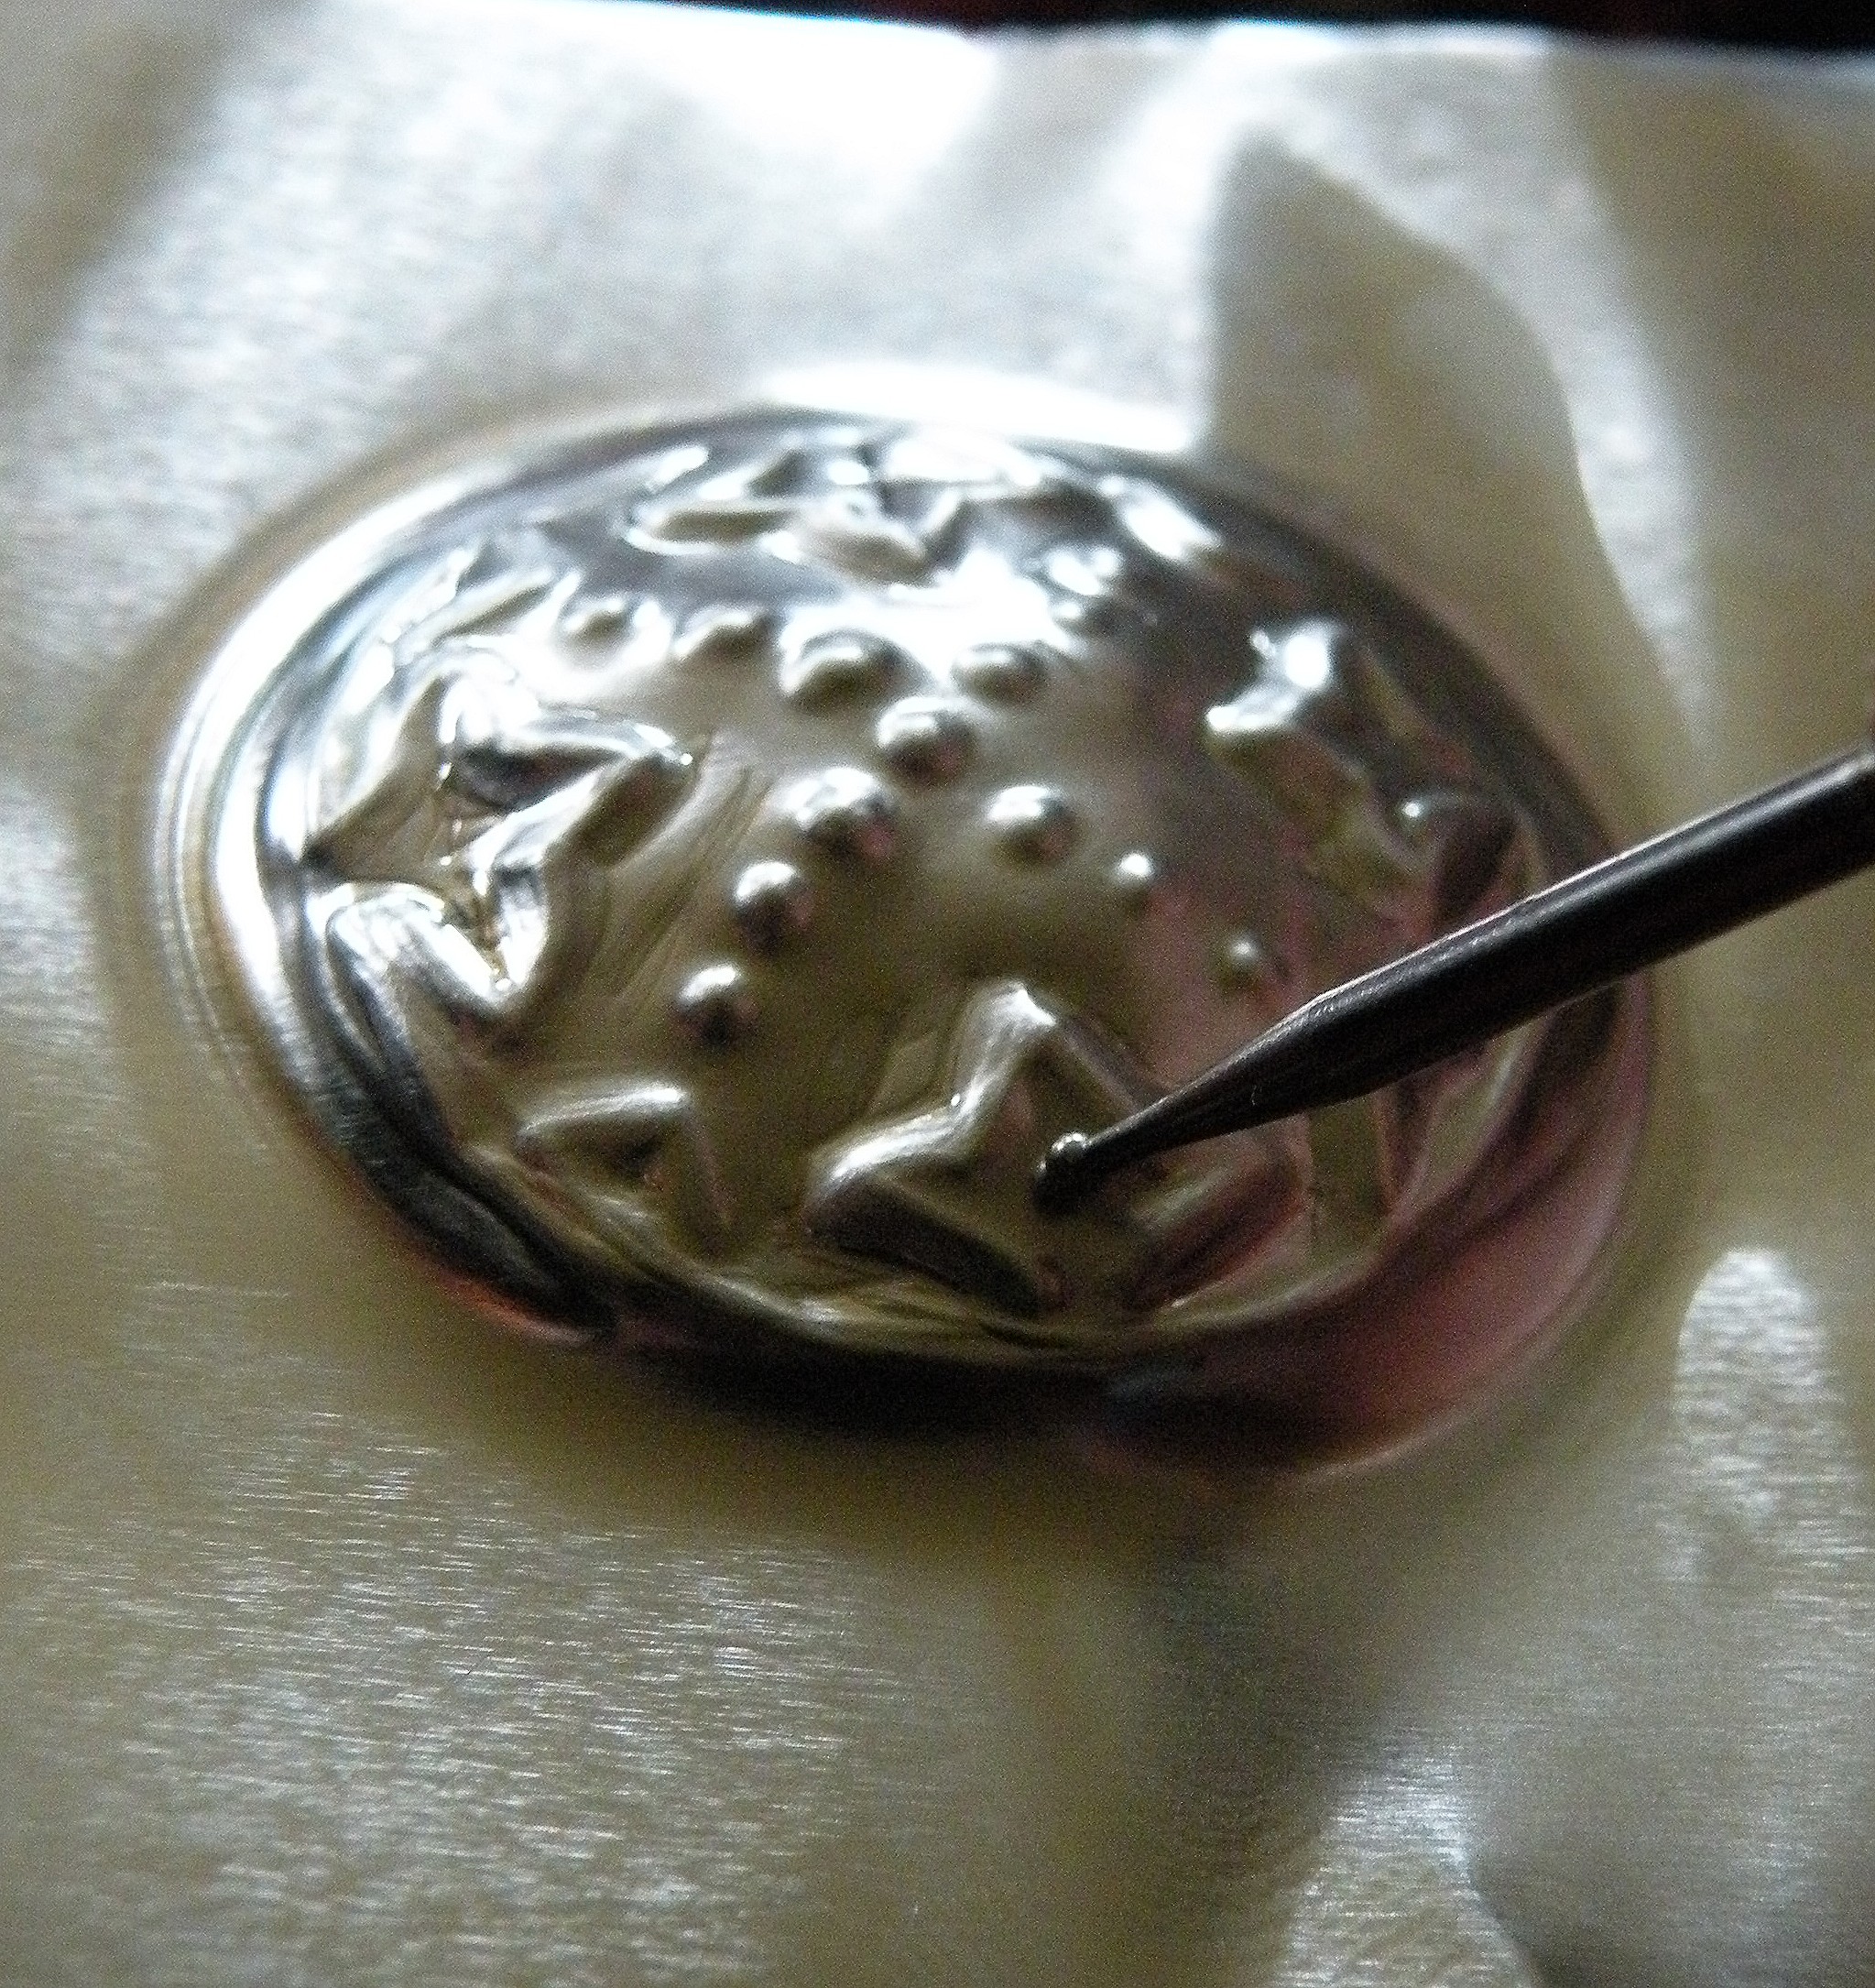 |
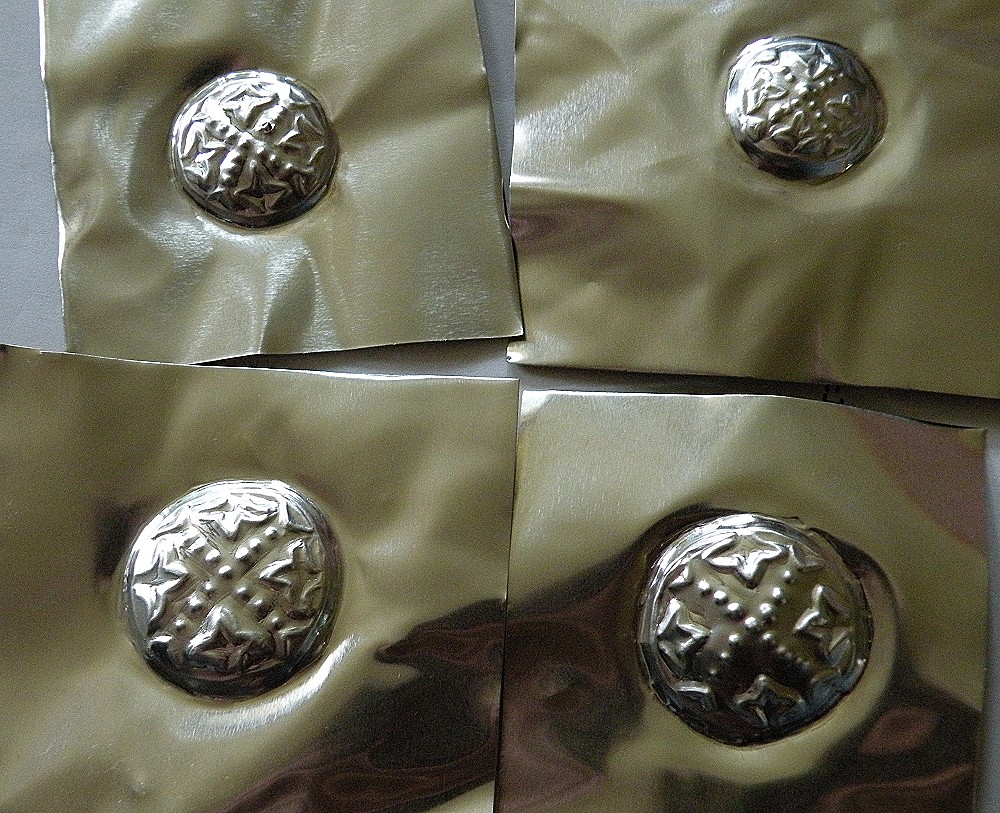 |
I made four of those imprinted button shapes, two of the smaller and two of the larger ones, to get a slight variation in the cast buttons. |
| This is what one of the smaller button „sheet metal templates“ looked like in a closeup. | 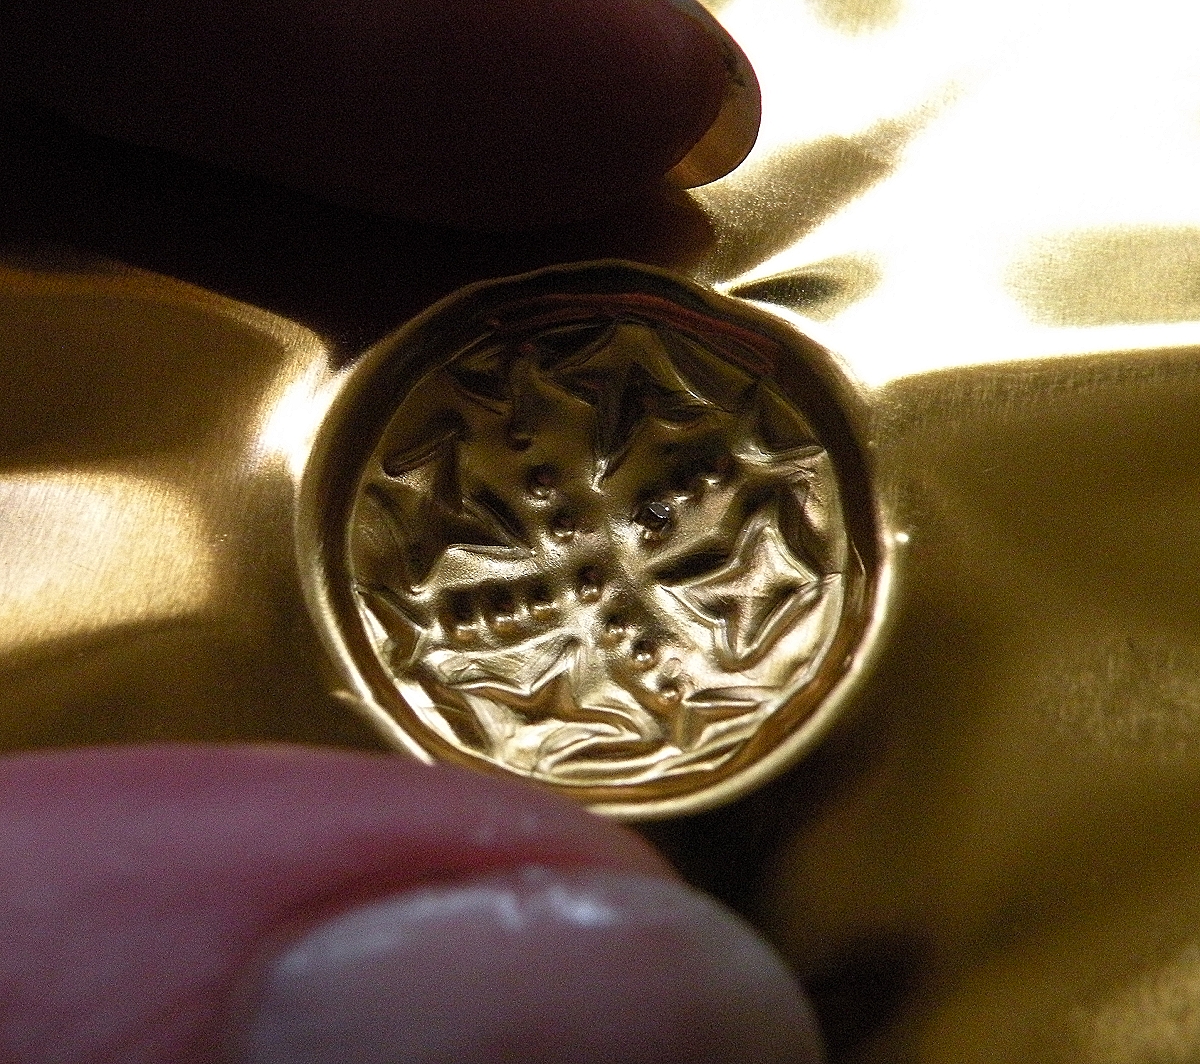 |
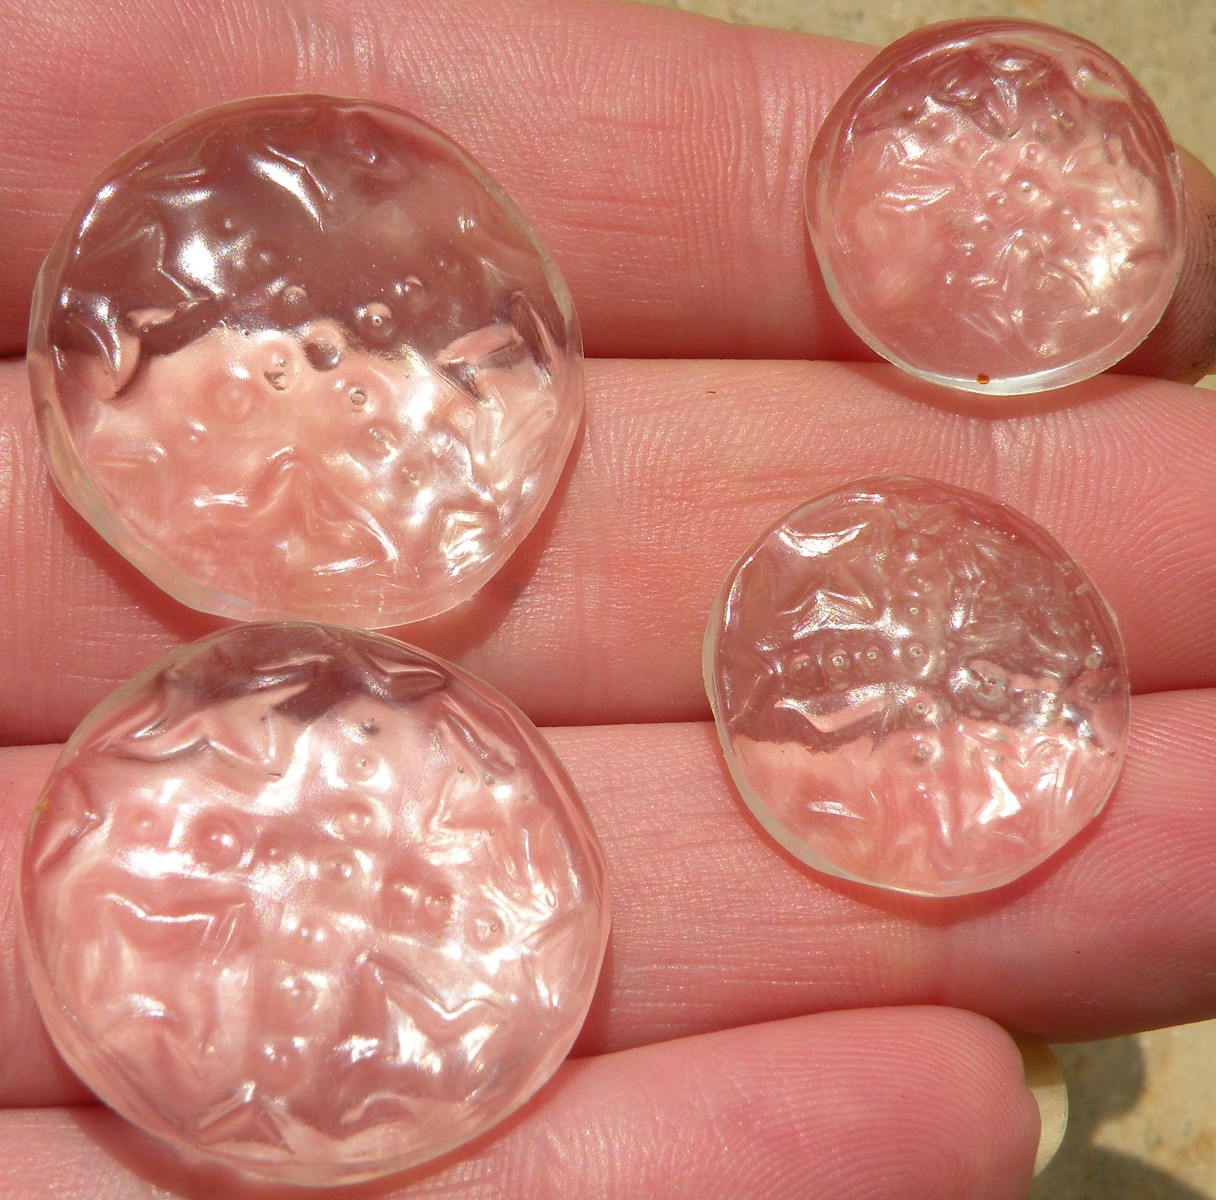 |
After finishing the sheet metal templates, I poured epoxy resin into them and let them harden for a day. After that I could just peel the sheet metal away (and destroy those sheet metal templates in the process) and was left with four „master“ buttons – two small and two large ones. |
| I used those master buttons to make silicone molds, to be able to produce MANY of those buttons. | |
Jacket fabrics
The jacket is apparently made from three materials:
 Brown leather for the edging, white linen (or similar coarse, simple weave) for the „white“ parts and a considerably coarse blue denim for the lapels.
Note that this only describes the fabric parts of the jacket; of course there are also the buttons (=not fabric 😉 ) and the „additions“ to the jacket, such as the beaded arm-bands; but those are on top of the jacket (and not made from fabric either 😉 ), so they don’t exactly belong to the base jacket.
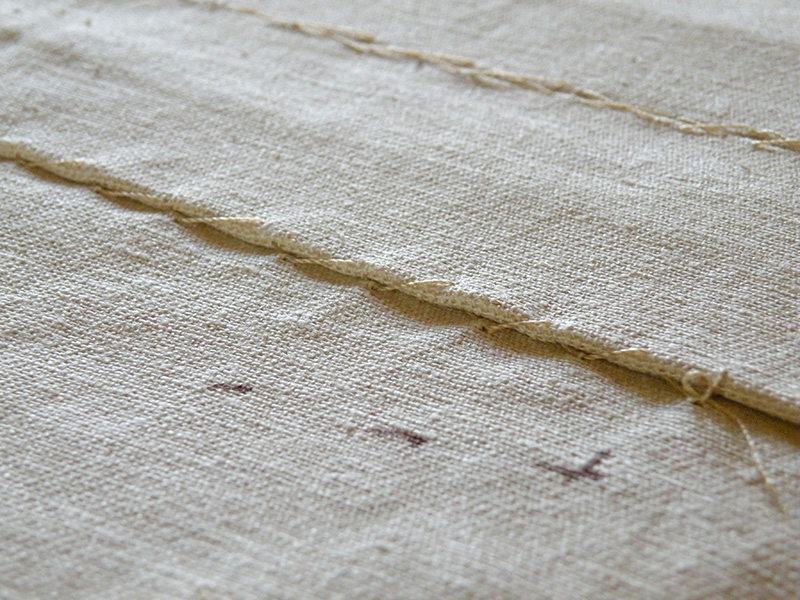
Here are the fabrics that I will use for the jacket (as well as for the vest):

Right: The vest and jacket lapel fabrics in a rendered promo image.
Left, my fabrics – top: a considerably coarse hemp twill, which I want to use for the vest. I know that historically, I should use wool twill; but the coarse hemp twill will just work so much better when aging it.
Bottom: A rather heavy, real indigo-dyed cotton denim, which I will use for the jacket lapels and decorations. It COULD be a bit more coarse, even; but this already IS the heaviest, coarsest denim that I’ve ever seen, so I’ll use it. It ages beautifully, by the way; I already did a bit of an aging test (rubbing with sandpaper as well as testing chlorine bleaching) on a small piece of it.
For the „white“ base material of the jacket I have ordered a considerably coarse linen in plain weave (because that is what I can see in the rendered promo images!) and am waiting for it to arrive. Same, by the way, for the leather which I will use for the edging – I ordered antiqued stag leather for that.
The Armbands
The native beaded armbands Connor wears over the sleeves of his jacket really gave me a headache.
They’re, of course, more or less typical native American bead-works, created over a layer of blue and black leather. The texture of the armbands from the game tells me that there are four repeats of the pattern on each armband.
![]()
Actual armbands texture from the game, enlarged and stretched to match the correct proportions required.
Now, my first idea was that I wanted to do it right. As in: NOT use modern beads, but the real deal – trade beads (search Ebay for those!), which is the actual type of bead that would have been used at that point of time for that kind of beadwork.
However… it’s not quite as simple. If you look at the texture of the bands above, you will notice that the beads on that texture are, in fact, stretched – they’re „wider“ than they are „high“.
By measuring the bands using my proportional method, I determined that I would EITHER need 4mm trade beads (not stretched), if I would add one more pattern repeat – or 3x5mm tube beads of any other kind.
I still was determined to make the armbands using the authentic, historical trade beads. So I counted them, and determined how many I would need. I even found a shop that carries the 4mm trade beads (plus white bone beads!) in all the colors I would need. I put the required amount in my cart… and found that for just the beads required for the two armbands, I would have paid $ 77.97 – WITHOUT shipping. And that’s JUST the trade beads; not the leather required for the base, the thread or the needle.
I then thought, why not look for an alternative which also looks nice but a) has the size I actually need and b) is maybe a bit less expensive?
And, lo and behold, I found the alternative – Magnesite beads in 3x5mm size, which, according to quite a few websites like this one, „Native American cultures have crafted magnesite into beads for both jewelry and currency for hundreds of years.“ So I ordered those (from this website) in red, blue, white and black and now wait for them to arrive – and they just cost me $33.75 – INCLUDING shipping.
Yes I know, that isn’t actually cheap either; but I want authentic-looking armbands, not „just some armbands that look like Connor’s“; and it’s still less than half of what I would have paid for the trade beads.
By the way, another mistake I noticed in the few existing accurate (beaded) reproductions of the armbands is that people apparently tried to weave them „up and down“ (texture-image shown above wise), which would put the holes of the bead „from top to bottom“ (again, I’m referring to the precise orientation of the above shown original texture image of the armbands).
This is, after all, how simple bead weaving is taught nowadays; but it’s wrong for these armbands.
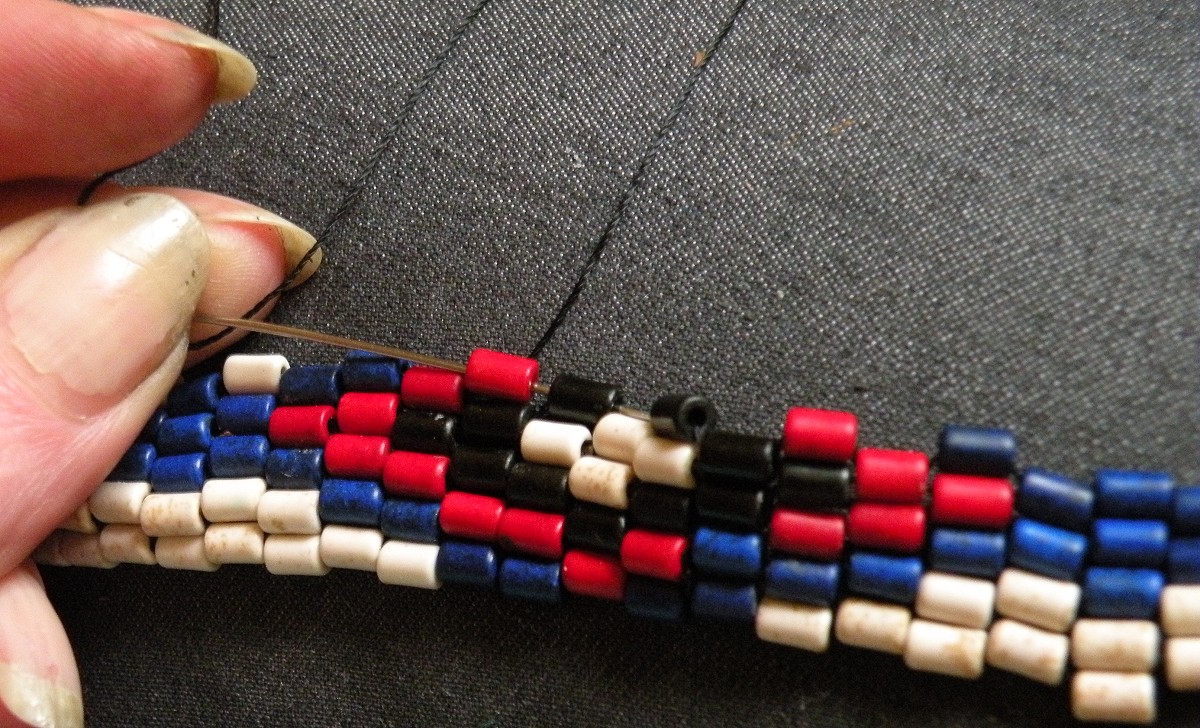
See this?
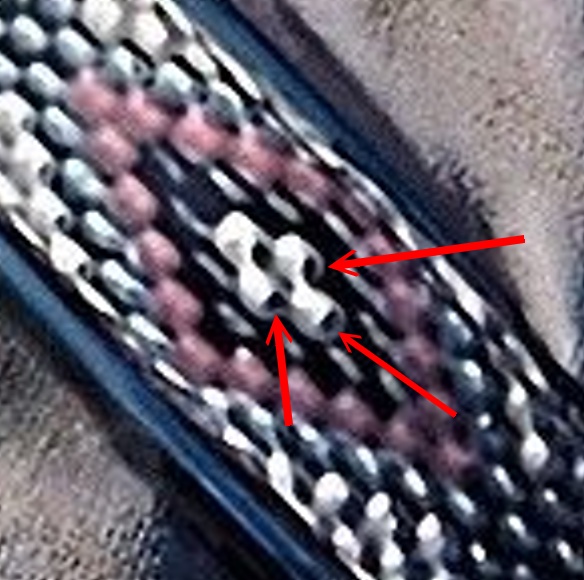
You can clearly see that the holes of the beads are going „from left to right“, opposed to what you achieve by weaving the beads „from top to bottom“.
These beads are not bias-woven either (which would not quite achieve that „shifted row“ effect), but instead I think they’re supposed to be beaded in a flat, odd count Peyote stitch.
The magnesite beads I ordered have finally arrived – here’s what they look like:
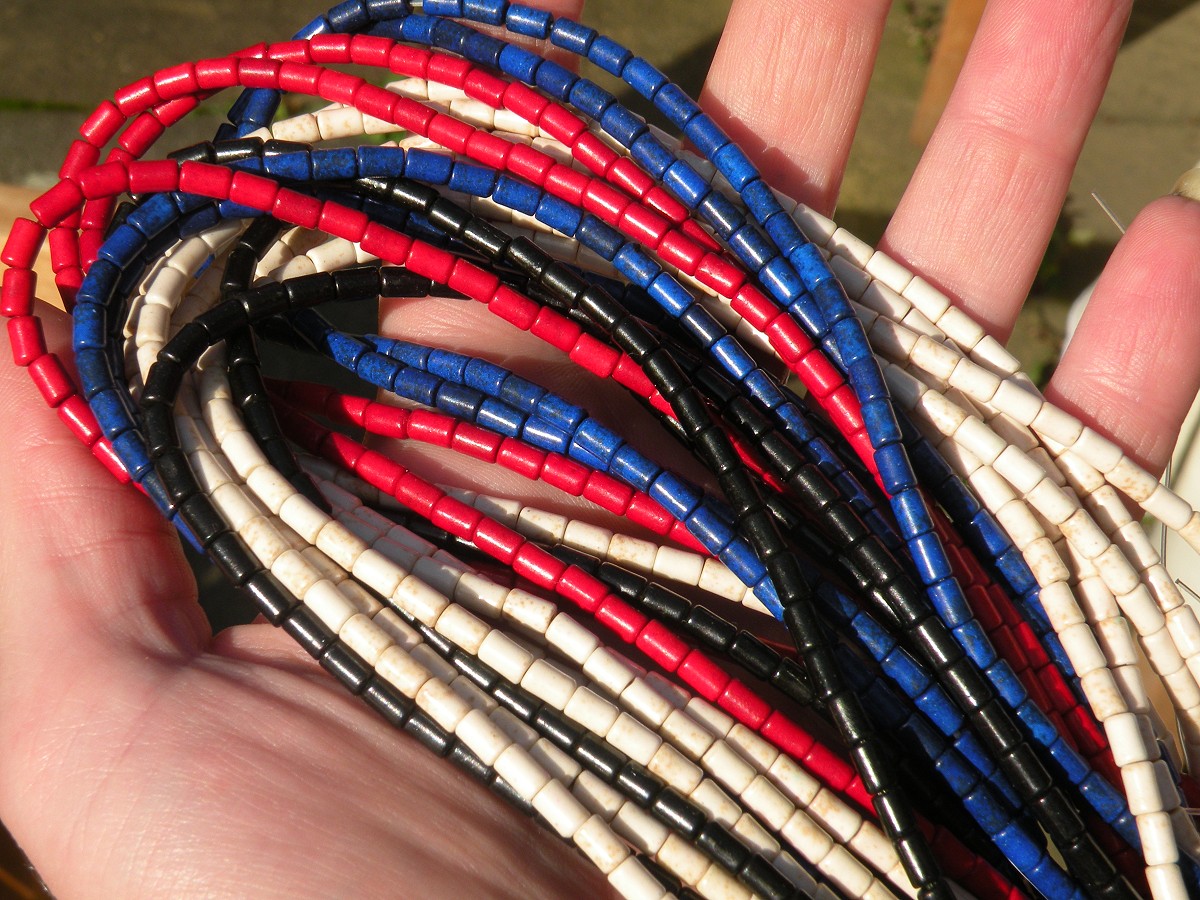
I think that with their very natural, slightly irregular colored look and their weight (they’re stone beads, remember?) they will work just beautiful for this project.
Here’s me working on the armbands:
The belt buckle
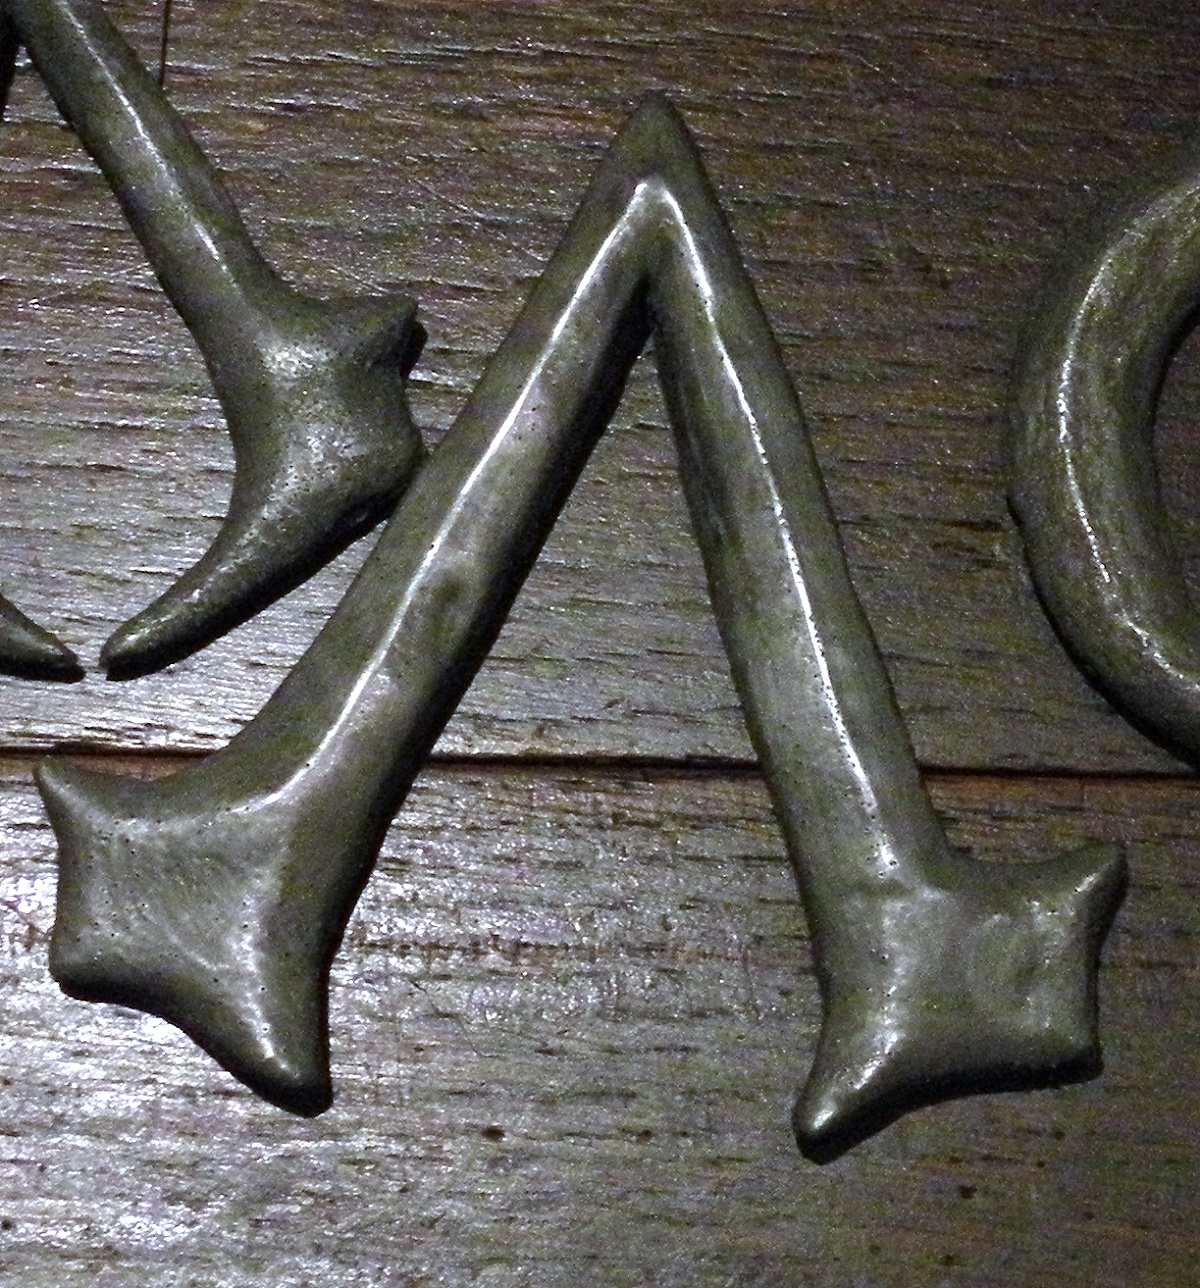
As already explained for Aveline’s buckle, I first sculpted a proportionally accurate sized buckle from modelling clay (and oh how many buckles I have seen which are just WAY too large… seriously, Connor’s buckle is a bit SMALLER than the palm of his hand!):
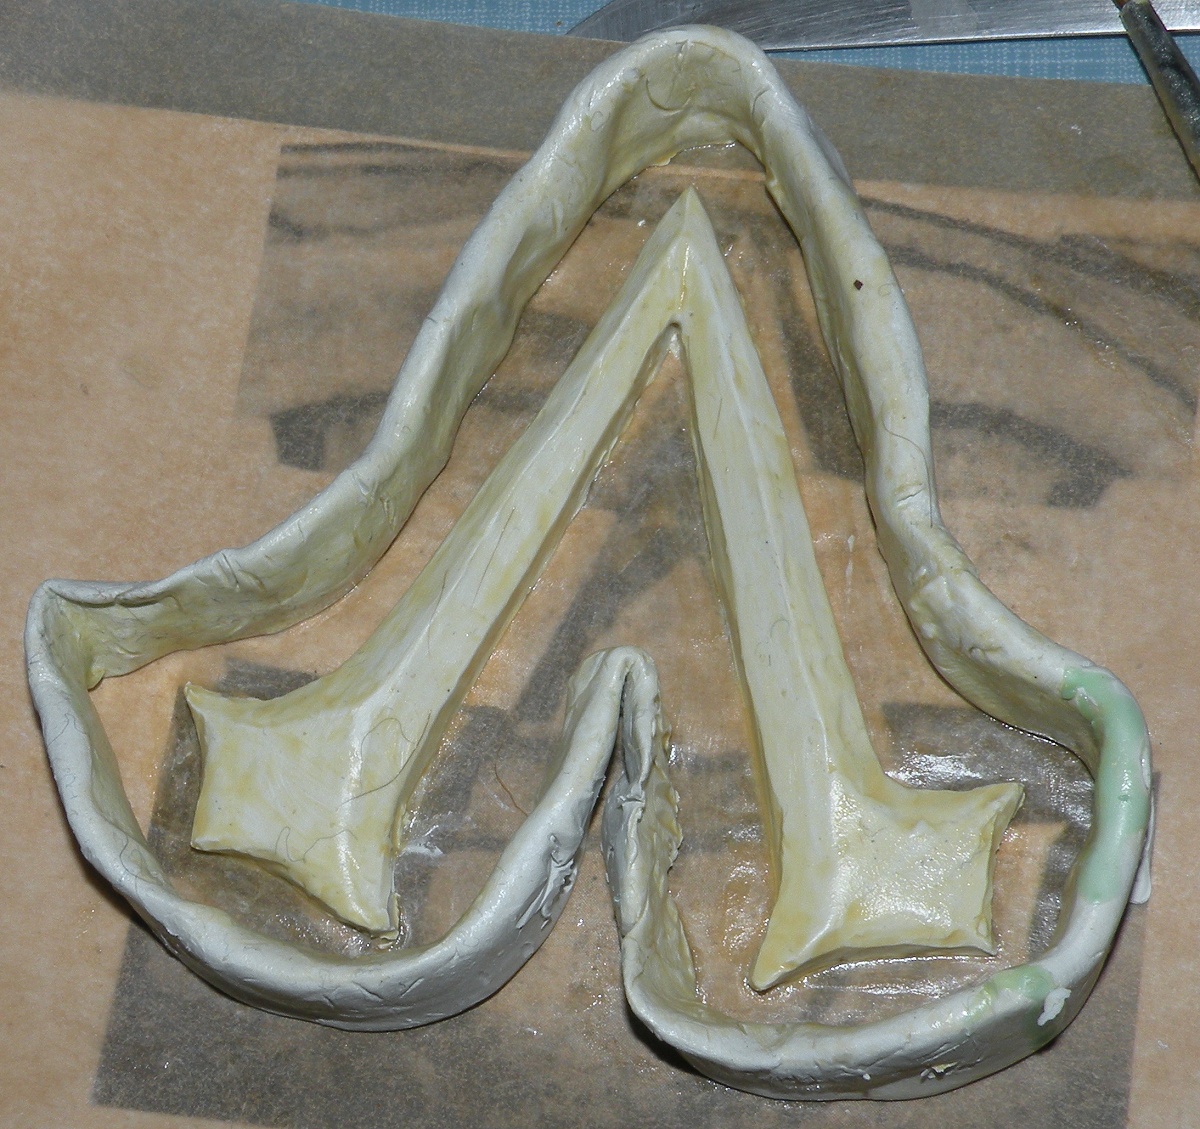
and then – just as for Aveline – I cast the buckle using the cold cast metal process:
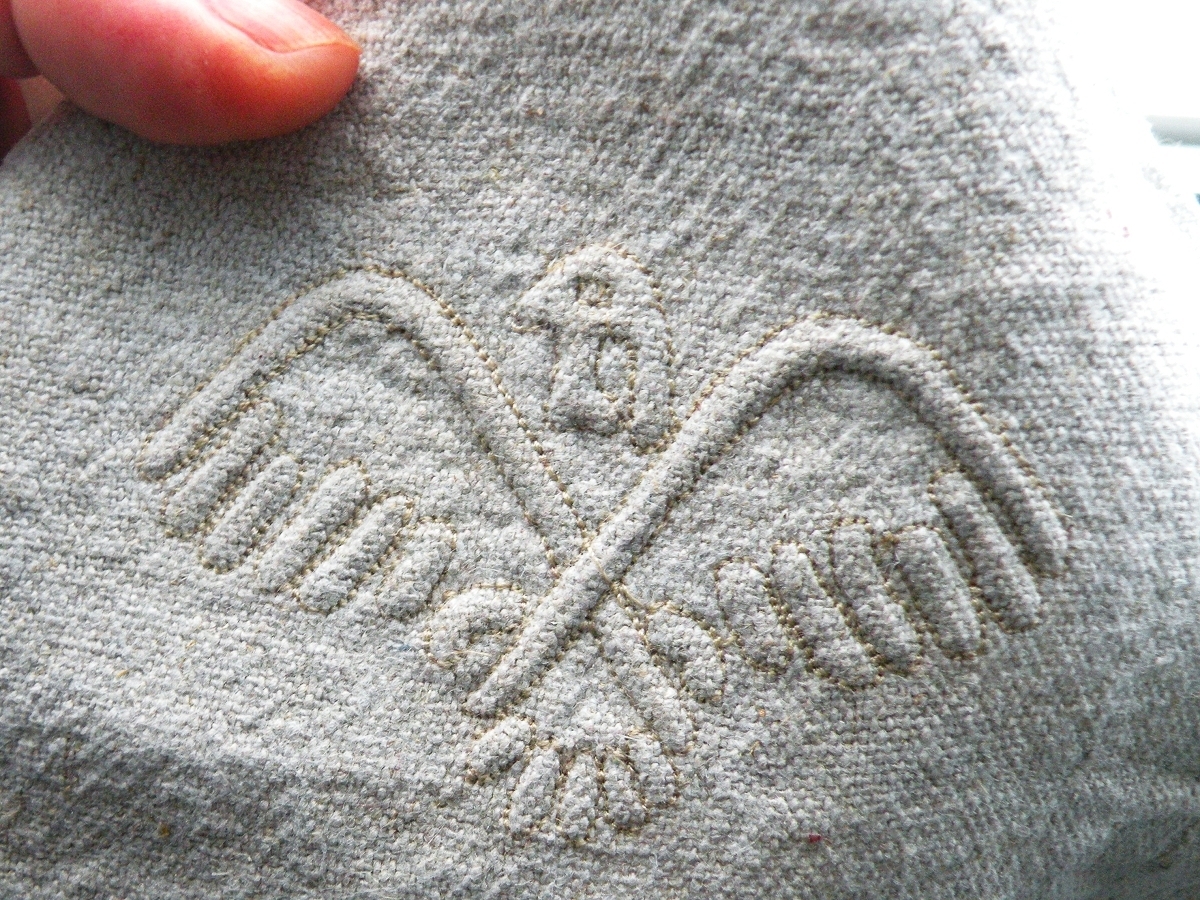
The hood
The hood is actually separate from the jacket; it is just connected to it via buttons.
The typical beak-shaped hood of Connor – I’ve seen so (too!) many attempts on it, yet I have not seen just ONE that got the eagle motif right.
ALL of the reproductions I have seen have an embroidered eagle on them, but that’s wrong.
See this?
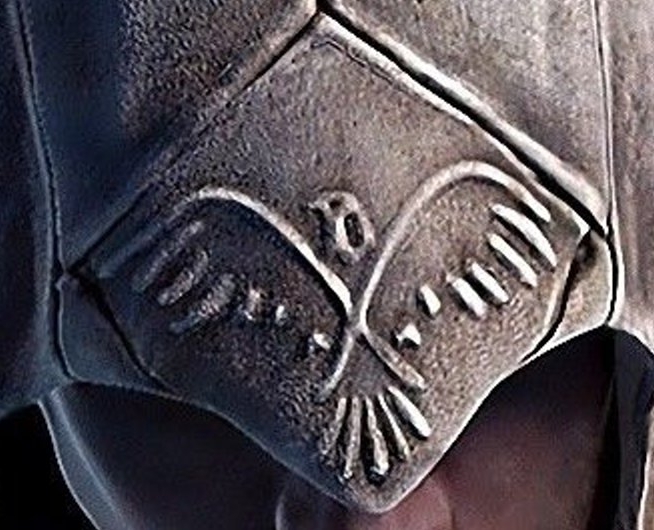
As you can see, you can see nothing. As in „no stitching“, hence „no embroidery“ (or rather – no embroidery that involves stitching OVER the eagle motif 😉 ).
And now you’re probably curious as to how this can be done. Just clever shadow / light painting? Is it tooled leather? Puched rawhide…?
No, it’s not any of those.
The technique to achieve this raised effect on fabric is called „Trapunto“.
You may want to watch this video on Youtube (and ignore the fact that the motif is outlined with red thread – just imagine outlining it with thread that’s the same color as the fabric…) to learn how it is done. Of course you’re also free to google „Trapunto“ beyond watching the video to get an impression how it is done.
So this is how to actually achieve the raised but not embroidered motif. Yes, it takes much more time than to just embroider it – but it looks MUCH more like what we see in the rendered promo images as well as to what’s seen in game. And, of course to my utter joy, the Trapunto technique would also be historically accurate.
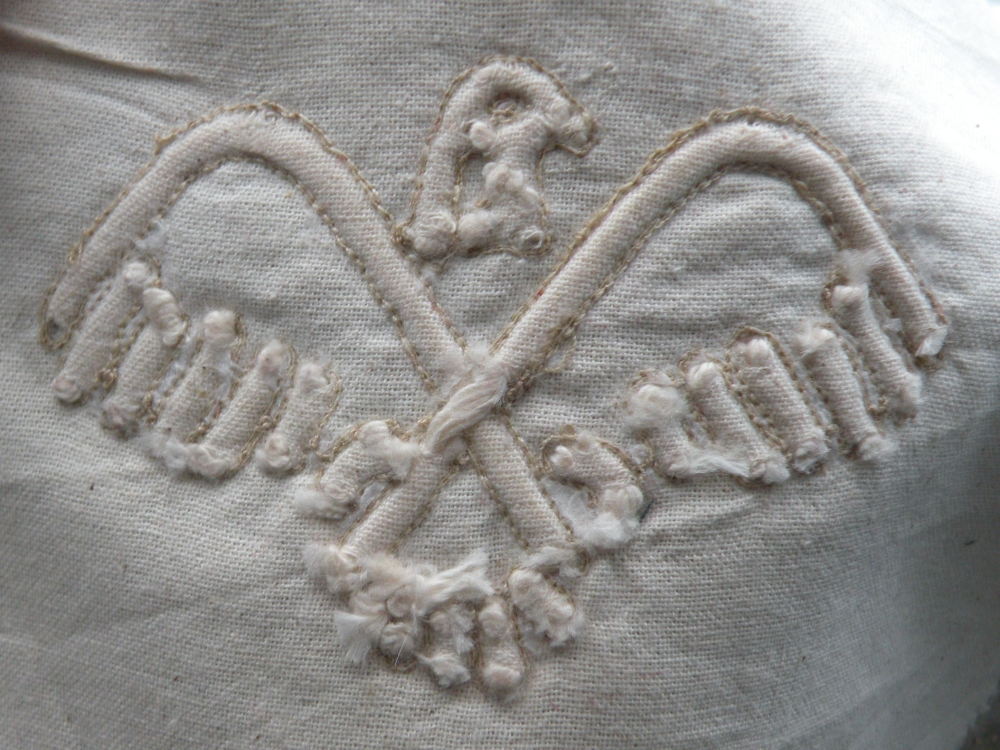
So here’s my Trapunto-stitched eagle motif:
Just in case you’re wondering, this is how the motif looks from the backside. Note that this is NOT the lining, but an interlining to make the Trapunto technique possible:
The vest
The vest is very interesting. It is, historically, nothing I’ve ever seen.
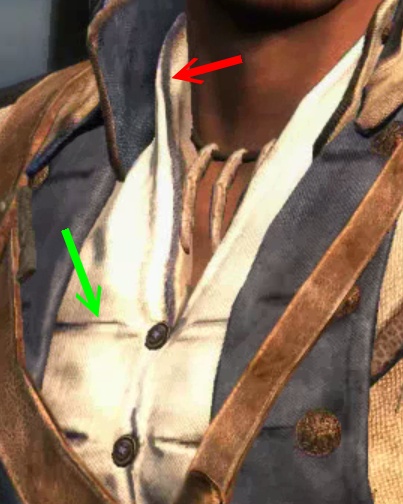
Now, the red arrow points to what seems to be blue piping along the edge. I’m fine with that; it has historically been done.
However, the green arrow points to some weird „slits“ that are all over the front of the vest.
At first I thought that maybe those were bound buttonholes; but they do indeed cover the entire front of the vest which would, well, be a moot point for bound buttonholes. Also, on close inspection, the slits aren’t actually „bound“ (like bound buttonholes) but basically „pleats“.
The only method to do that is to actually MAKE pleats, all over the front of the vest, in the process tripling the fabric in that place.
There is a decent pattern available on Deviantart – here, to be precise – but it’s really just a starting point, particularly because the number of pleats (and buttons) is wrong on that pattern.
The original vest, as per the texture, has six pleats and buttons, while this pattern shows seven pleats and buttons.
Here’s a picture showing the vest texture from the game to prove this:
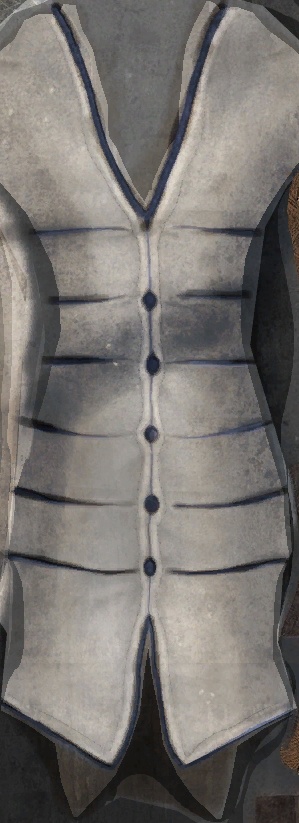
So that readily available „pleated“ vest pattern would have to be changed insofar as that one pleat has to be eliminated, and all other pleats have to be readjusted to be evenly spread along the length of the vest.
Also note that from the texture, there’s pretty much „as much unpleated space“ from shoulders to first top pleat as there is from last bottom pleat to the end of the vest.
What I did first was to basically derive a vest pattern from the texture you see above, then cut the pattern for the front sides apart at the pleats and added more „space“ between the pleats (to be able to actually pleat the fabric while keeping the length).
After that, I pinned the pleats down and first gave the pieces some thorough ironing.
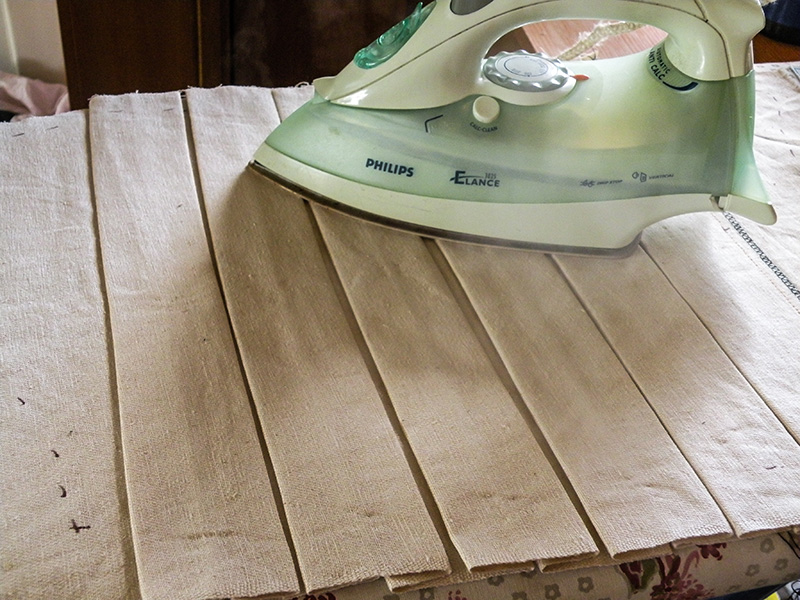
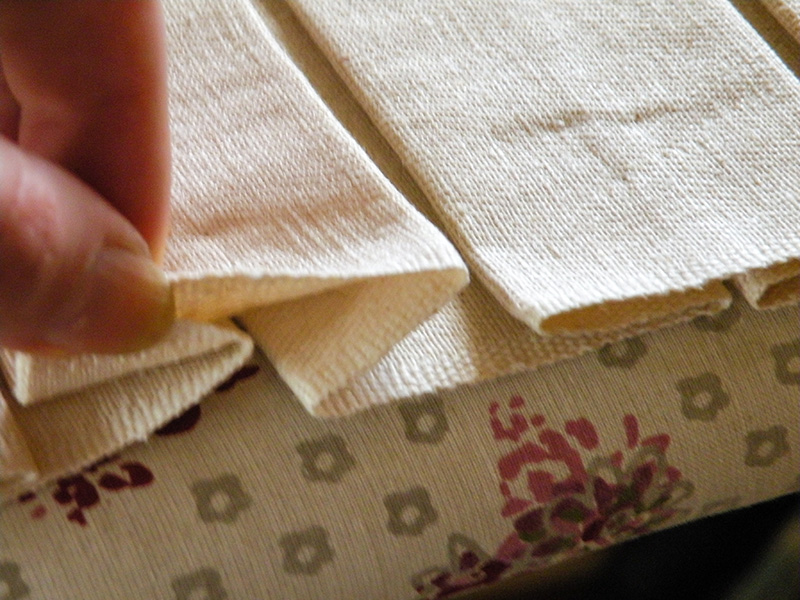
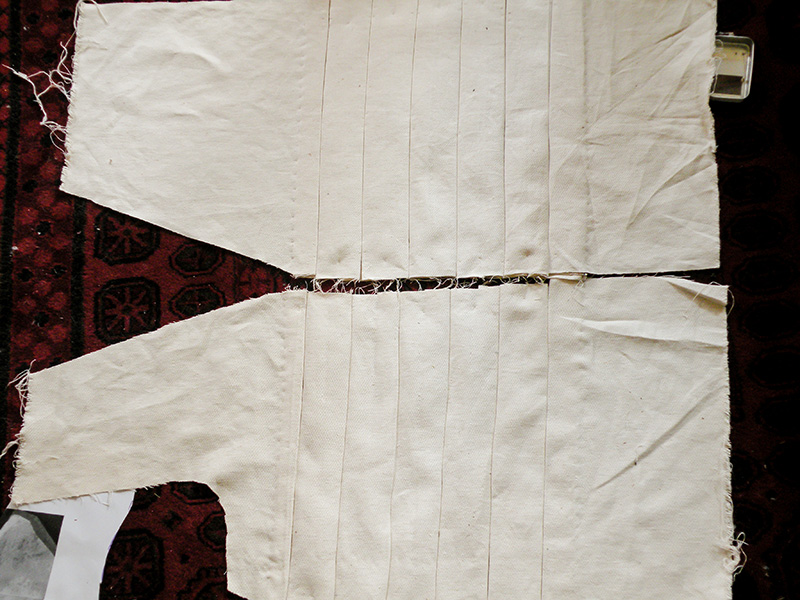
Just to illustrate it closer, this is how the pleats are laid out:
Now, since you can’t really use a sewing machine to sew the pleats down without that being visible on the front side, I stitched the pleats down by hand from the backside. It’s basically joining the edges of the pleats without catching any of the part of the pleat that shows at the front.

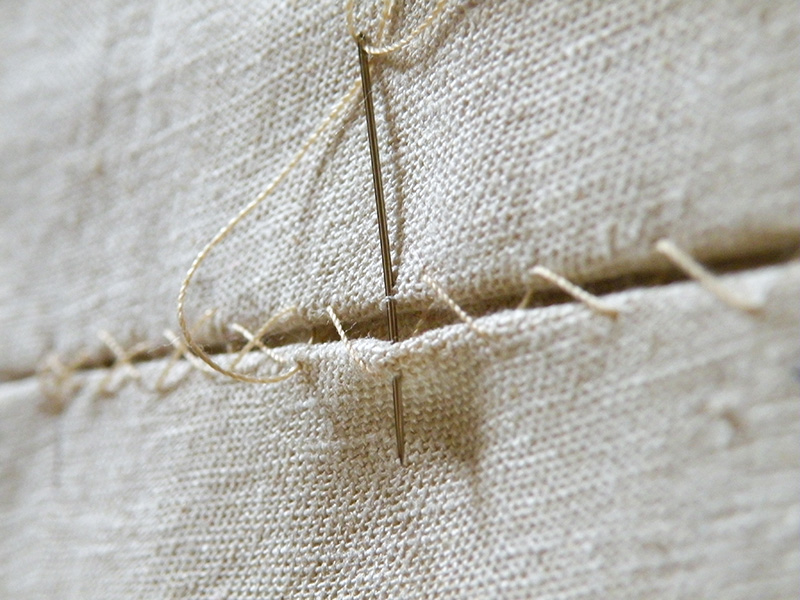
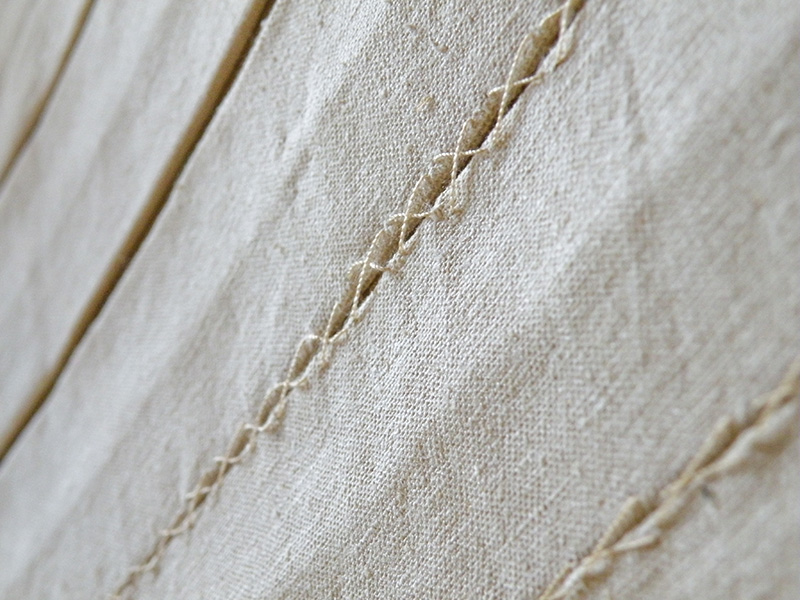
On the upper and lower pleats, I had to sew extremely careful to just catch one of the fabric threads, so that stitching would STILL not be visible on the front:
And here’s a photo of the two finished, pleated vest front pattern pieces:
The Quiver
Now, Connor’s quiver is something that really, really surprised me.
All other reproductions of it that I’ve seen so far were made from smooth or suede leather (or man-made materials that strongly resemble suede or smooth leather).
As you can see, that interpretation isn’t really far away from what you can see in screenshots and promo images from the game, such as this one:
However, during my own analysis of the original game textures as well as the original quiver object from the game, I was surprised to find that the in-game quiver is actually NOT leather – neither suede nor smooth!
I have rendered the following image that shows the quiver from all sides – using the original game quiver object and the original textures! – to prove it:
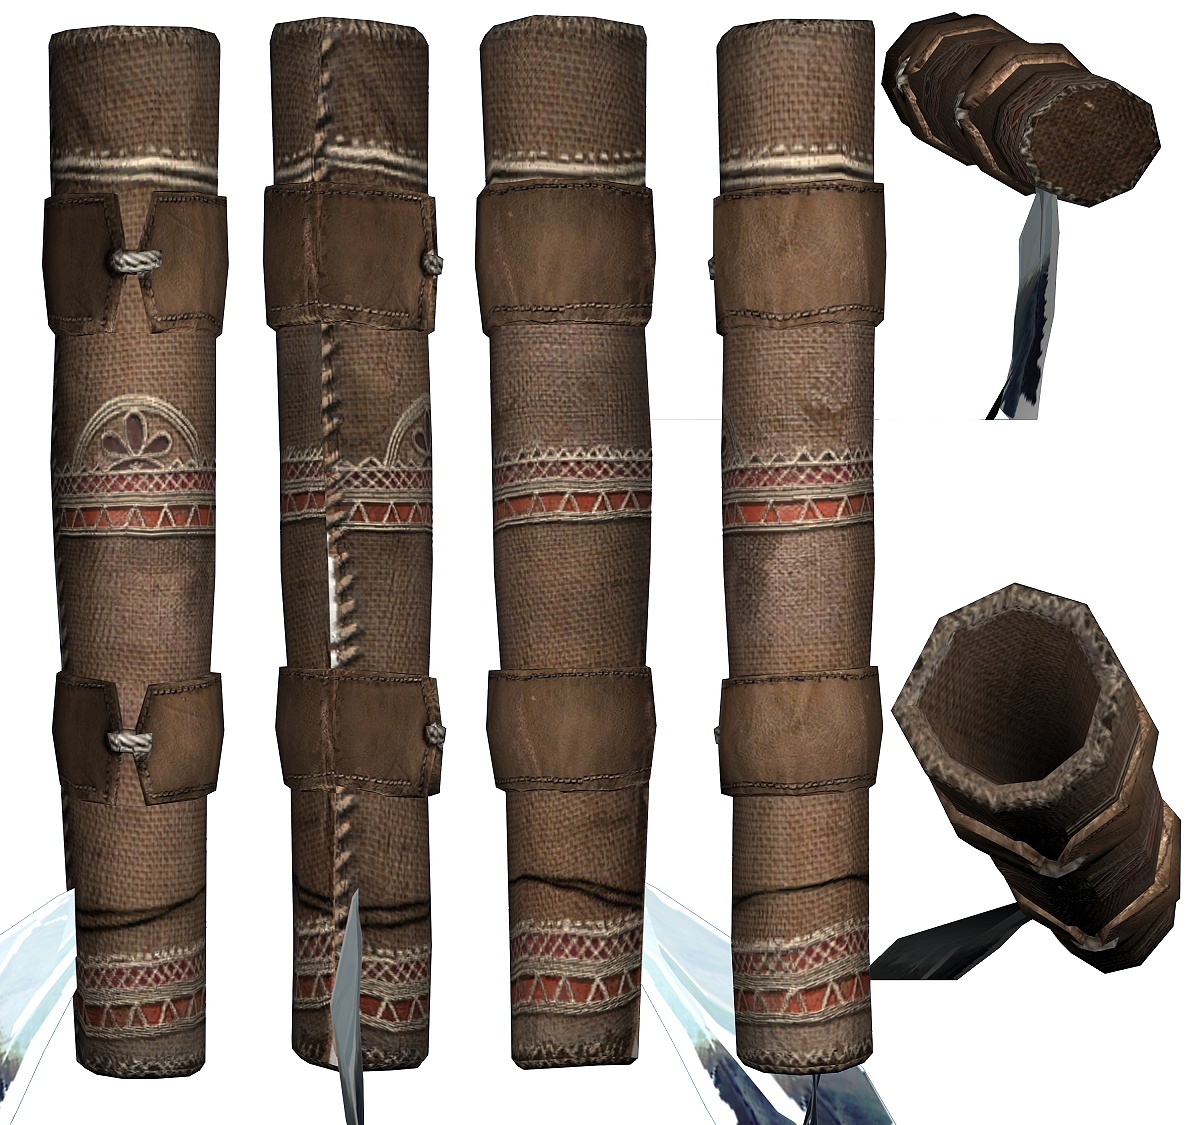
As you can clearly see when clicking and enlarging the picture, the base of the quiver is very obviously either supposed to be made of jute or coarse linen – NOT leather of any kind. The two straps that run around the quiver are leather, yes; but not the base of the quiver (the part with the red inlays and white thread embroideries).
As I said – I was surprised; and probably as much as you are now.
Materials list
grows as I obtain the materials).
Note that those are really just the material prices; shipping not included if I had to order them somewhere.
| Item | Material | Price |
| Jacket | Denim, 2 yards | ~20 $ |
| Stag leather, 1 skin | ~30 $ | |
| Coarse linen, 3 yards | ~40$ | |
| Buttons: Sheet metal, epoxy resin, molding silicone, wire, paint | ~25$ | |
| Armbands | Magnesite beads in red, blue, white and black | 28.80$ |
| Vest | Hemp twill | ~30$ |
Navigation for these costumes:
My motivation – Connor Kenway – Aveline de Grandpré – George Washington
Wow, this is great!! I’m actually building this costume right now for the Texas Renaissance Festival. I’ve seen quite a few people do this costume very very poorly and my goal is to be authentic as possible, not only to the time period but also to the character. I feel a connection to this character being that we both are half native American and half European and I felt I needed to do him justice. I will definitely be using your page to finish the coat and the armbands.
Thanks a lot!!
You are such an amazing costumer! I adore pouring over all of the incredible costumes you have posted! I am a BFA costuming student here in the states and for a while now I’ve been planning the making of a Connor costume. I am so happy to have found your site earlier last year! The texture and size of the beads you ordered for the armbands are so beautiful and perfect for the project, yet I am hesitant to order them after reading so many negative reviews for the jnsbeads site. Were there any issues or problems that you had with your order?
Also, I cannot wait to see the Assassin’s Creed outfits you’re making! It will be incredible!
And your Jupiter Ascending gown will look utterly gorgeous 😉
Thank you! 😀
As for JnSBeads, yes, I ordered from that website and had absolutely NO problems with them – otherwise I would not have linked that website.
Of course many people do not seem to realize that they are not based in the US, but in Hong Kong; which results in longer shipping times and occasionally (depending on the order value) on customs charges. So that, I think, may be a reason for negative reviews from people who expect to receive their beads within a days (instead of weeks), lol.
As for Jupiter, I just hope that I can do that gown justice. You see, while I love to create those reproductions, I basically hate myself (as in: the way I look). Occasionally I also have the idea that slowly but surely, I’m too old for those gowns, lol. Never mind, that’s just me 😉
Hi. I really love your site! Verify informative and at the level of detail and analysis that explains a lot. I haven’t done any button making and was reading your part on the buttons. At the end it says „I used those master buttons to make silicone molds“.
What type of silicone did you use? Like is caulking silicone okay?
How did you make a mold from that? I can think of perhaps laying out a bunch of silicone and pressing the epoxy molds into the flat cookie sheet like silicone and using that then to I guess pour pewter or perhaps aluminum.
I’m guessing a lot of hardware stores have some metal I can buy and melt in a cooking pot to pour into these molds?
Oh also where did you order your leather from? We have local Taddy Leather shops around here, a bit of a drive but they have a good selection (bit pricey).
I was hoping to make this outfit by halloween but with my lack of sewing experience I ‚dout it will happen. My mom has a machine I could use, which I think could handle the thicker material..
No, caulking silicone is NOT okay – this is a special molding silicone, which, opposed to caulking silicone, does not „dry“ but „cure“ (and within minutes, even). Also, this is cold cast metal (metal powder in polyurethane resin), not real metal. Please DO re-read what I wrote instead of just looking at the pictures; I even brought out a link to my „cold cast metal“ tutorial in the text; which should help a lot understanding the process of cold casting metal.
I buy my leather from two German Ebay sellers.
Only few sewing machines – particularly older ones! – have the ability to sew through leather that thick; but even they have limits – some parts have to be hand sewn
Hope that helps!
hey 🙂
nice work on al the 3 costumes 🙂
now, are you done with this (and aveline’s) so you can show us pictures?
and what pattern did you use for the coat, on connor ?
I am unfortunately not yet done. Had some emergencies which prevented me from finishing them.
I will finish them eventually; cannot say when exactly, though.
For Connor’s coat I’m using an 18th Century gentleman’s coat pattern; which I deemed most accurate for that task 😉
This is super duper awesome and amazingly helpful, thank you and I can’t wait to see the finished costume
when will you show the final product? i really want to see it because i am making one too.
Oh, I want to have the three costumes (Connor, Aveline and Washington) finished by the end of May 2014 – so by then I will have pictures of all three finished costumes.
That may seem a long time for some people but I’m also keeping parts of Aveline and Connor on dress mannequins outside in the garden over the winter, to naturally age them – so I really need that time 😉
ok, thanks 🙂