Jupiter Ascending: Jupiter Jones – Wedding gown
(Wedding scene with Titus Abrasax – did anybody else find the concept of wanting to marry your reincarnated mother weird…?)
Note: This gown is mostly finished, but I still need to add some more documentation (i. e. how I made the armbands).
Also, if you learned something from this page and used that knowledge for your reproduction, it would be fair, to say the least, if you would link to my page.
Thank you!
– This gown won the first place at FedCon’s costume contest May 23rd, 2015 –
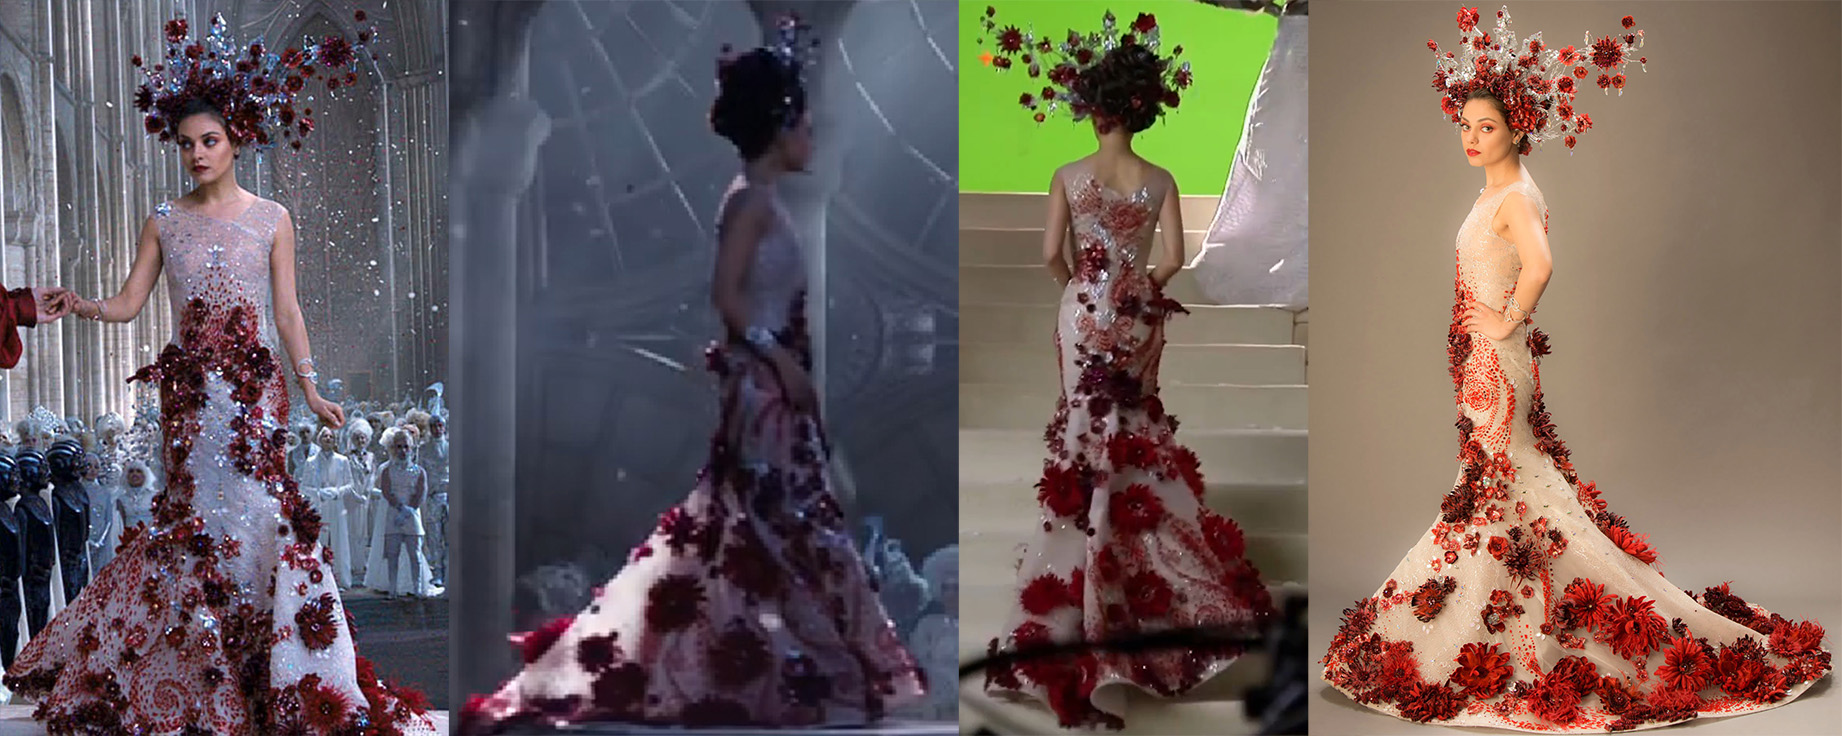
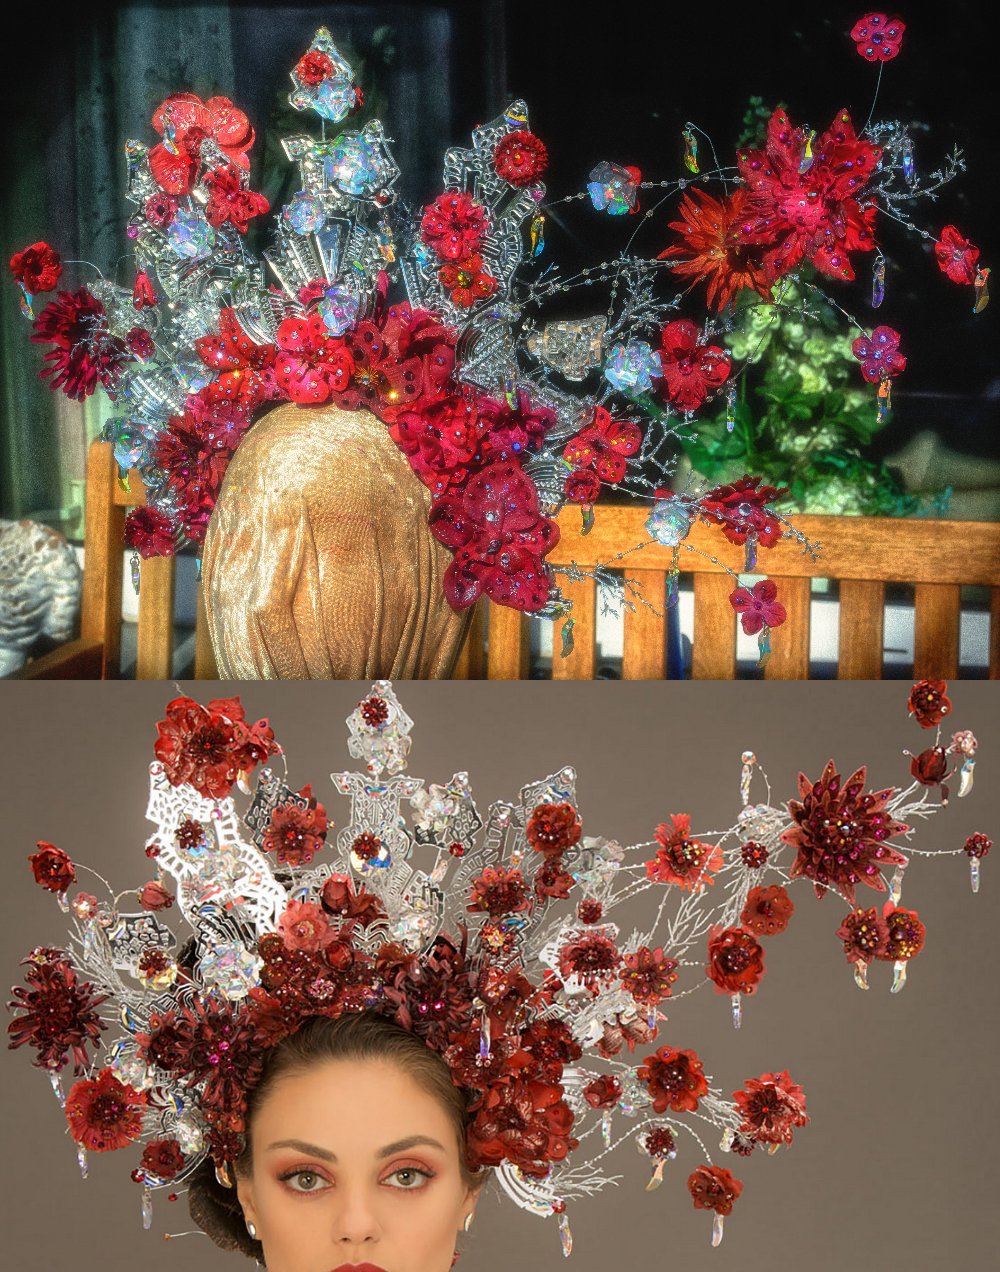
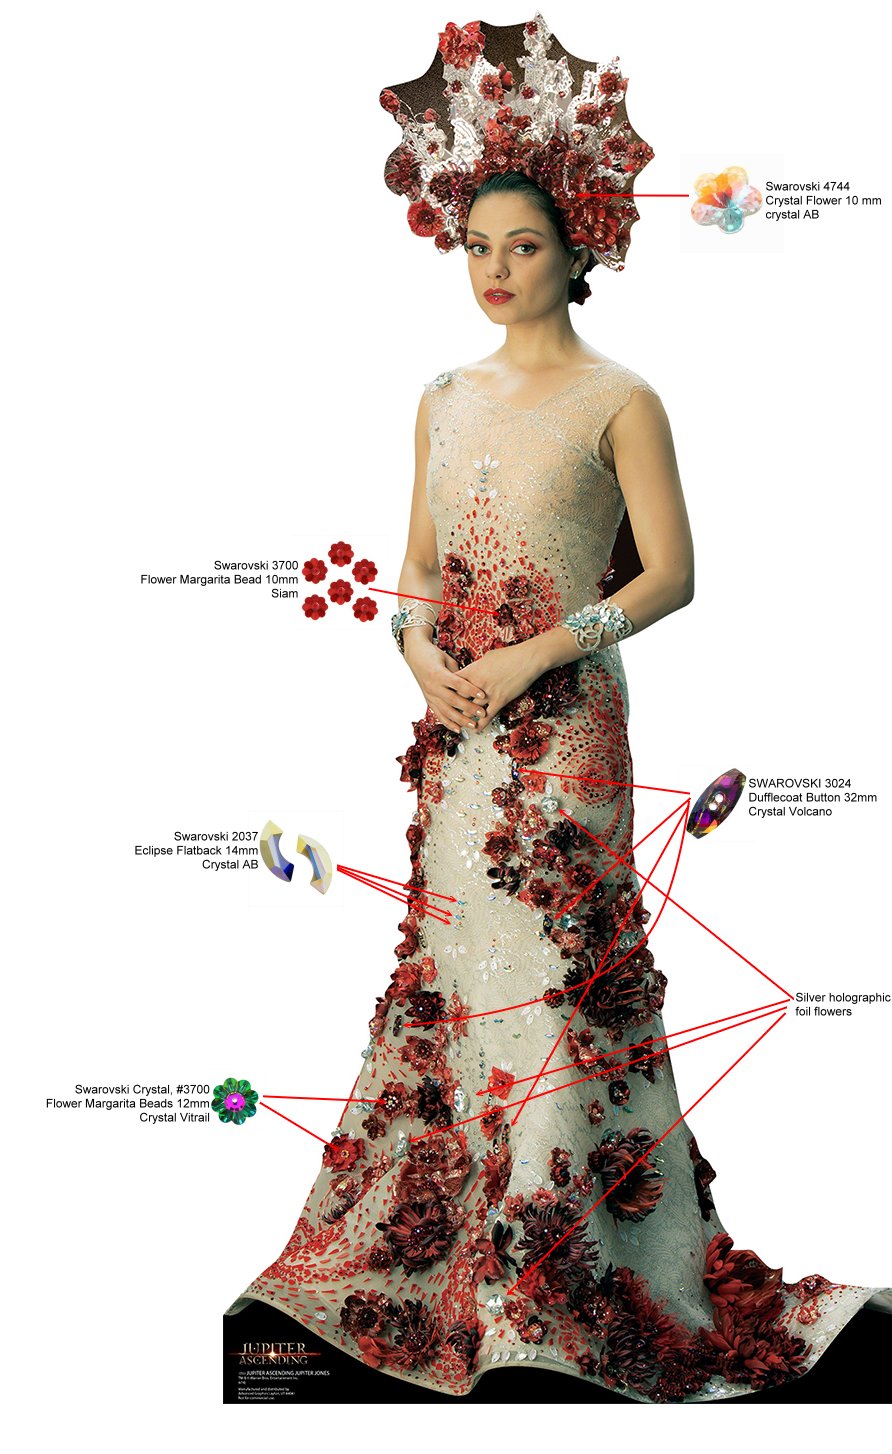
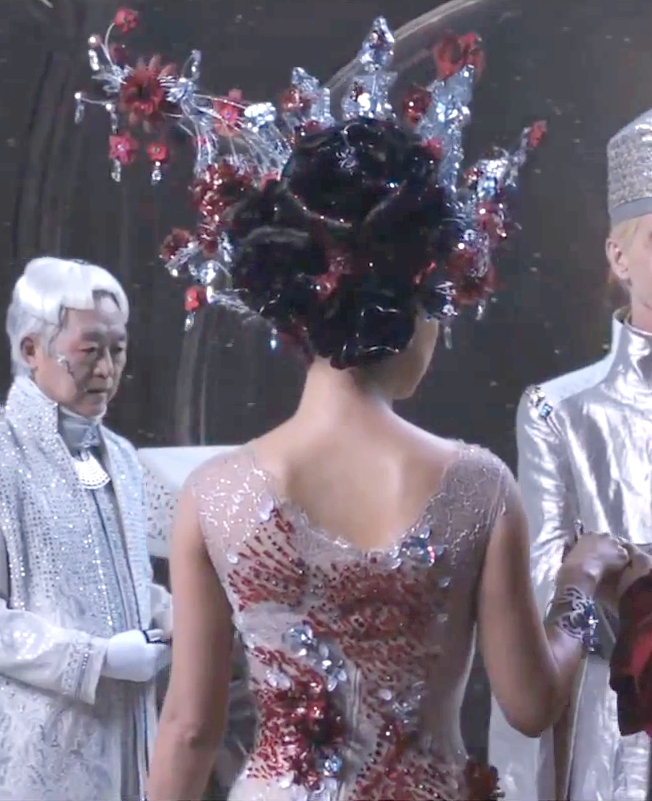
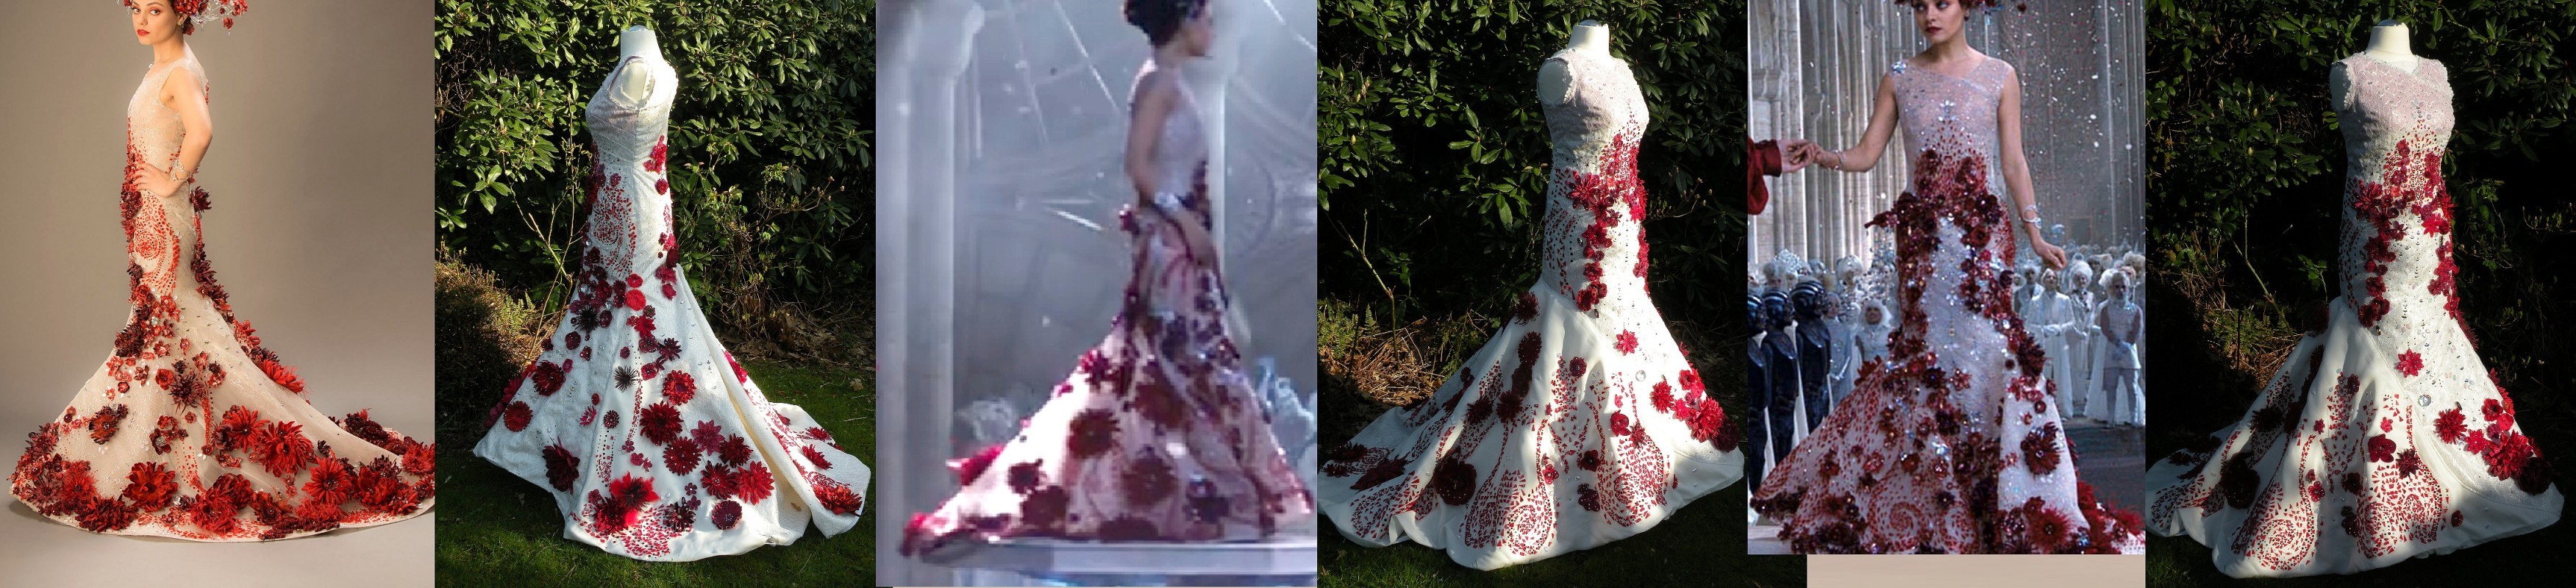
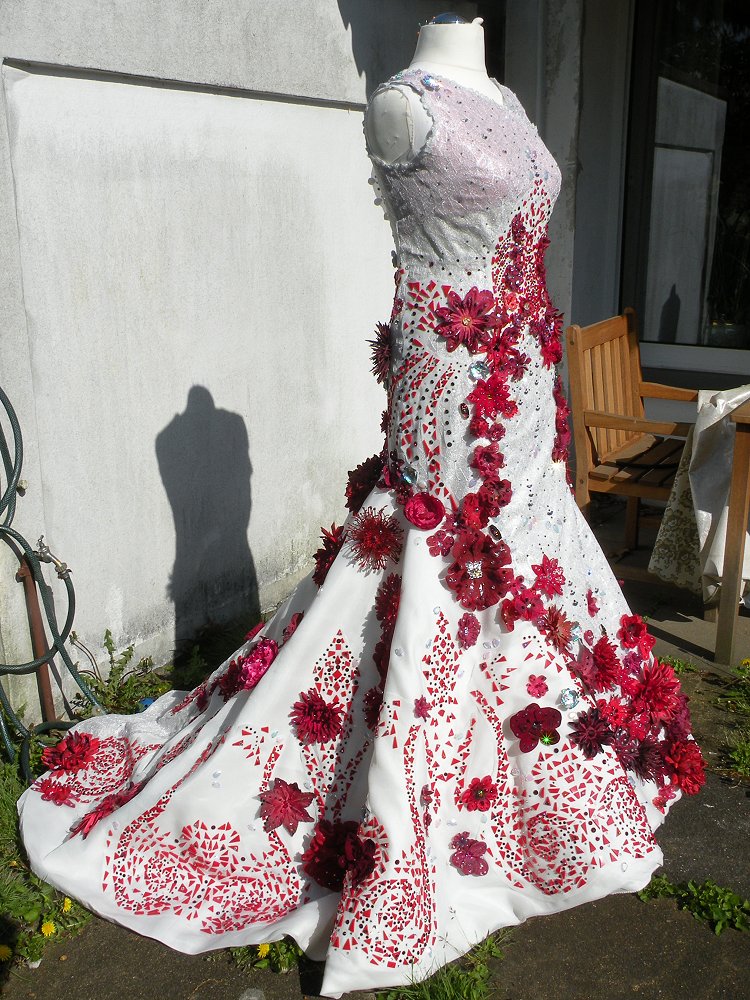
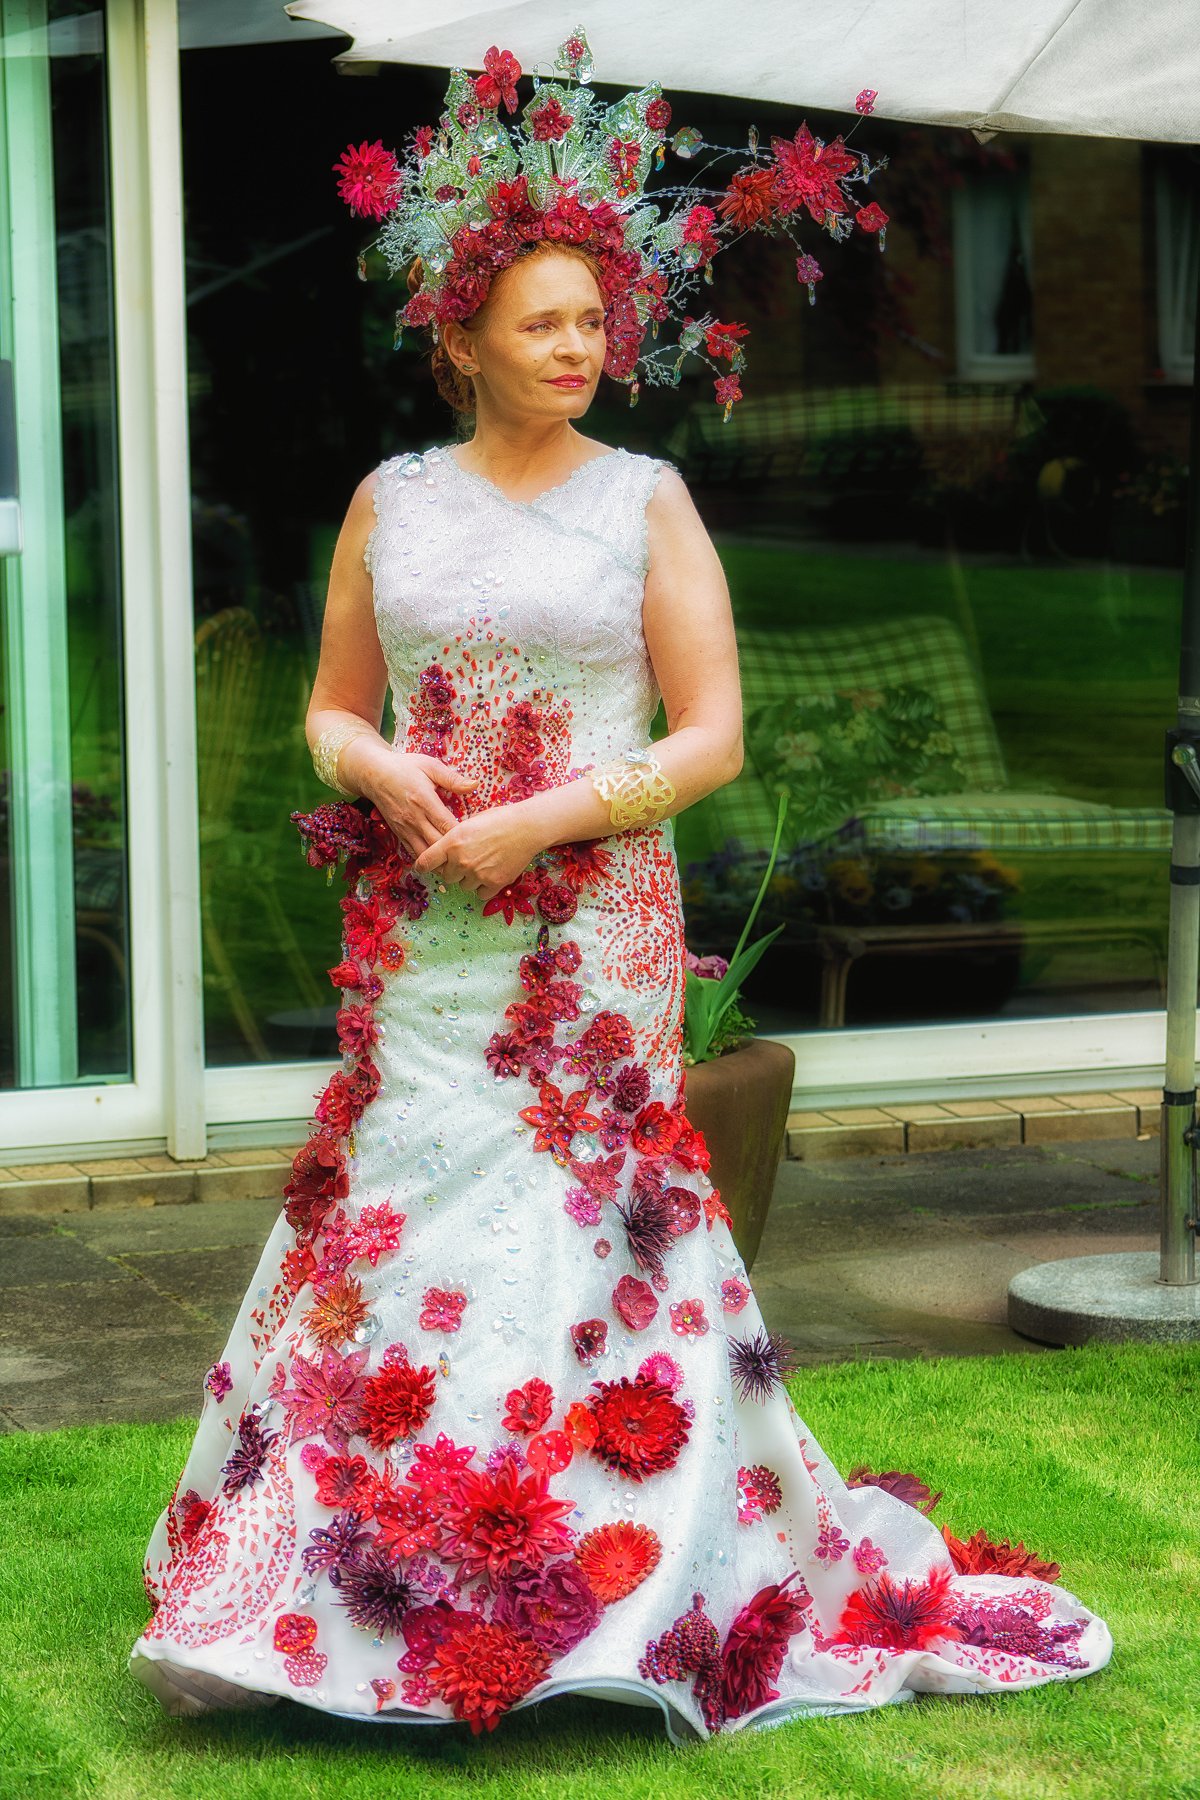
Jupiter Ascending – the original wedding gown from all sides.
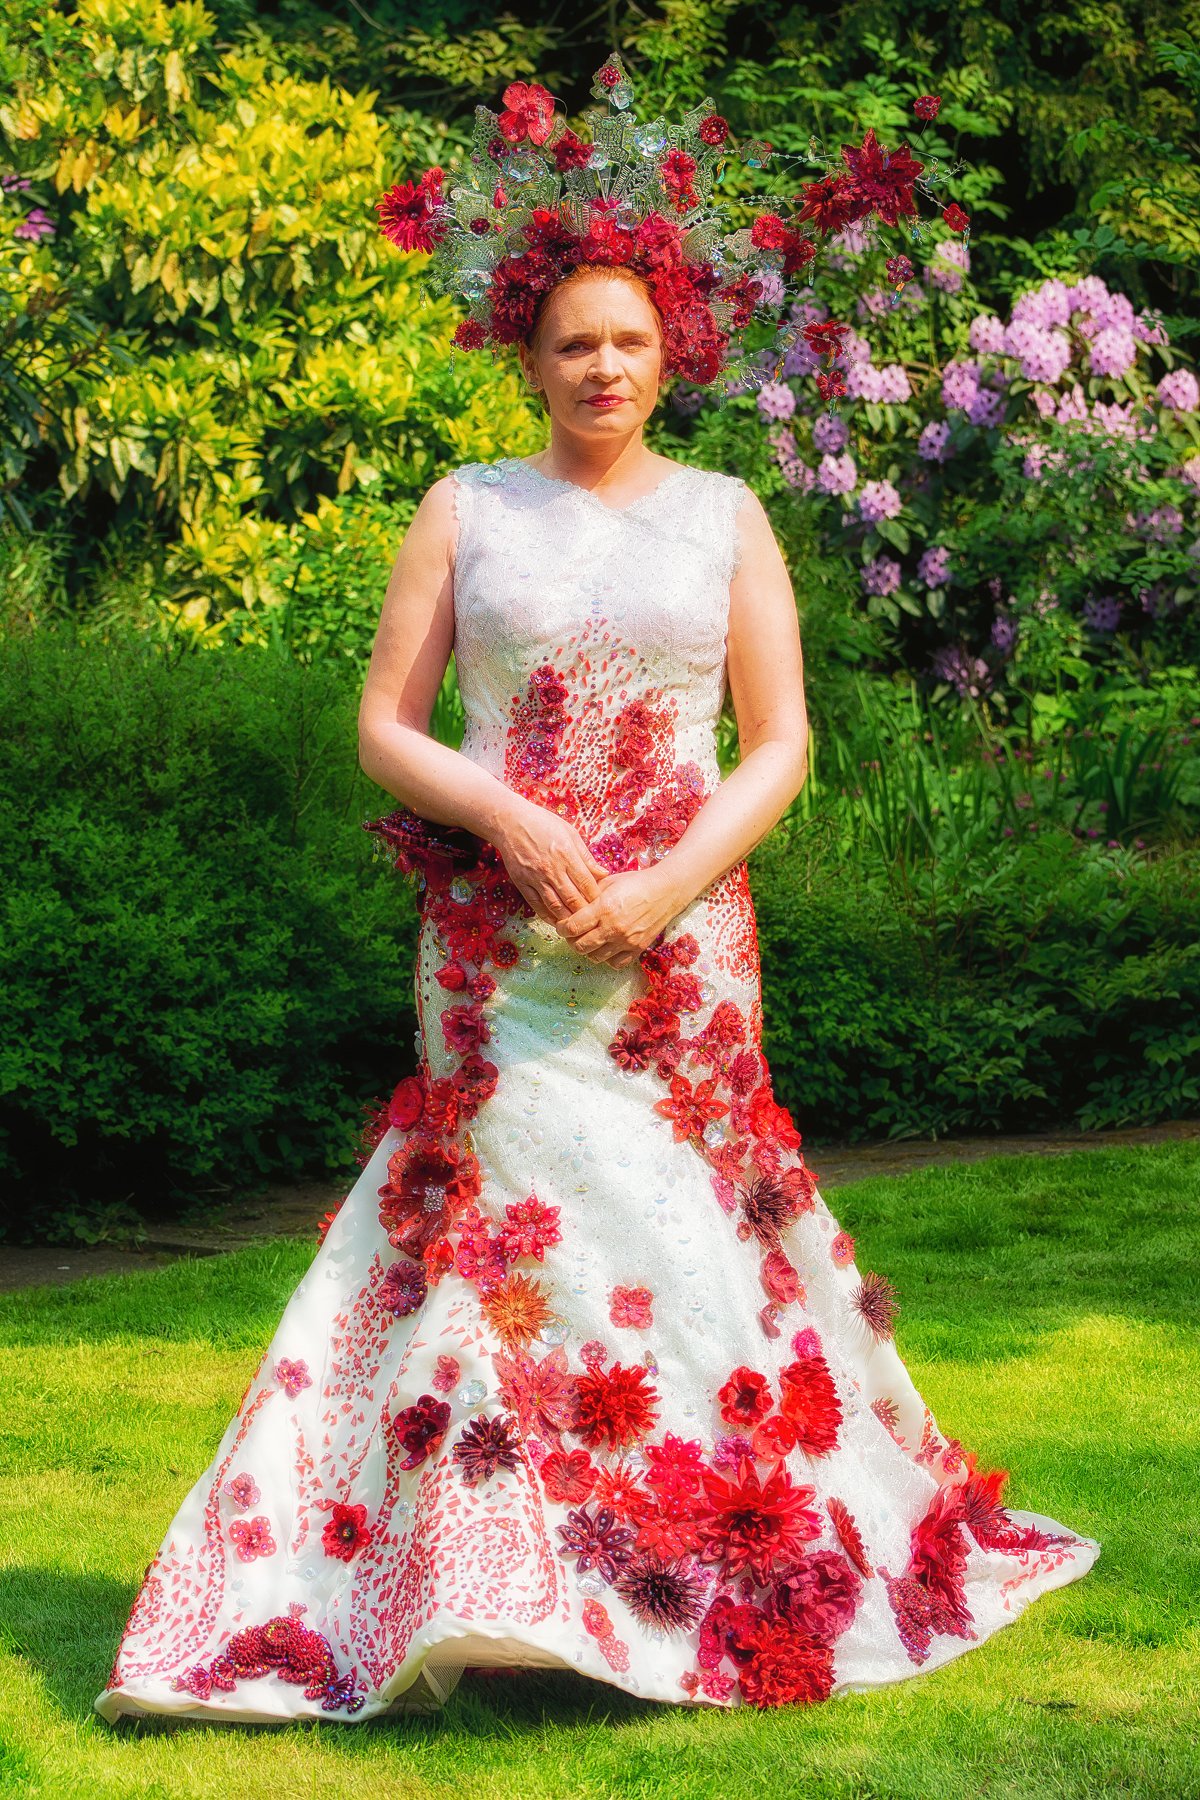
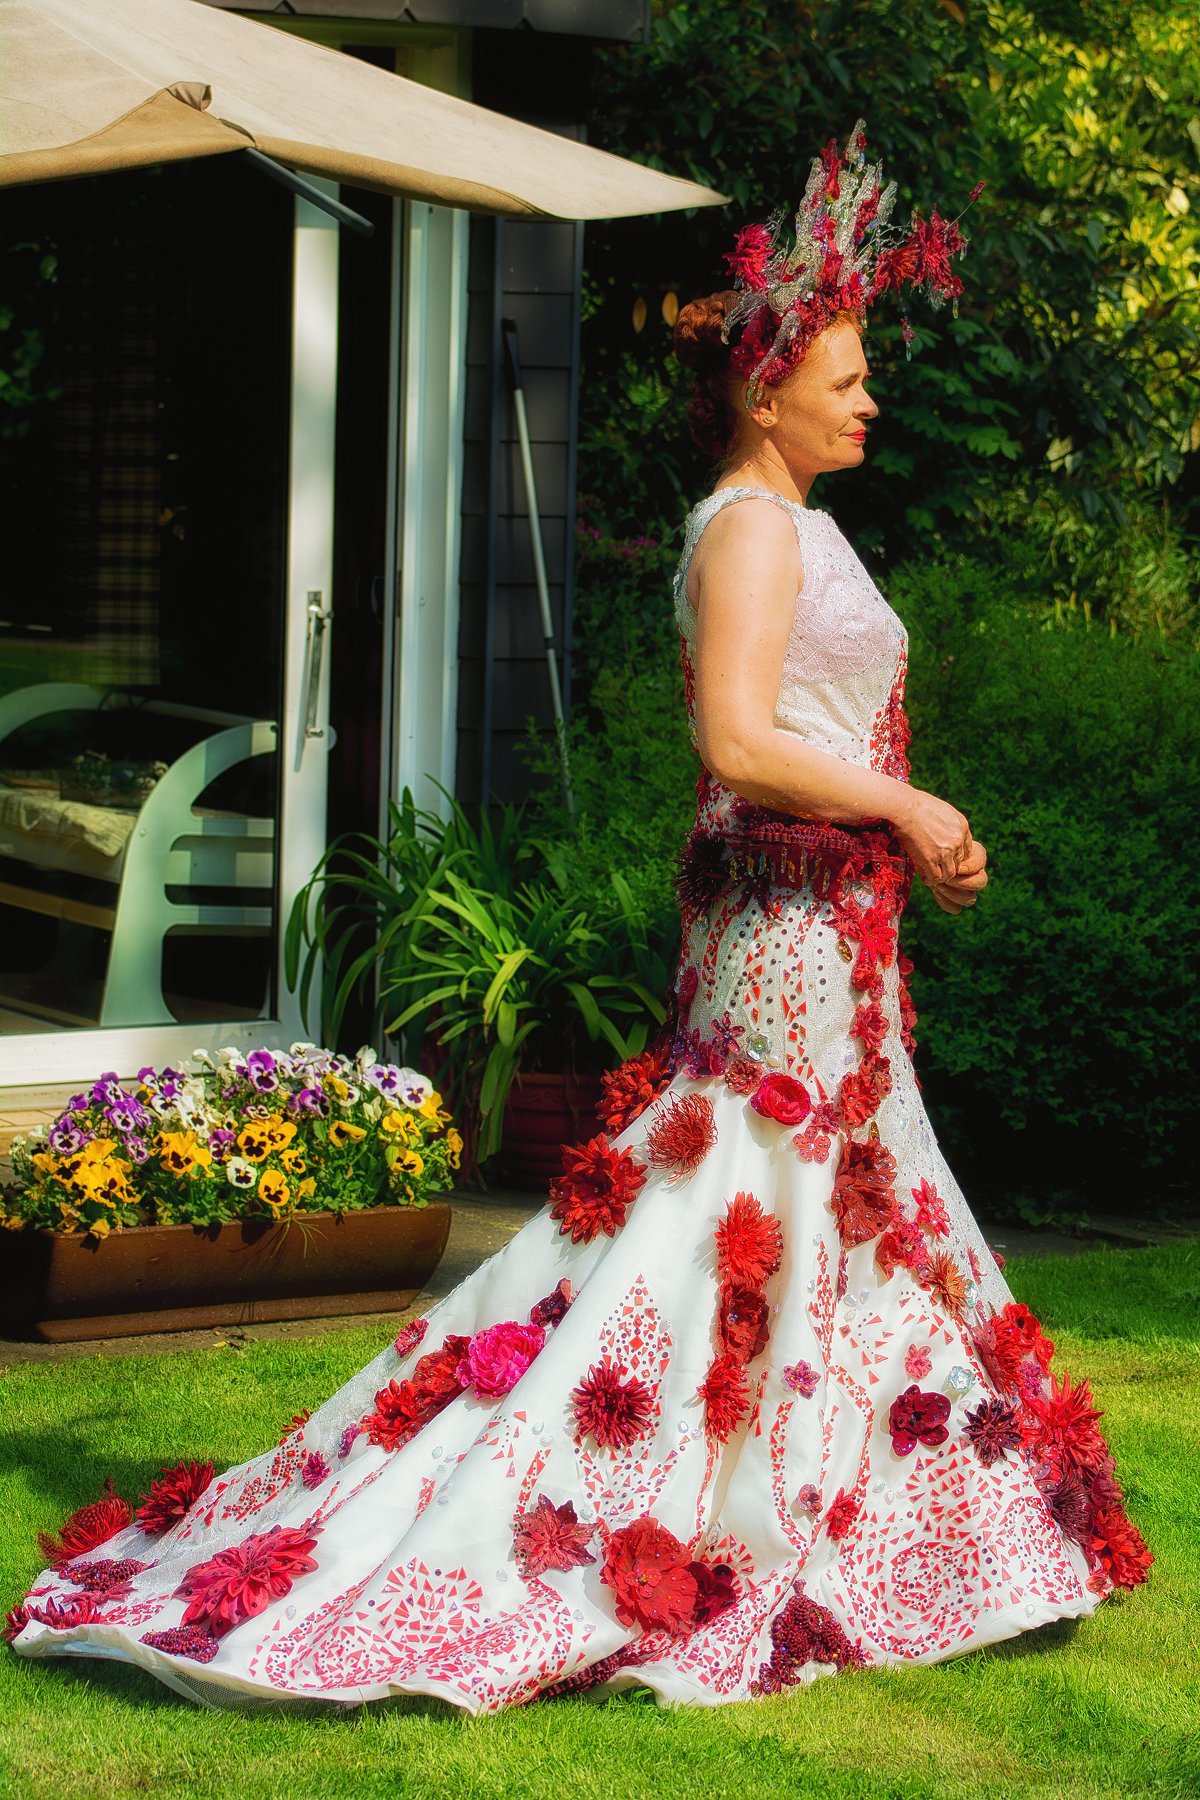
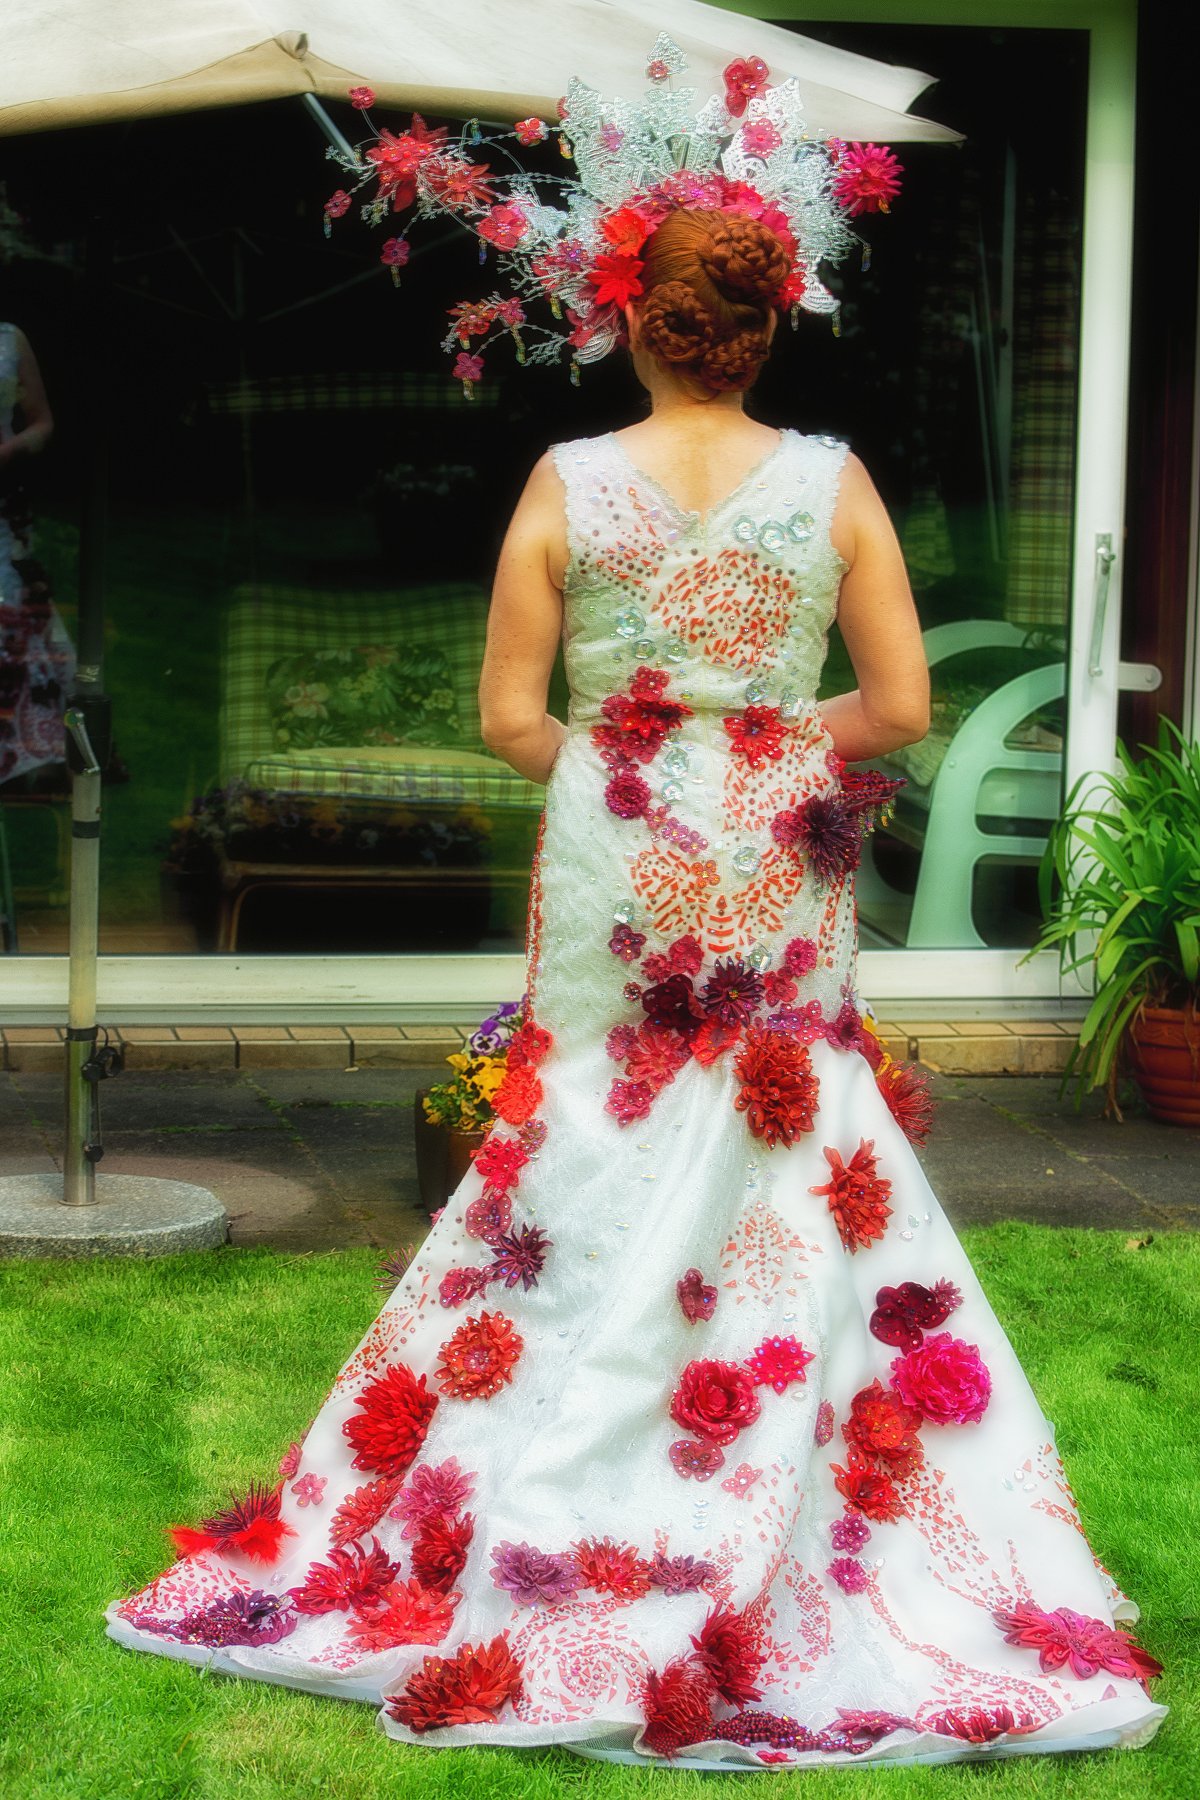
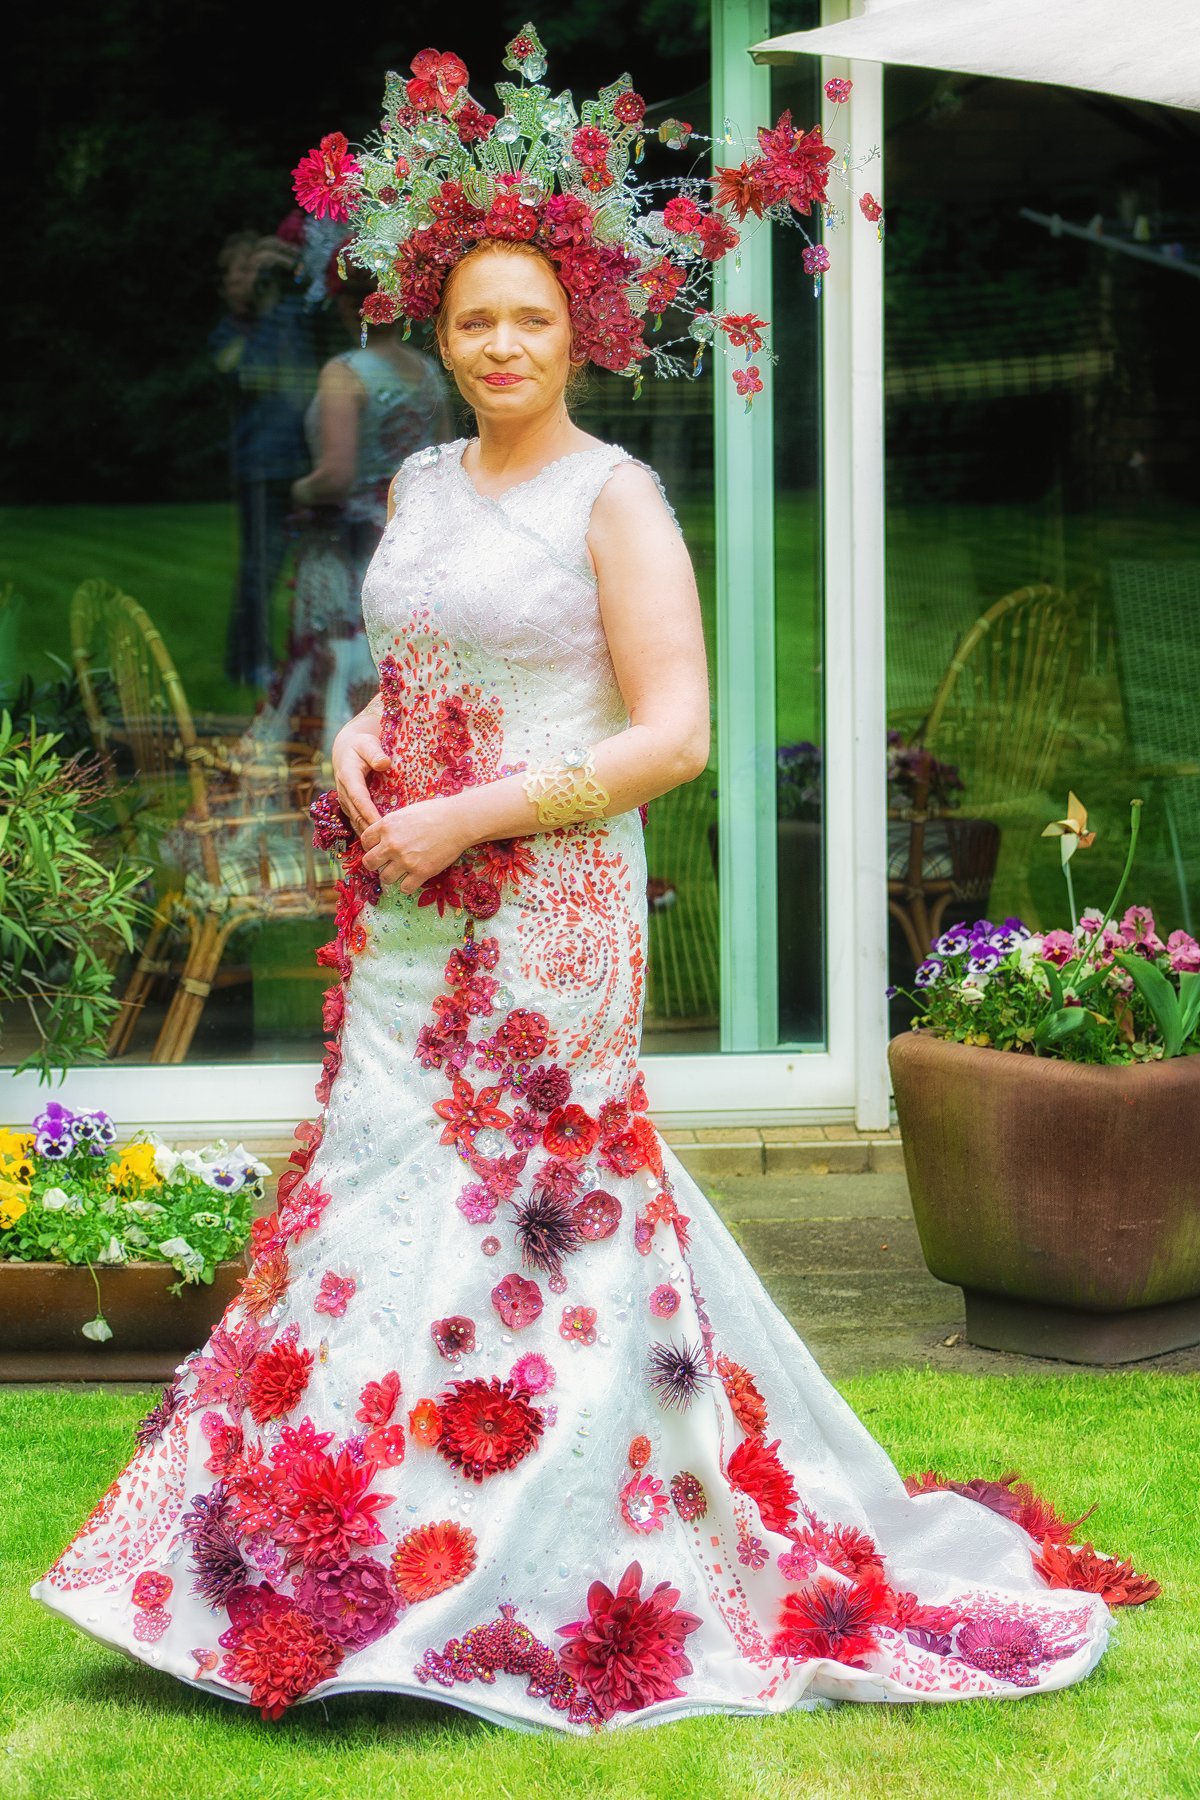
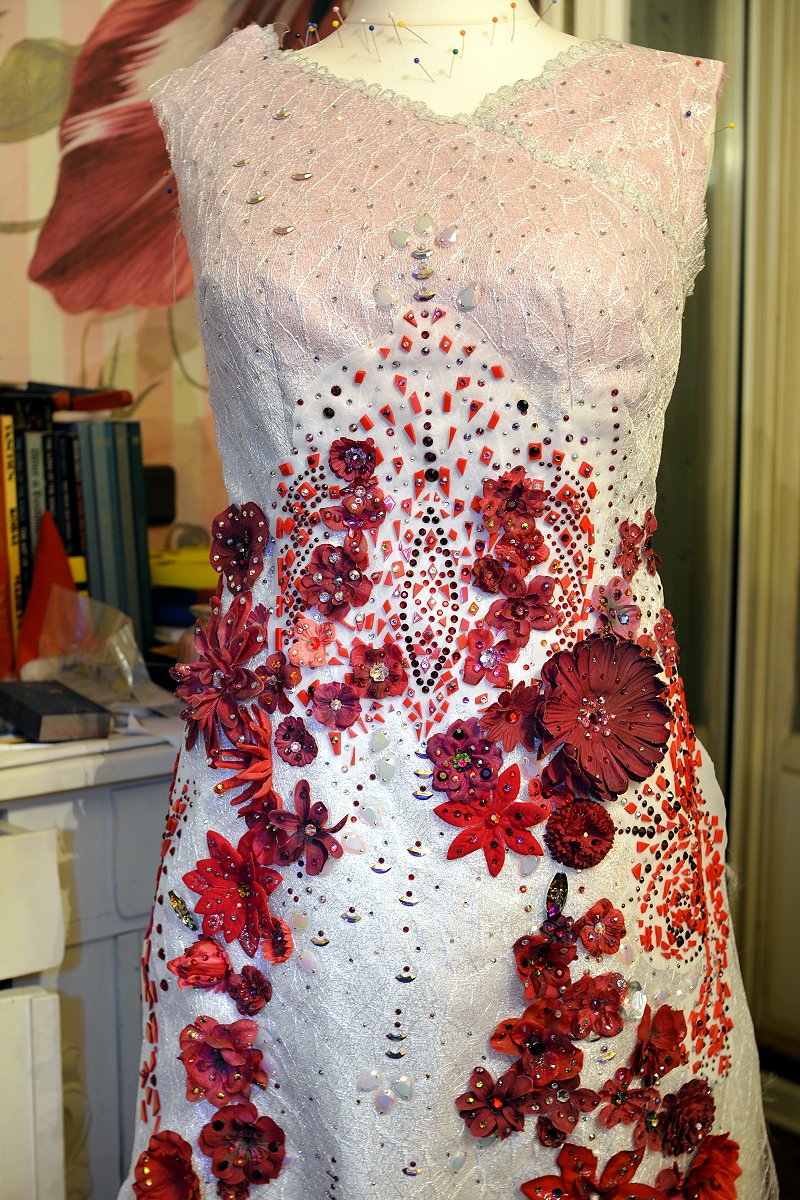
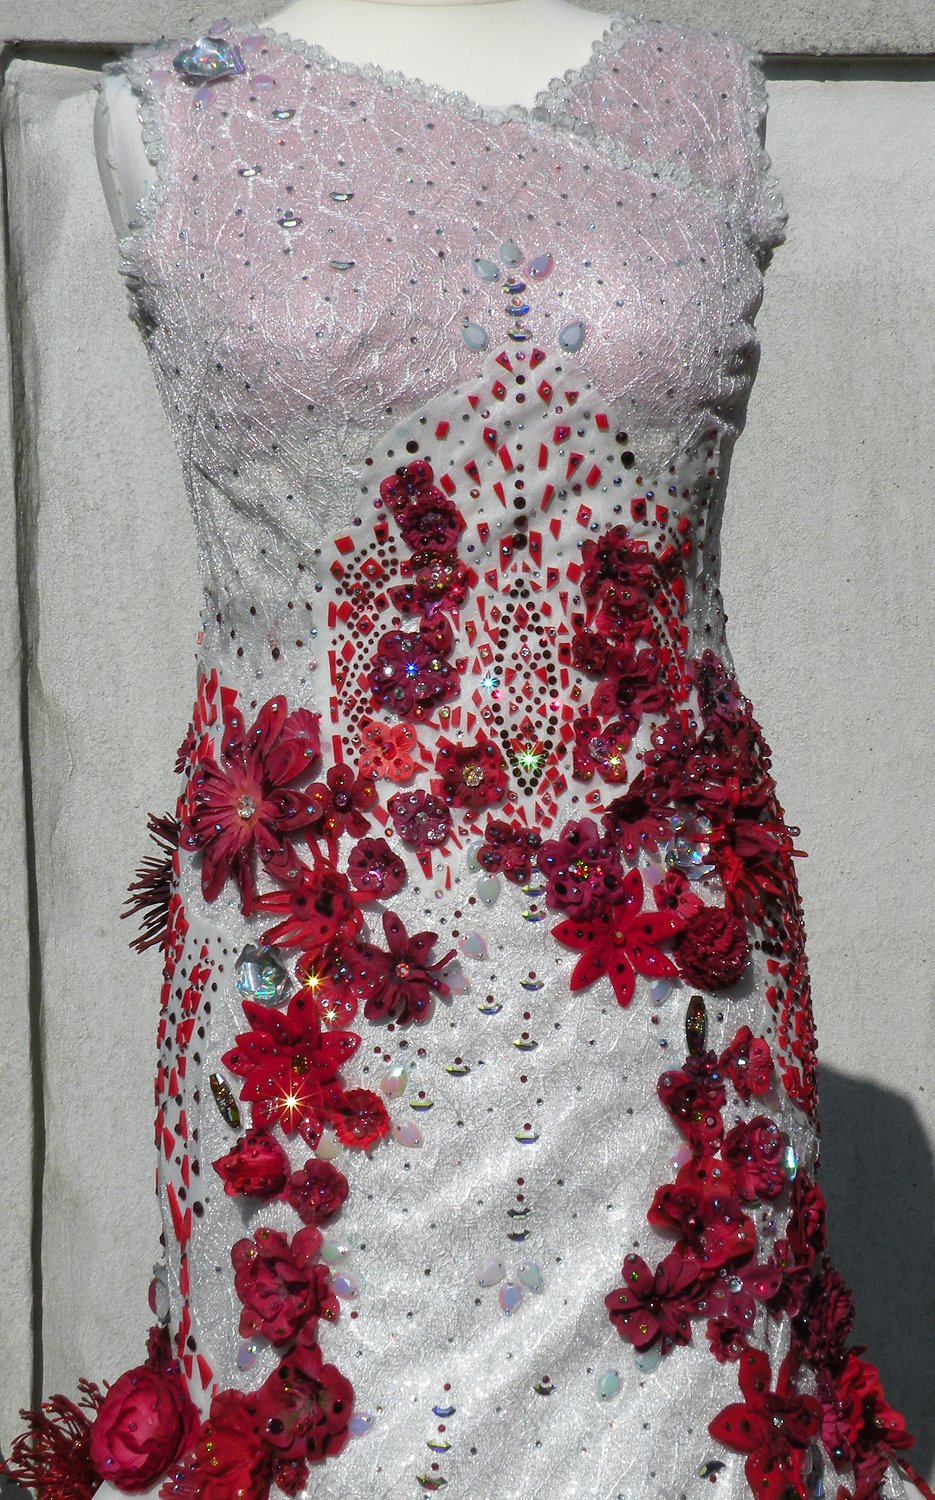
My gown, finished except for some minor tasks (i. e. adding some more rhinestones to certain flowers).
Nine months and ten days – or, to be more precise, almost 1,000 hours of work – 99.9% finished!
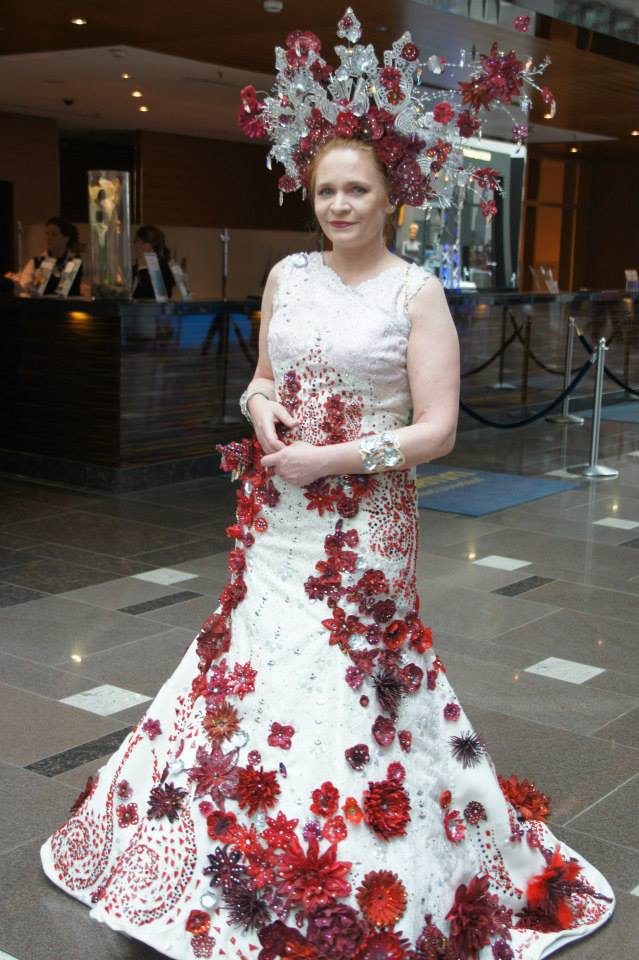
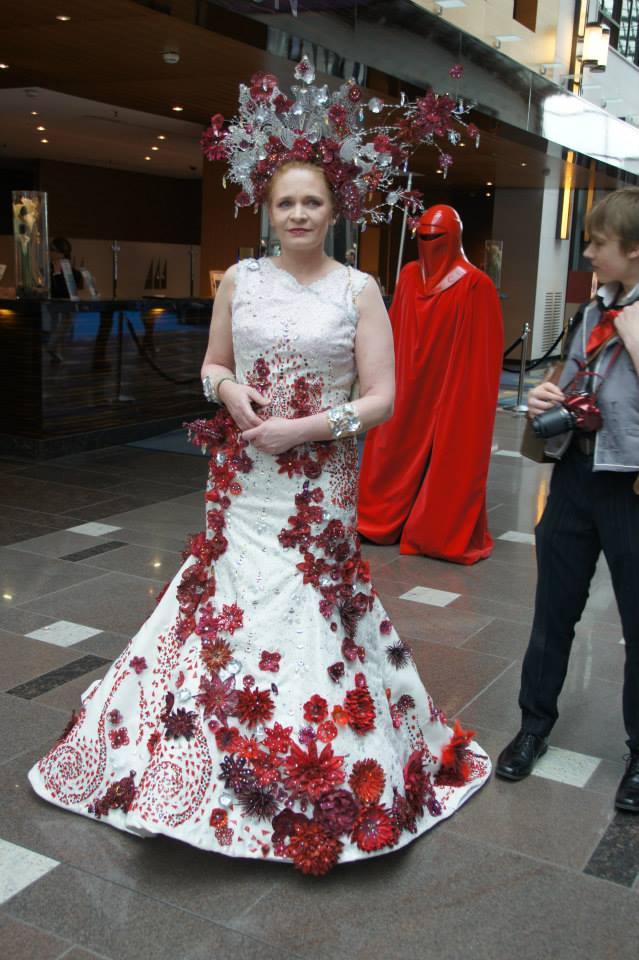
A week later At FedCon 2015 in Germany – 1st place at the costume competition 😀
August 7th, 2014 had me scream out loud. That was when I first saw a trailer for Jupiter Ascending.
When I first saw that beautiful white gown with all the pretty red flowers in the trailer, my stomach instantly turned into a vacuum, sending a clear message to my brain – „MY dress.“
My brain, on the other hand, instantly sent a message back: „Hey, your body is way too curvy for this!“ (because seriously, my body is NOT that of Mila Kunis – not even remotely!)
My heart, on the other hand, lost no time and replied: „SO WHAT? Spanx do exist!“
Since I tend to listen to my stomach and heart, my decision to make this gown was also instantly set.
At that point, the release for the movie had been pushed back to February 2015; which put me in no good position to obtain the lifesize cardboard standee – which I knew I would NEED to get that dress just right. So for a start, what I had was just the image of the standee as well as screen captures from the HD trailers for my initial research.
Eventually, I received the lifesize cardboard standee of the gown. It’s approximately 10% smaller than I am, and if I stand in front of it, my eyes are level with the center of the headdress.
Nevertheless, that helps A LOT in determining crystal placement, types and colors; and to correct a few things from my initial research.
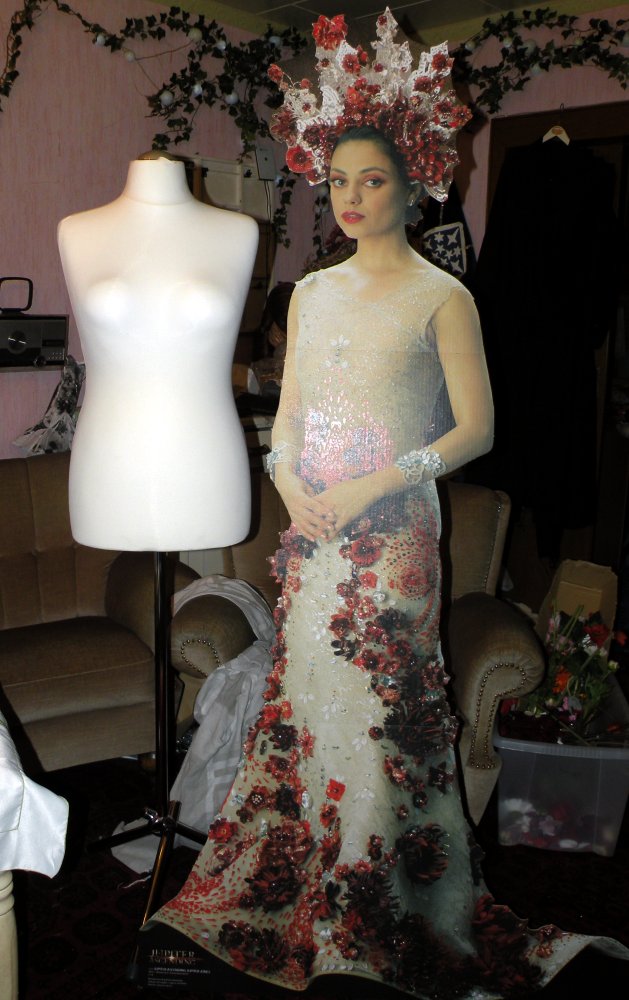
The standee in my living room, next to the dress mannequin which, height- and circumference size wise, is adjusted to my own measurements.
You can see that I’m approximately 10% taller than the standee, which is „Mila Kunis lifesize“.
Now you will probably understand why I have to pick all the rhinestones one size larger – if I would not do that, they would be proportionally off for my own size.
By the way, there’s an interesting costume featurette for that movie now available on Youtube:
To summarize who was responsible for the original gown, as far as I could find out:
The original gown was designed by Michael Cinco; but I can’t tell who made it – designers practically never actually sew the clothes they design.
The flowers and beadwork were created by Angel Amor.
Katherine Wardropper provided the dimensional decorations.
The Swarovski crystals as well as probably the red shapes were set by Adam Dee (which explains why they are on organza overlays on the gown – they were probably created while the actual gown was still created, and later applied to it).
I have no idea which role Kym Barrett – the costume designer of the movie – had in its creation – I assume that after receiving the Cinco gown, she came up with the concept for the flowers and rhinestones.
The headdress
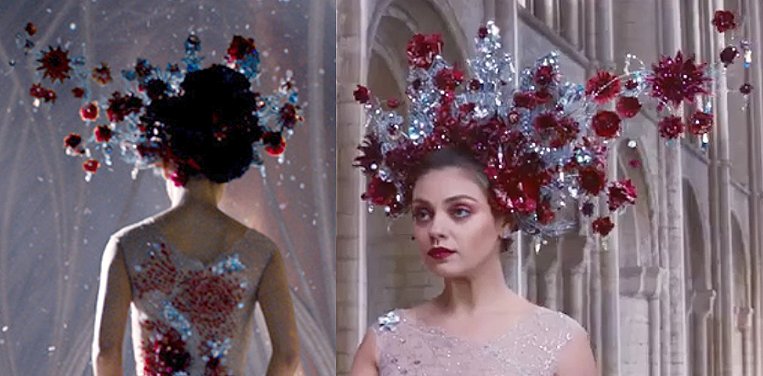
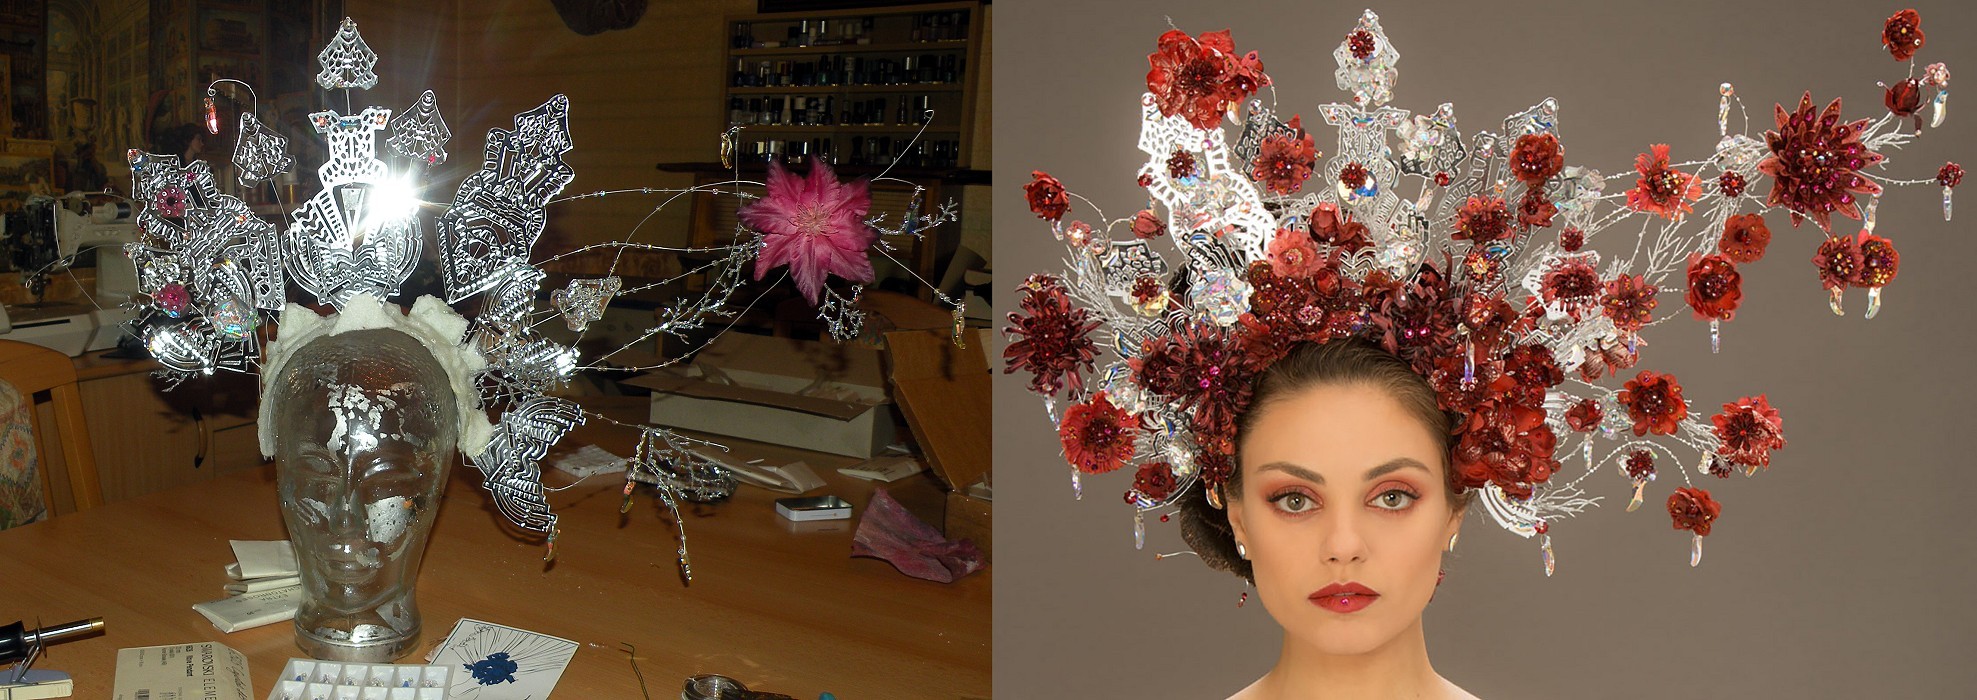
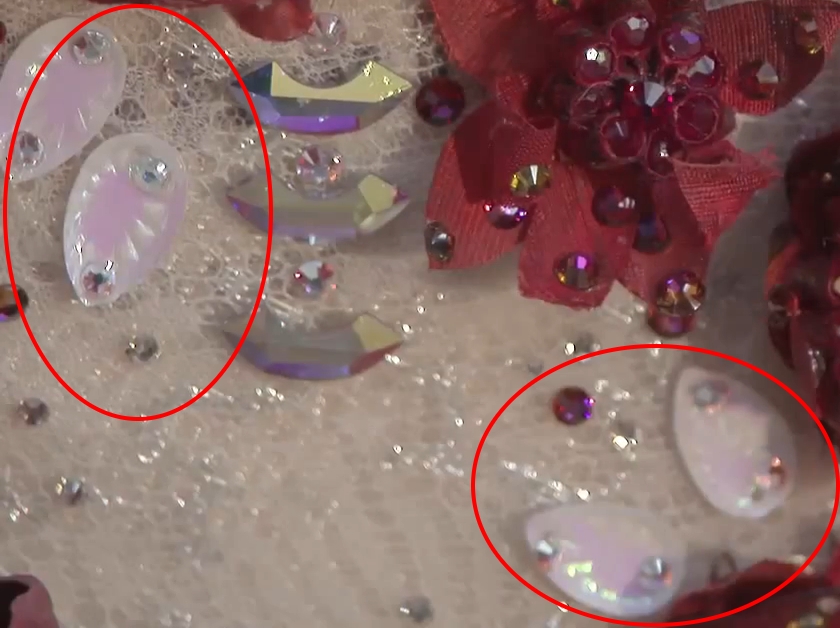
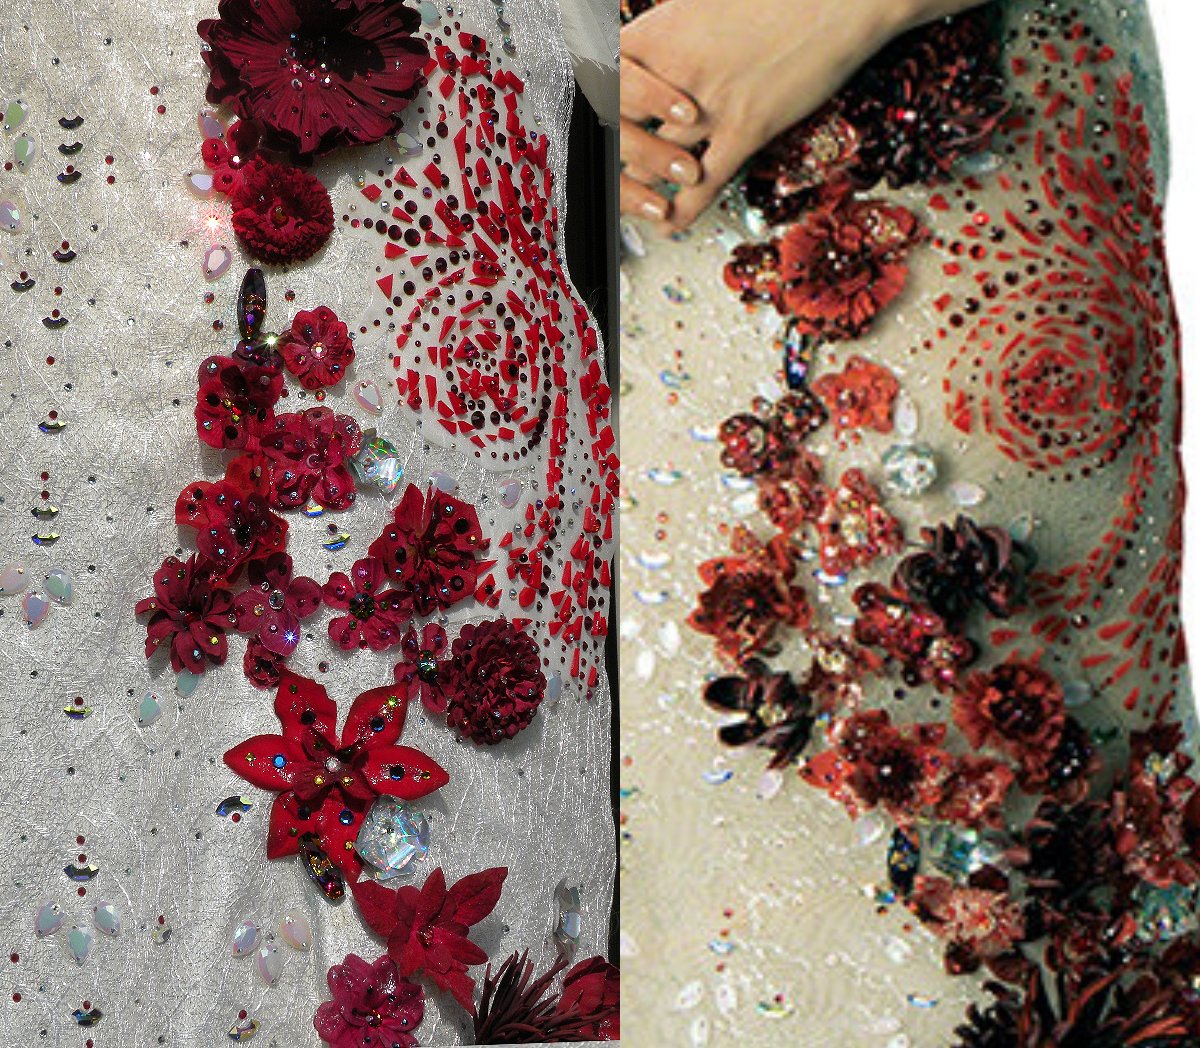
A new trailer showed something that is not on the original headdress as shown in the promo photos and / or the standee, but just in the movie.
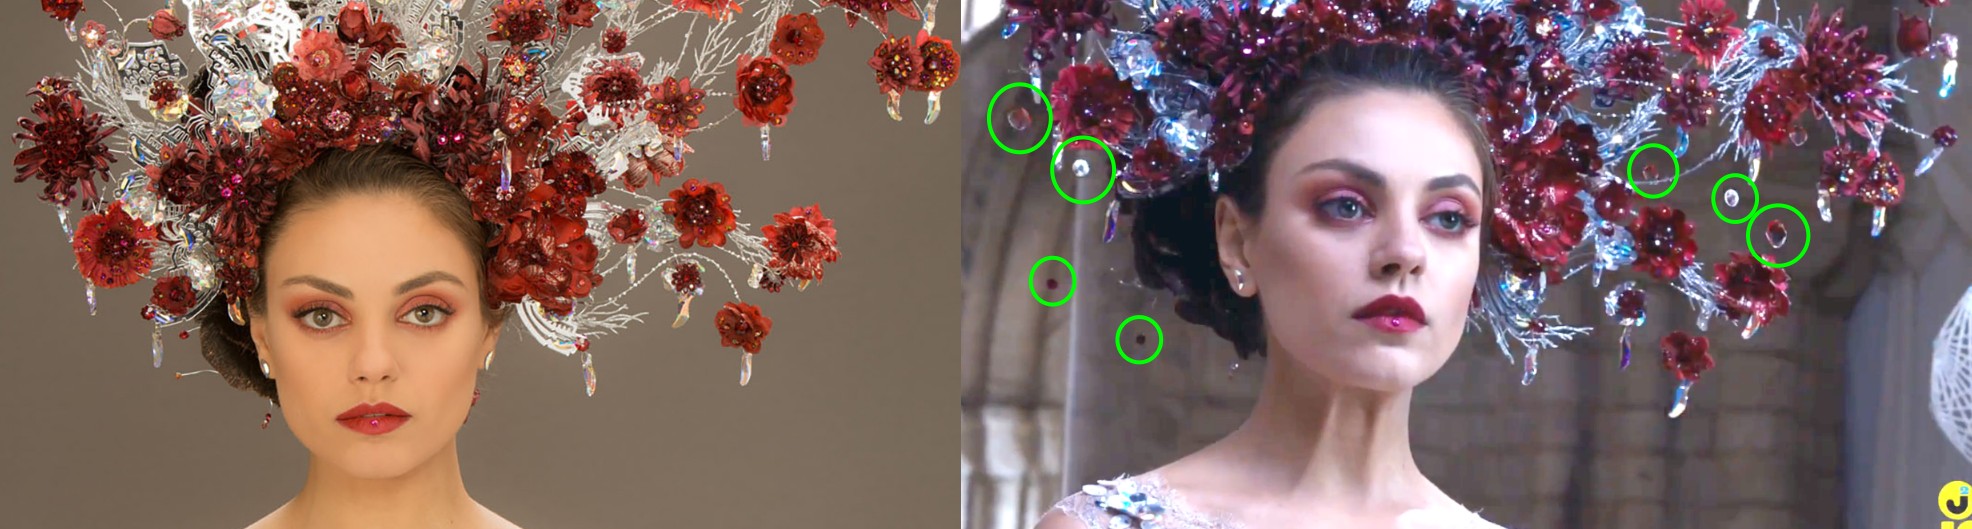
Compare left (promo photo) and right (trailer screenshot).
I’ve marked what you’re supposed to look for in the trailer screenshot with green circles.
See those „floating rhinestone crystals“? Right. They’re floating without seeming to be attached to the headdress. They’re definitely NOT in the promo photos.
They added floating CGI CRYSTALS to that headdress! *dies*
And that is where my reproduction MUST differ from the headdress as seen in the movie, because seriously, no one can make crystals float around a headdress with any available current technology. I’ll stick to the promo images version of the headdress.
Note that previously, I had an early version of the „shapes“ draft on this page.
It’s funny where I found that again – please read the „Other people’s reproductions and / or other interesting things“ part at the bottom of the page to find out more.
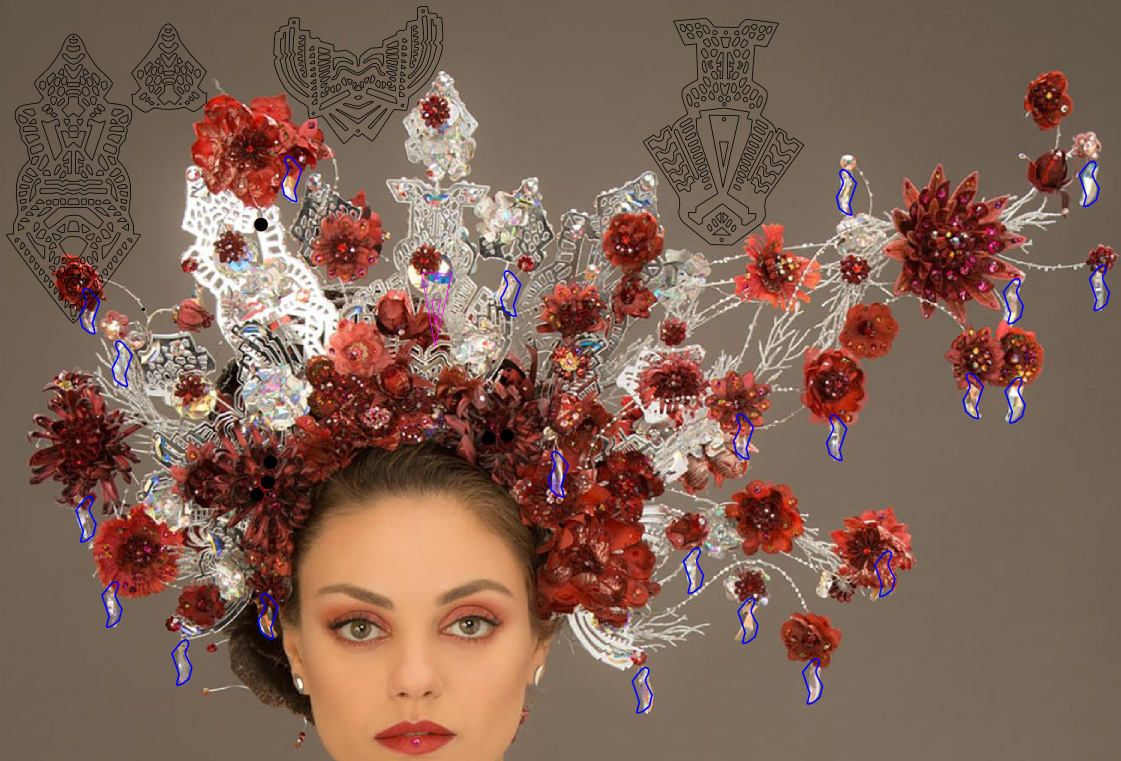
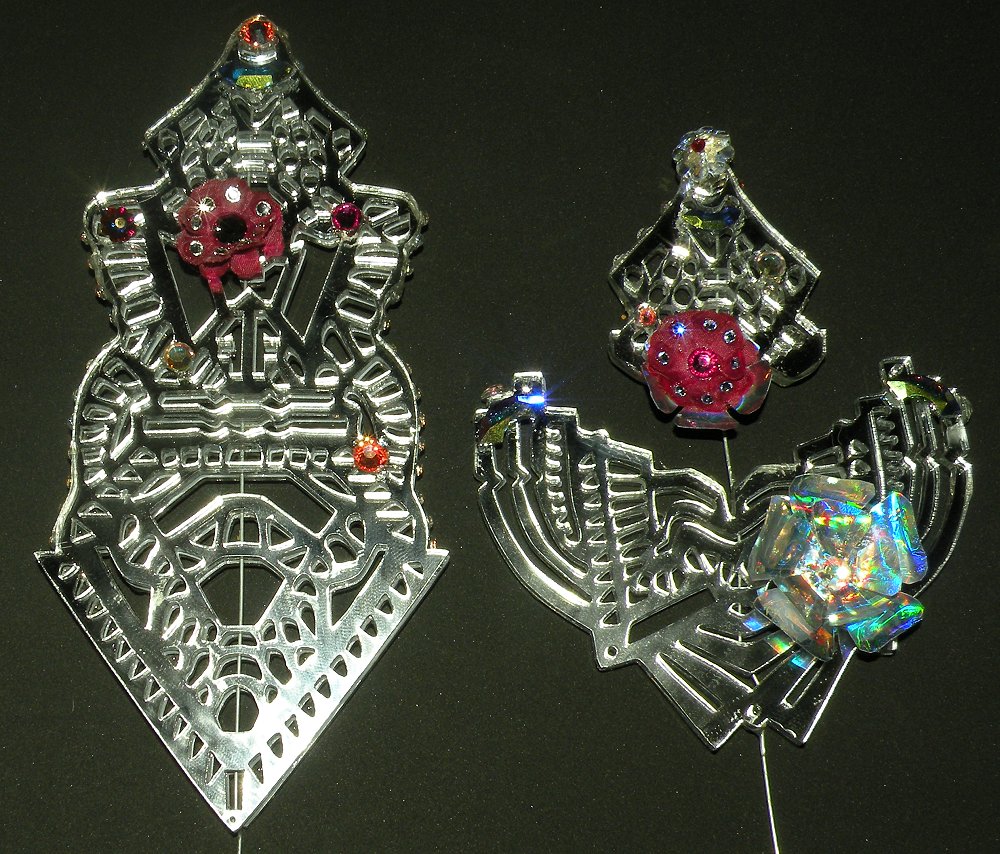
The basic shapes of the original headdress are based on the „Obelisk“ earrings by Finchittida Finch; as well as some other jewelry by that company.
Comparing their jewelry line with the images I had, I came up with the following shapes which are repeated throughout the headdress – compare the shapes to what you see in the headdress; and you will pretty much instantly recognize all three of them. The blue markings show the positions of the Swarovski 6525 „Wave“ pendants in 28mm size, which were also used on the headdress as well as on the gown.
Here’s an image of the exact jewelry shapes used. Printed at 150dpi, the image shows them sized precisely proportionally accurate for my own head; so the size is proportionally a bit larger (~10%) than the original jewelry.
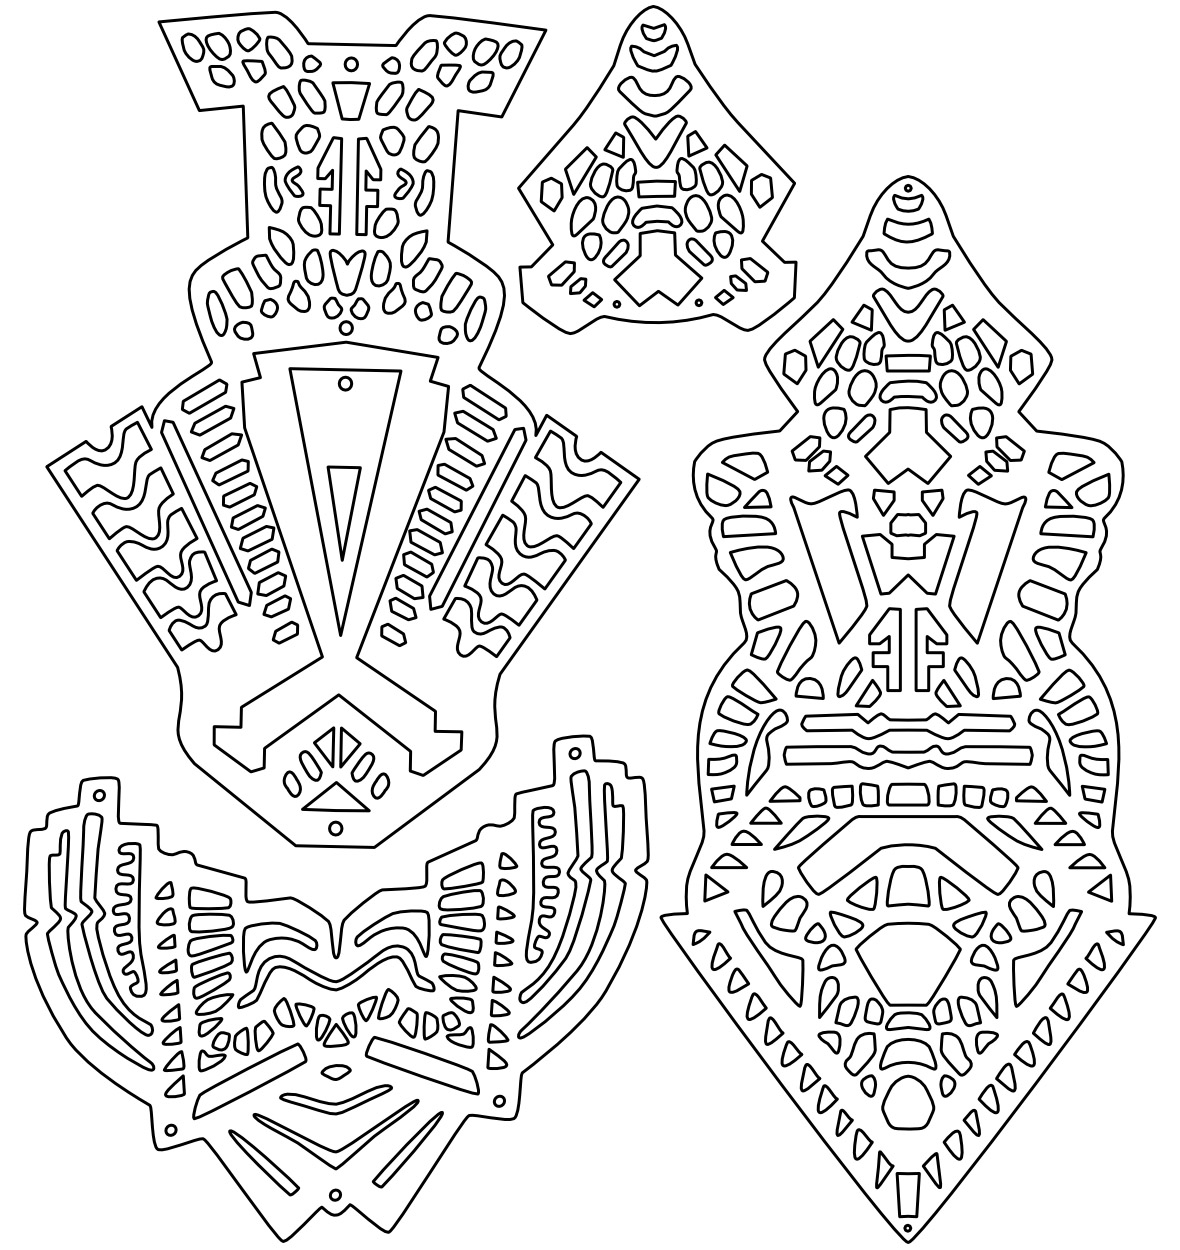
Those are the „Obelisk“ earrings plus a part that has been derived from them; parts of the „Temple Talisman“ necklace as well as the larger part of the „Temple Drops“ necklace.
| In case you’re wondering – I will NOT hand out the vector version of that file. There’s a really simple legal reason behind this – owning the vector file enables you to create counterfeit brand jewelry (that of Finchittida Finch to be precise) which is NOT something I want to be involved in. The bitmap image you see above cannot be processed by a laser cutter; but the vector version can be without problems. That „counterfeit jewelry“ part is also the reason why I would never, ever create that headdress for someone else or sell my own headdress. |
The standee as well as newer reference photos, such as the one above, revealed that the shapes are, in fact, cut from silver mirrored acrylic. So casting them with resin, as I had previously planned, is out of the question. So is using the mica pigment.
I have to order another batch of silver mirrored laser-cut acrylic to make the headdress. Pretty painful as that is rather expensive *sigh*
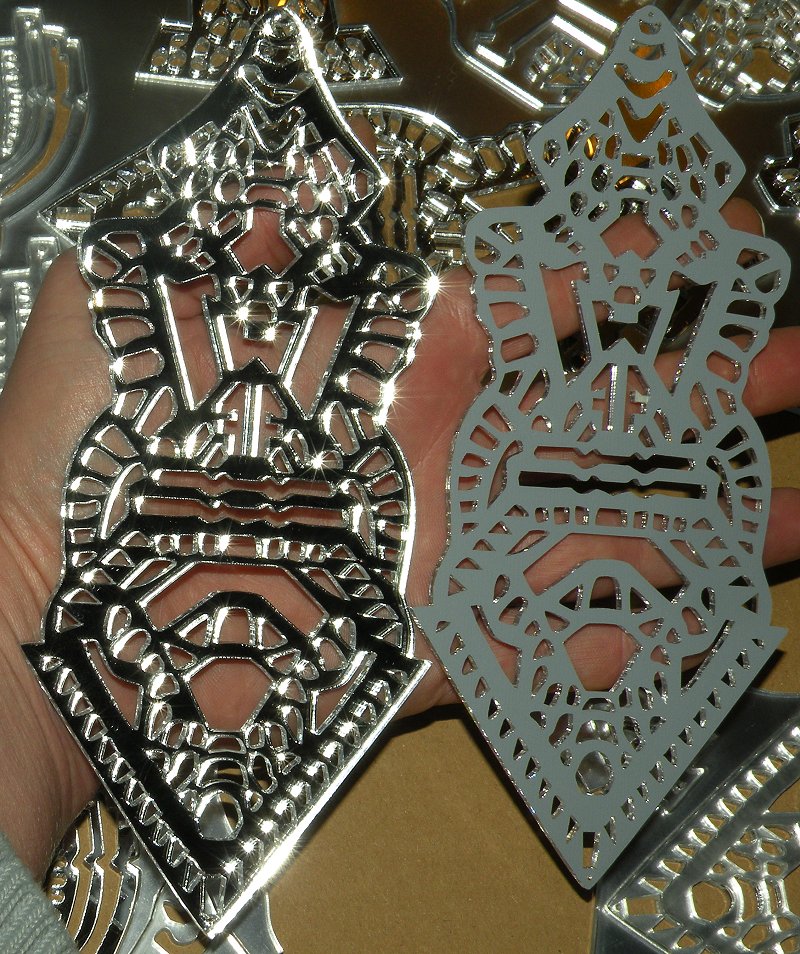
Anyway, I finally ordered that batch and here it is:
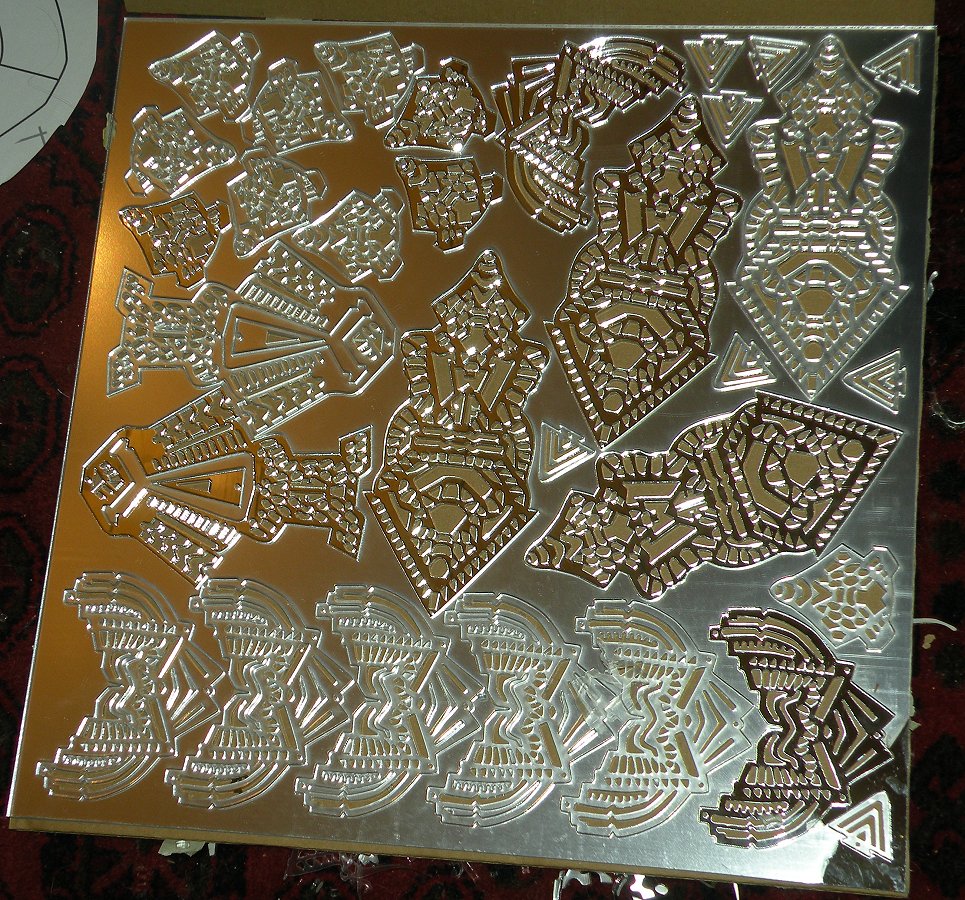
Sheet of Acrylglass XT Mirror, with the lasercut shapes.
On some of them I already peeled off the protective film, see below for details, so they are more shiny than others.
Why that was a mistake? Read the bottom of this page („things I have learned from making this costume“).
Maybe you are wondering why almost all shapes are cut double (twice as many times as required for the headdress). Here’s why:
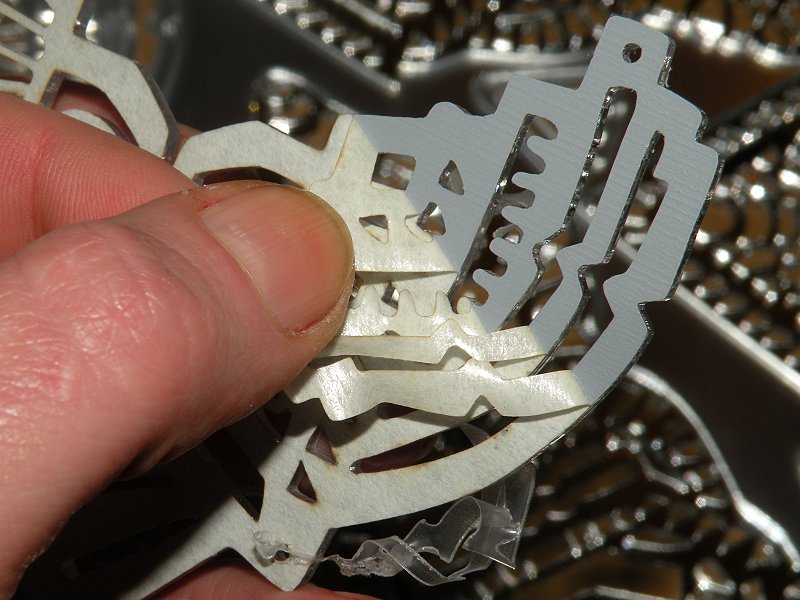
Front and backside of the laser cut acrylic
As you can probably see, while the front is a perfect mirror, the backside is dull and gray. However, on the original headdress….
Headdress back and front. No difference in front and back appearance of the shapes.
So that’s why many of the shapes are doubled – I need to glue them back to back, so both sides of the shapes are mirrored.
The sheet does have protective film on front and backside, which remains on the acrylic while it is being cut. That means you have to pry that film from each of the cut shapes on front and backside, which is not easy as the film is thin, tears easily and is also partially welded to the acrylic shapes during the laser cutting process.
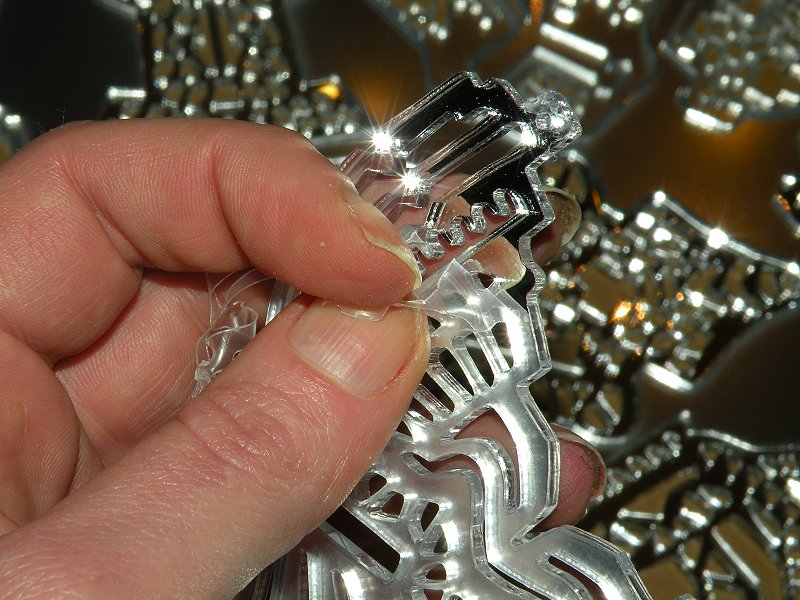
Peeling the protective films from front and backside of the shapes. The film is clear on the front and paper-like, beige on the backside.
First shapes, original headdress:

Original headdress. Note the thin wires that run through the shapes and towards the head.
Same shapes, my reproduction, in progress:
The wires run between the sandwiched back-to-back glued shapes to stabilize them and, of course, to enable me to actually attach them to the headdress base.
And yes, I’m fully aware that you may be wondering about that silver flower on the right shape (which is actually the left shape in the picture of the original headdress).
I’ll explain how to make those in detail later.
Also note that just as on the original headdress shapes, some rhinestones have been glued to the edge of the sandwiched shape layers. I think that was done to obscure the seam between the two layers of mirrored acrylic.
By the way, in case you need to know, I used epoxy resin to glue the shapes back-to-back. It doesn’t affect the mirror backing, fills the tiny gap between the shapes caused by the wire well and also helps to make the shapes more rigid.
The wire is spring steel millinery wire – strong, thin and flexes back into its original shape if not bent with too much force. Basically like ultra thin crinoline steel.
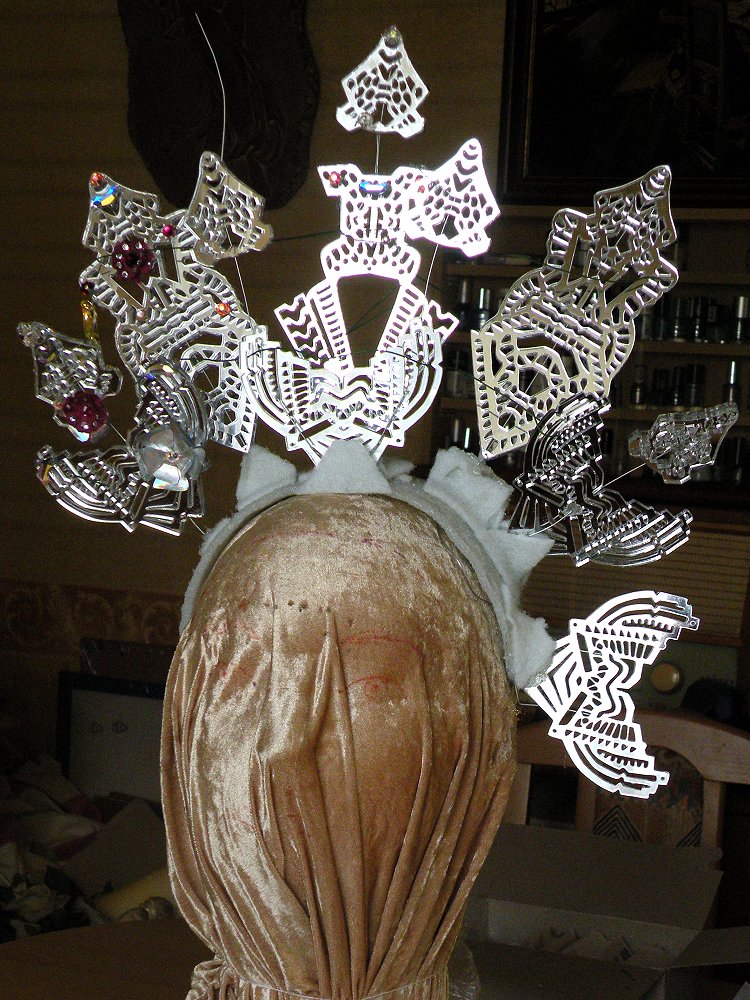
Headdress construction in progress.
The base is made from fiberglass felt, hardened with epoxy resin.
Same for the little cutout felt pieces which help to hold the mirror acrylic shapes on their wires in place.
I will paint the felt base dark red when it’s finished, and then cover it up with flowers, so that still white base will never be seen again.
…more headdress progress.
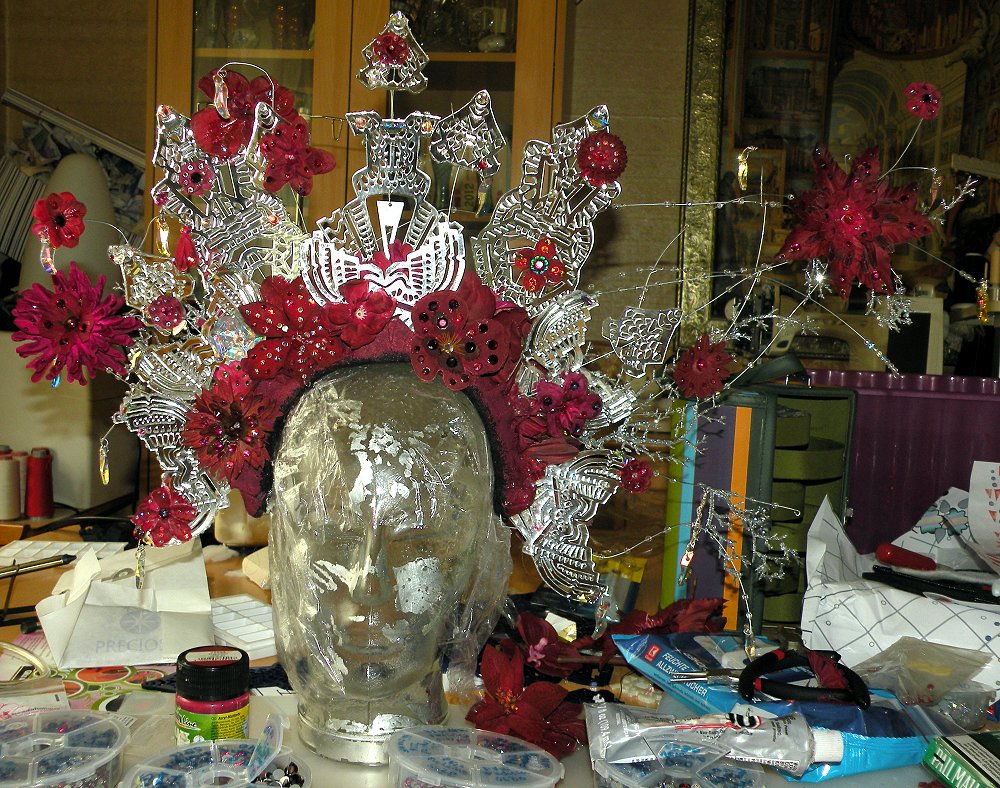
About 3/4 done.
Finished headdress front, directly compared to the original headdress. Color is a bit bright because of sunshine.
Yes, some of my flowers are a bit off; but other than that, I think it’s a rather good reproduction.
I still have to create a video of the headdress because seriously, a photo does NOT capture the sparkle of all the crystals.
At this point, I have not finished the backside yet because I am still trying to figure if I want to attach parts of the hairstyle to the headdress – which requires way more hair than my own, waist-long hair.
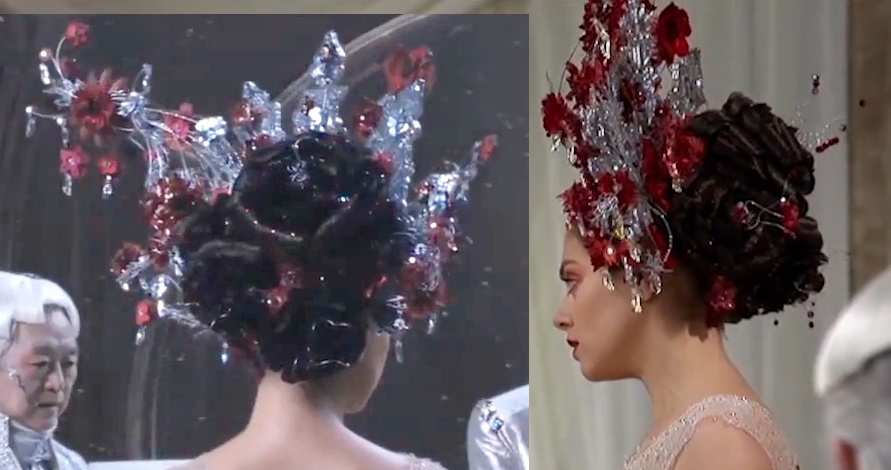
Just so you know what I’m talking about, here’s the original hairstyle, which is a serious mess of carefully arranged, twisted hair rolls.
It’s also at least three times as much hair as a human being normally has.
The gown
Identifying the red shapes
One issue I had with the gown was identifying the red shapes which are scattered all over the gown. These, to be precise:
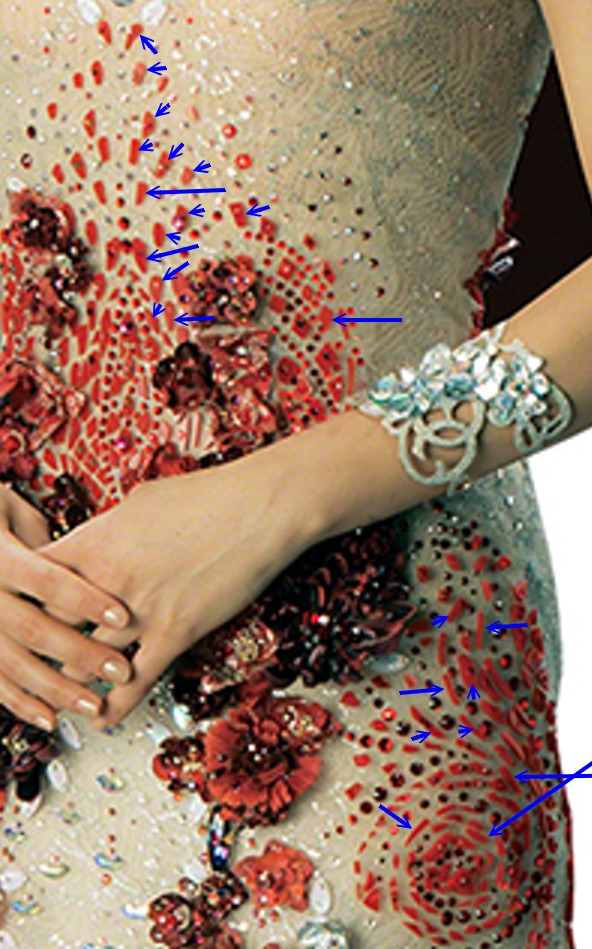
(I did not mark all of those red shapes with blue arrows in this picture, but you probably get the point.)
Those, so I found, are not Swarovski crystals, so what could they possibly be?
And then, with the help of some friends, it dawned me:
Those shapes are 3D printed shapes. Remember the 3D printed headdress above with the shapes inspired by Finchittida Finch? Yeah, those.
Just that for the gown, no Finchittida Finch jewelry was printed – they printed the HOLES which are present in the jewelry as solid objects!
Then again it could be possible that those tiny shapes are cut from acrylic glass, of course.
The standee shows that the red shapes are actually mounted on pieces of organza, which have been mounted to the gown.
Actually that can be seen in the photos, because the organza obscures the lace texture. I first thought that this was the effect of JPG artifacts, but it’s not.
I could not afford to either have them 3D printed or laser cut from acrylic glass.
So I tested a few options, and here’s what didn’t work and what worked in the end:
- Pearl pen in red
Didn’t work because the surface became very uneven after drying. - Puffy paint
Didn’t work because this, also, resulted in an uneven surface of the red shapes; and also the original red shapes are shiny, while puffy paint is matte. - red PVC flooring
Didn’t work because the backside of PVC flooring is white foam – which became very visible along the cut edges.
What worked:
- Flexible PVC as used for flexible flap doors, 3mm thickness.
You have to look around a bit, but that stuff IS available in opaque red.
Only downside is that you have to use a special kind of glue for soft PVC to a) fix the shapes to the organza and b) fix the rhinestones on the shapes. Not all flexible PVC glues will work for BOTH tasks. I used „Pattex Kraftkleber Transparent“ to glue the shapes to the organza, and „Uhu Weich-PVC“ to fix the rhinestones to the shapes – these are both German-brand glues.
Why two glues? Because the first is cheaper but does NOT work for glueing rhinestones to the shapes (and I needed a lot of it!); and I needed less of the second glue.
Identifying the Swarovski rhinestones on the gown
Surprisingly, there are not many different shapes present on the gown, even though it has to be said that there is a RIDICULOUS amount of Swarovski crystals and also, the size variety of the flatback stones is large.
Note that at this point, I can’t tell which variant of the flatback stones has been used since I cannot see the exact cut of the crystals (and even if I could, the differences are often marginally and sometimes just the difference between hotfix and non-hotfix); so it could be either of Swarovski’s product numbers 2028, 2058, 2088, 2038 or 2078.
I’m ruling out product number 2000 since that is only available in very small sizes; and there are quite a few larger flatbacks on the gown (up to SS40). This is particularly obvious in the „swirl“ on the hip.

Illustration outlining the various Swarovski crystal shapes / product numbers used on the gown.
Note that, just as for the red shapes above, I did not mark all Swarovski crystals on the gown; just a few of the shapes used so you get the point. If you look closely you will see those shapes repeat over and over on the gown.
As I type this, I have not yet counted them; but my rough estimate is that there must be approximately 10,000 Swarovski crystals on the gown. Guess I will find out when I have finished it, lol.
As for colors of the stones, I’m pretty sure that for most of them (particularly the flatbacks), the colors siam and crystal were used. The 2037 Eclipse are probably crystal AB. She also wears small earrings made from the Eclipse crystals.
The teardrop shapes are actually the same teardrops which Kalique Abrasax / Tuppence Middleton has on one of her gowns.
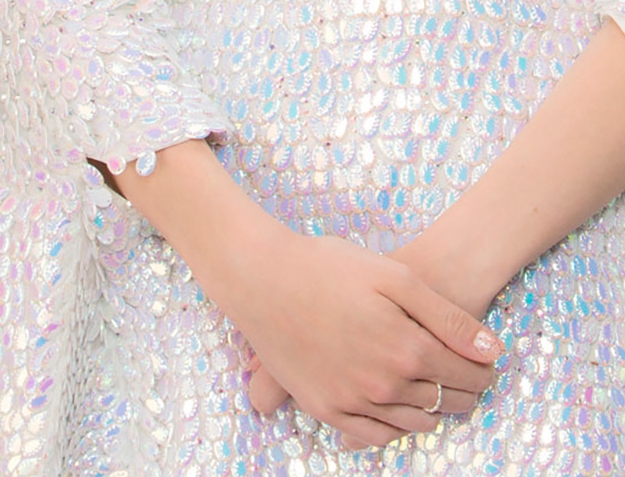
Left: Kalique’s dress; right: Closeup on Jupiter’s gown. You can probably instantly see that the drops are exactly the same – White AB, and probably acrylic or resin.
The funny thing is, those simple-looking acrylic or resin drops seemed nowhere to be found. I know because I searched for them over 80 hours on the internet.
In case you are wondering how it can possibly take more than 80 hours to search for something, here are some search terms for you:
- Color: White AB, AB, iris, iridescent, pearlescent, rainbow
- Shape: Tear, drop, teardrop, pear, elongated
- Type: Flat back, flatback, sew-on, sequin, paillette
- Material: Plastic, Resin, Lucite, Acrylic
- Other search terms: Faceted, beveled, bling, shiny, facets,
Try finding those drops using those search terms. Use the terms as single search terms or in any possible combination. Hint: If you just combine two of those search terms in each search, you will have performed approximately 600 searches. If you combine more than two, you will perform more searches. Believe me, I HAVE used all those words and more and combined them in every possible way with up to five words per search. ’nuff said.
I was already talking to a Chinese supplier to have them reproduced to the exact specifications of the original drops. Yes, THAT is how far I was willing to go after wasting 80 hours to find them.
I would have had to order approximately 5,000 of them; which would have been WAY more than the 150 that are required for the gown. I started contemplating making Kalique’s gown as well.
And, as it usually is right AFTER hitting the „order“ button for such an order, I did ANOTHER search just BEFORE hitting that order button – and this time, I actually FOUND the teardrops on Etsy! Well not the exact teardrops – the side faceting is a tiny bit different and also, they do not have holes (which actually does not matter as the holes are covered with rhinestones anyway…); but they have the proportionally correct size for my reproduction! 😀
This is the listing for them. At that point, there were just six units (at 10 teardrops each) listed. So I messaged the seller, asking if they had more – and fortunately, they had!
My own drops have arrived by now; and this is what they look like on my fabric:
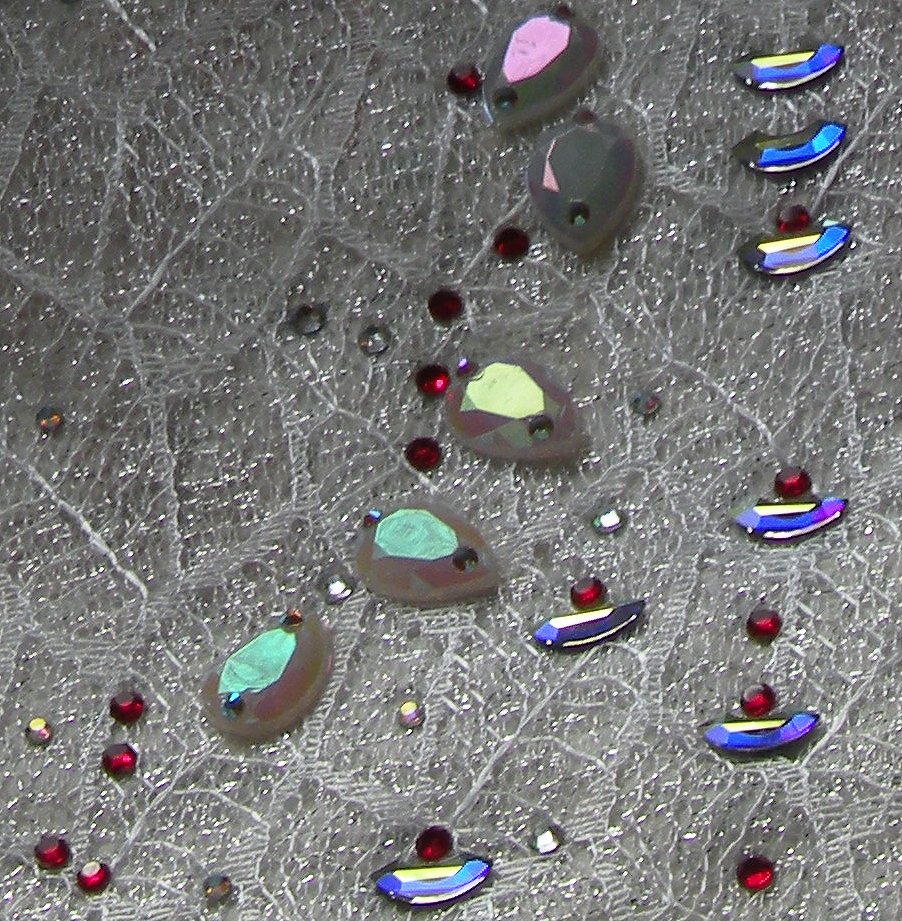
If you compare this photo to the one of the drops on the original dress above, you will know how happy I am with them! 😀
On the flatbacks that decorate the red silk flowers, I think I am also seeing some siam AB variants; same for the 3700 flower shapes which decorate the centers of some of the silk flowers. Also, from the standee I could see that quite a few other colors were used – like Crystal Volcano, Crystal Vitrail Medium as well as some other pink-, orange-, green- and purple variations in quite a few sizes.
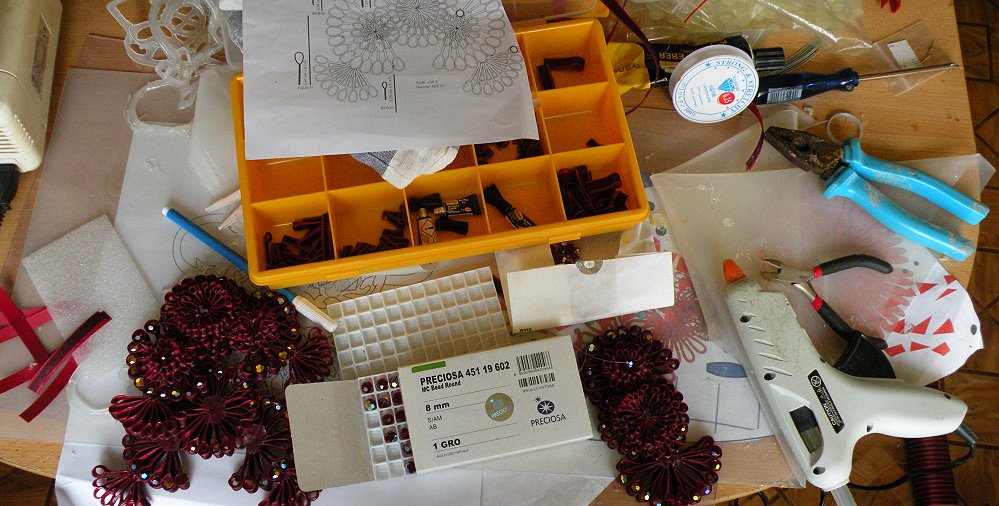
Here are examples of the most „unusual“ Swarovski crystals used on the gown, with the measurements they have on the standee:
Non-flatback rhinestones used on Jupiter’s gown.
There are some more colors and sizes of the Margaritas and flower crystals other than those which I have identified in the picture – basically those types of crystals form the center of many of the flowers. Let’s just say that just on the front of that standee, there are approximately 50 different (type / color / size) margarita and crystal flower variations at the centers of the silk flowers.
The crystal type that baffled me most are the dufflecoat buttons. I would not have expected to find them on a gown like this; and they looked like parts of flower petals or leaves in all reference photos – but the standee clearly let me identify them as Swarovski’s crystal dufflecoat buttons.
Then again of course the dufflecoat buttons as well as the dimensional decorations described below are also on Titus Abrasax‘ wedding suit. So those two elements are what ties the two wedding outfits together.
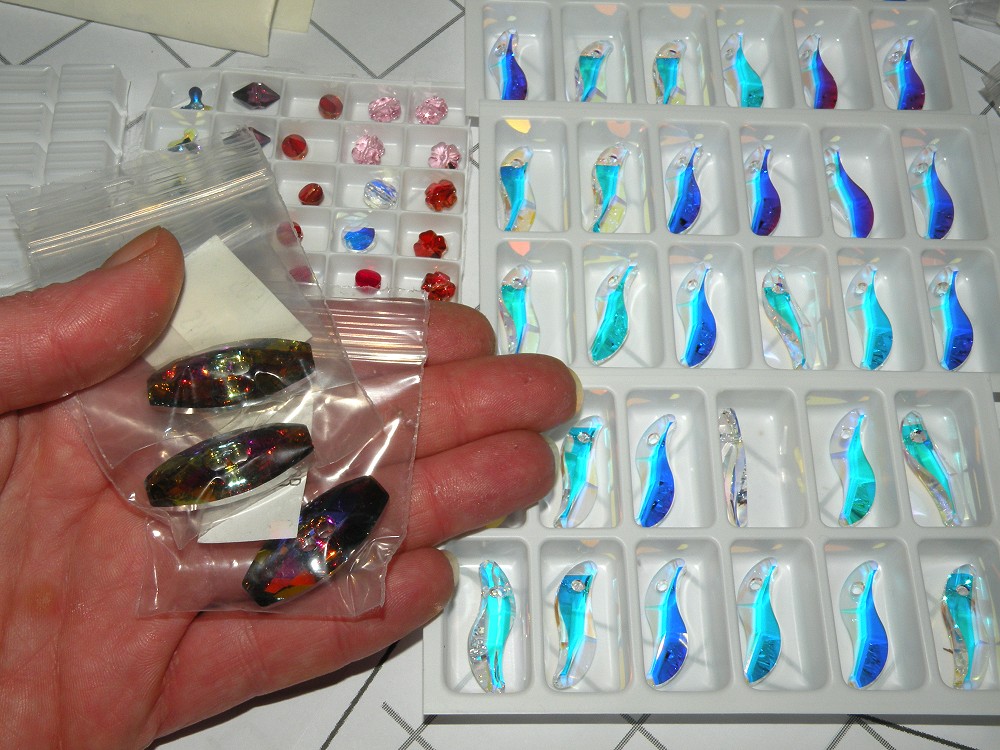
…and that’s what some of those dufflecoat buttons look like in my hand.
Background shows the „Wave“ pendants for the headdress – and no, they’re not blue in reality; they’re Crystal AB – the camera flash just makes them look blue.
As for the various sizes of the flatback stones, I had to use my proportional method (about which you can read more on the „Emperor Palpatine“ page) to determine these. Here’s how that turned out for my own proportional size. Note that I’m a bit taller than Mila Kunis; therefore it’s entirely possible that the flatback crystals were used one size smaller for each on her gown:
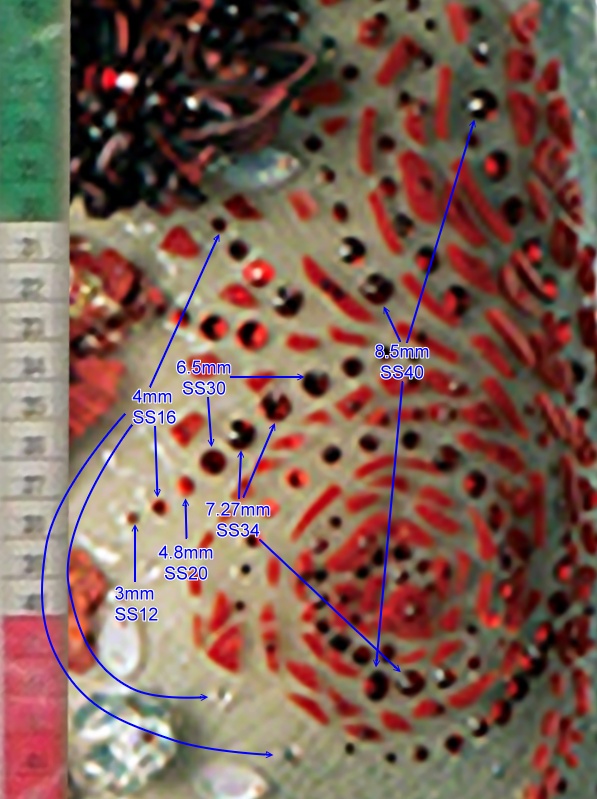
There was one problem which I found when determining the sizes, which, again, comes from me being taller than Mila Kunis and therefore having to use a stone size larger than what was probably used on the original gown.
Swarovski only sells SS40 sized flatback crystals in very limited colors; and that does NOT include the „siam“ colorway.
However, the Czech company Preciosa does. So I had to go for that company’s crystals for the largest flatback size to just be able to obtain that particular crystal size.
That, however, brought me to the point as to whether it’s worth to use Swarovski crystals versus Preciosa crystals on a costume like this. Let’s face it, unless you’re MUCH into rhinestones, you would probably not know the difference between the two company’s products if you saw them. Also, Preciosa pretty much produces the same shapes as Swarovski – and yes, that includes the navette and pear shaped stones.
Here’s an educational video comparing the quality of Swarovski vs Preciosa vs Blue Nil vs DMC vs Korean rhinestones:
So a switch to Preciosa crystals it was for me – because that didn’t determine an overall difference in appearance, just in pricing of the required rhinestones. With a project like this, with approximately 25,000 – 30,000 rhinestones involved, for a costume which I will rarely wear, even small things can make a difference. Also, unless you would inspect the gown with a magnifying glass, you wouldn’t even know that it’s Preciosa vs. Swarovski.
And NO, not even for a second I contemplated using Chinese imitation rhinestones because those, seriously, are of inferior quality.
Of course that switch only works for the flatback and pear/teardrop shaped crystals. The flower-, margarita-, eclipse and dufflecoat button crystals are available from Swarovski only. Oh well.
Dimensional decorations
The dress also has some interesting decorations on the (wearer-wise) right hip as well as 4 or 5 times on the edge of the skirt.
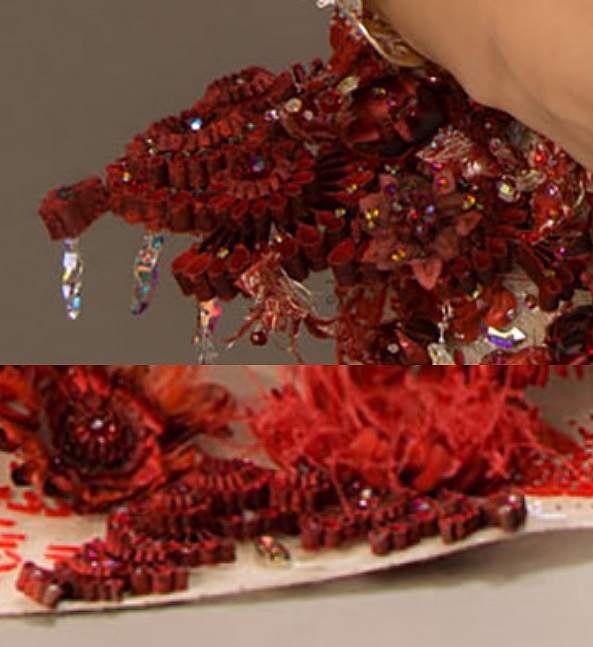
That looks weird, doesn’t it?
Those decorations are actually shaped ribbons. That type of decoration is something you probably saw before – Chinese frog buttons are basically made the same way, just smaller:
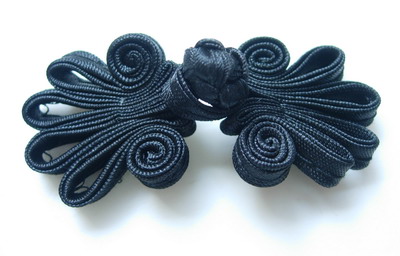 A tiny Chinese Frog button.
The ribbons which were used to create those decorations on the gown are approximately 1/2 inch wide (proportional to my own body height, that is). At least for the hip part, I think the decoration has maybe been stiffened with some kind of resin.
The original dimensional decorations were created by Katherine Wardropper with her Sculptural Fabric Technique and, in some parts, apparently also by Angel Armor – you can see them on their blog right here.
It seems they were created using red grosgrain fabric with what seems to be a black lace overlay.
I created a template derived from photos of the original dress, then used that to create reproductions of Katherine Wardropper’s work for my gown. As she – as the term „Sculptural Fabric Technique“ indicate – uses fabric to create, but I used ribbons, I rather call my reproductions „3D ribbon formation“.
All together, I used 108 meters (or 120 yards!) of EACH the grosgrain- and organza ribbons. Which results in a total of 216 meters (or 240 yards…) of ribbon I used to make the decorations.
And yes, that took long, and it was insanely boring. I highly doubt that I would ever want to do it again. Seriously, human lifetime is SO short.

My dimensional decorations creation in progress.
They take freaking amounts of ribbon, Siam AB cut glass beads in various sizes and time to create.
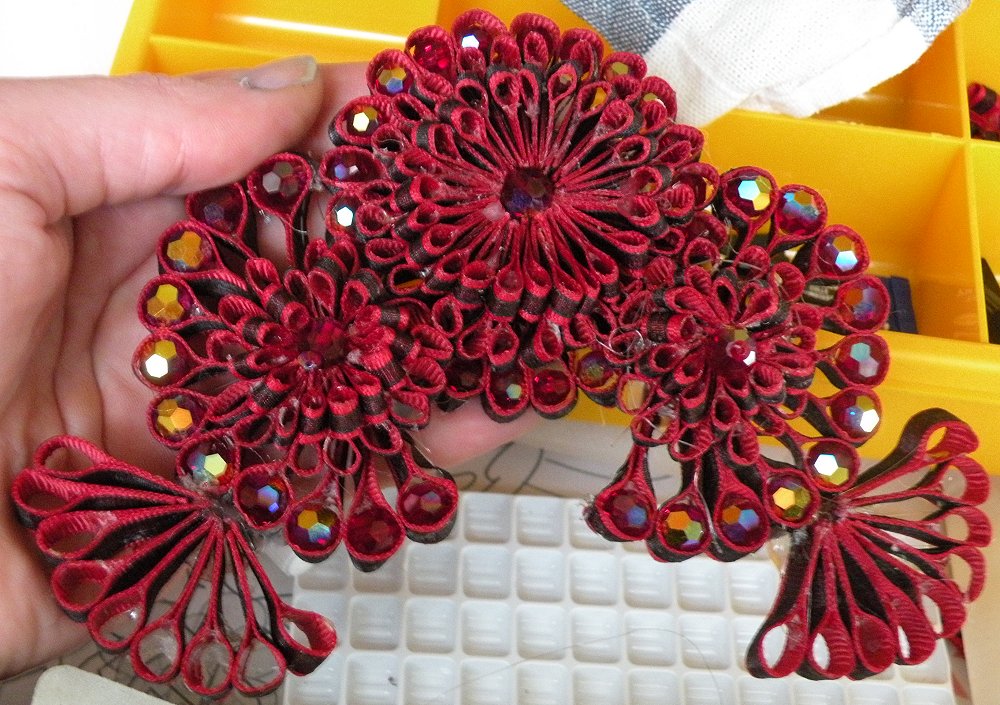
More progress on the dimensional decorations.
Funny thing is, when my father saw one of them, he said, hey, that would look great as a necklace! – strange how he instantly knew what Katherine Wardropper originally intended them to be 😉
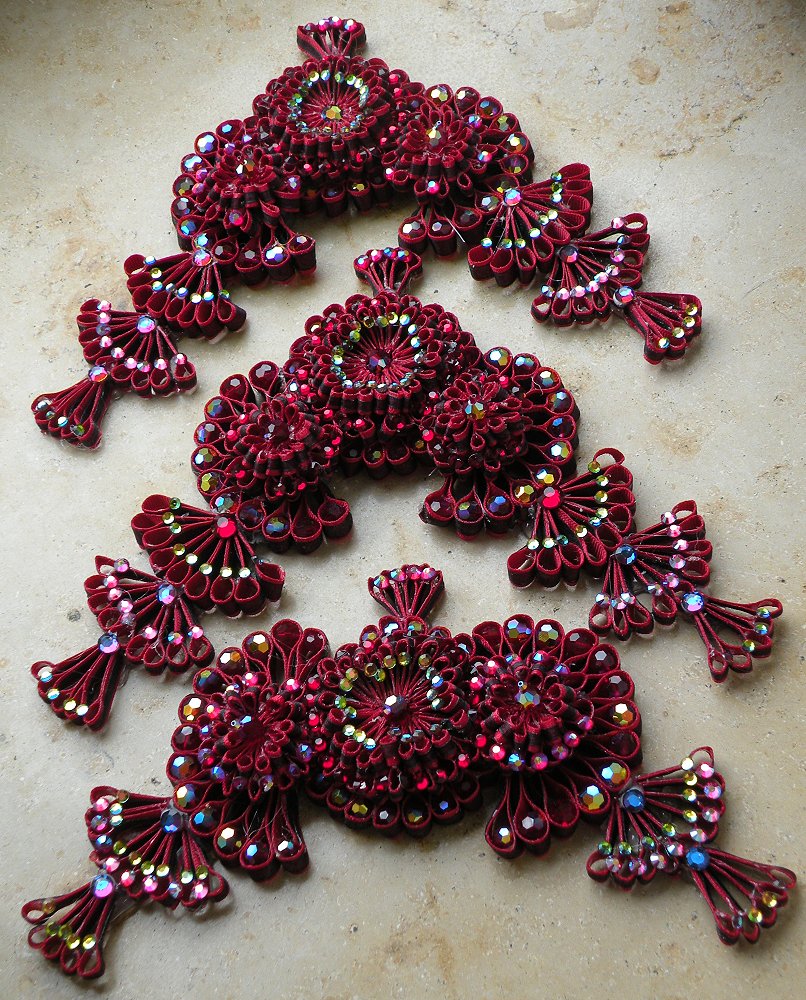
Three „dimensional decorations“ finished.
The bottom one is the one for the hip, which has a slightly different shape; the other two are for the skirt.
Four more for the skirt to go!
Creating the dimensional decorations isn’t difficult. You just need a LOT of ribbon, beads, rhinestones and even more patience.
I found out that I can create one in two days, or three in four days (more = faster, because I can work in larger batches of cutting, sewing and glueing) – I’m working in two batches of three, one batch of two for the seven dimensional decorations required for the gown plus an additional necklace piece because I REALLY want it, lol.
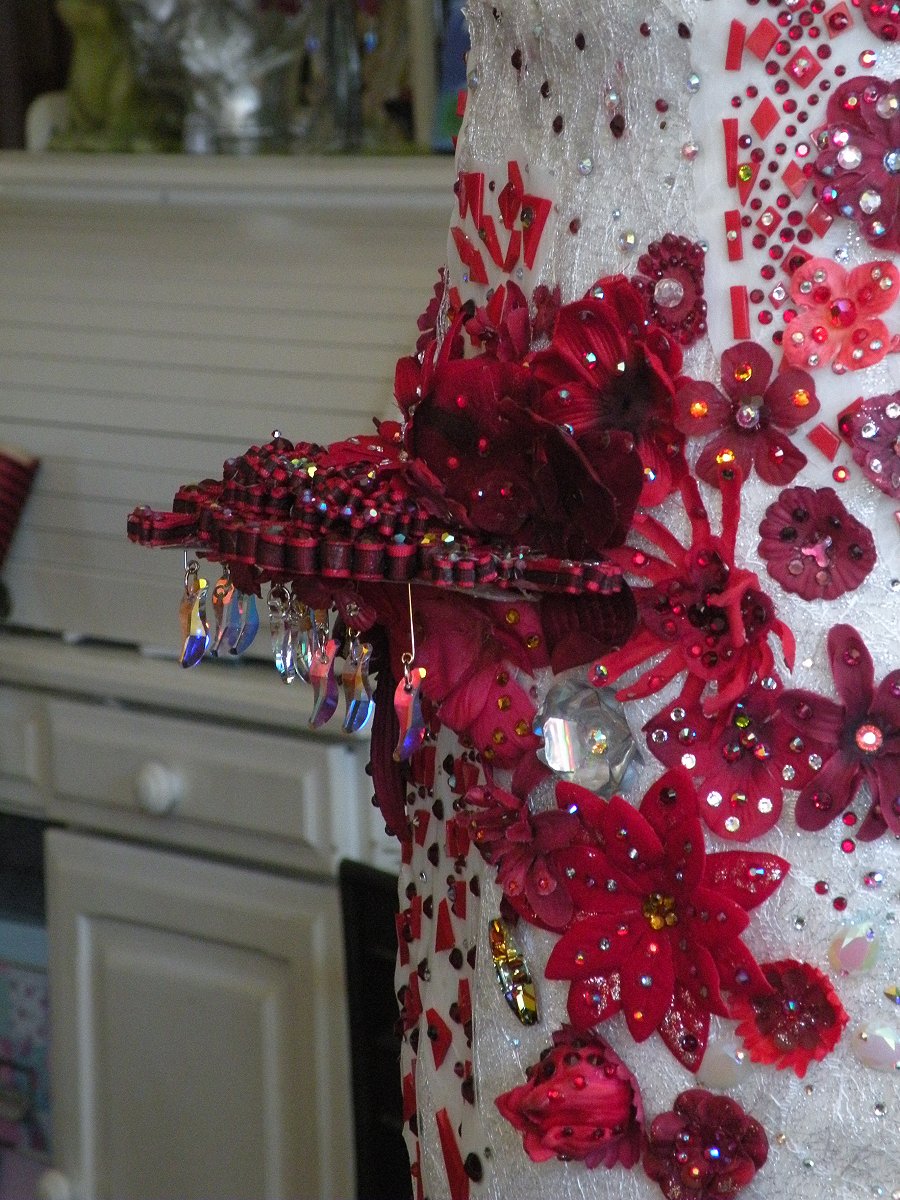
The dimensional decoration attached to the hip.
I constructed a tiny thin „shelf“ from fiberglass and epoxy resin, attached that to the hip with velcro, and on top of that, I put the dimensional decoration (also with velcro). The Swarovski „Wave“ pendants which are dangling from it are attached to the fiberglass shelf. The fiberglass is necessary because without it, the dimensional decoration would bend down within a short time. With the „shelf“, it doesn’t do that.
Fiberglass shelf and decoration are completely detachable from the gown as well as from each other. This makes transportation of the gown MUCH easier.
Creating the sewing pattern
The sewing pattern for this gown was an interesting challenge. I think I only managed because I am not just good at sewing, but also at creating patterns, 3D modeling and texturing. I have been doing ALL of this for up to over 35 years – some things longer, others less long. But I know what I’m doing, so to speak, so while it was still challenging, it wasn’t a stressful challenge.
I thought of quite a few possibilities, but all of them involved creating a dress with visible seams – which the original gown does NOT have. The seams, which HAVE to be somewhere, are cleverly hidden beneath the flowers and rhinestones.
In fact, the only visible seam is where the zipper is – on the backside of the gown.
The zipper is partially hidden on top by one of the organza overlays on which the red shapes and rhinestones are mounted.
I suspect that this organza piece „closes“ over the zipper with snaps.
When there were still very few images of the gown around, I first created a wrong version of the assymetrical skirt, which I thought to be symmetric.
When I found out that it was not, I was frustrated – but I started anew and did it again.
See, that’s the problem with creating a gown early:
Unless you have seen it in person (or have access to really good exhibit photos), there is always the possibility of new reference photos showing more details – particularly details that you didn’t know about before; and which change your so far made plans (construction / materials / etc.) considerably.
If you even just remotely obsess over details like I do, that can pretty much put you off to a point where you don’t even want to MAKE the gown any more; as you have put so much valuable lifetime and, maybe, money into things that are now worthless.
Then again of course we could say that obsessing over details is the problem.
But see, it’s like this. I love this gown. I seriously fell in love with it the moment I saw it; and I instantly knew that nothing but „perfect“ would do for a reproduction.
I could have used „some“ pattern, decorate a white gown with flowers and holographic glitter, cut the headdress shapes from cardboard, paint them silver, and sprinkle some more holographic glitter over them.
The resulting gown, or rather „costume“, would still have been recognizable for anyone who had seen the movie – but *I* would not have felt that this is „my gown“. I would have felt uncomfortable wearing it. And yes, you just learned my definition of „gown“ and my definition of „costume“. Costumes are often more or less cheaply and quickly made. Gowns are not.
So I saved up months and months so I’m able to afford proper materials, and I stared at the gown for, like, ages.
Therefore, I thought that redoing the model, texturing and resulting pattern was such a small thing I could do to make the gown really gorgeous.
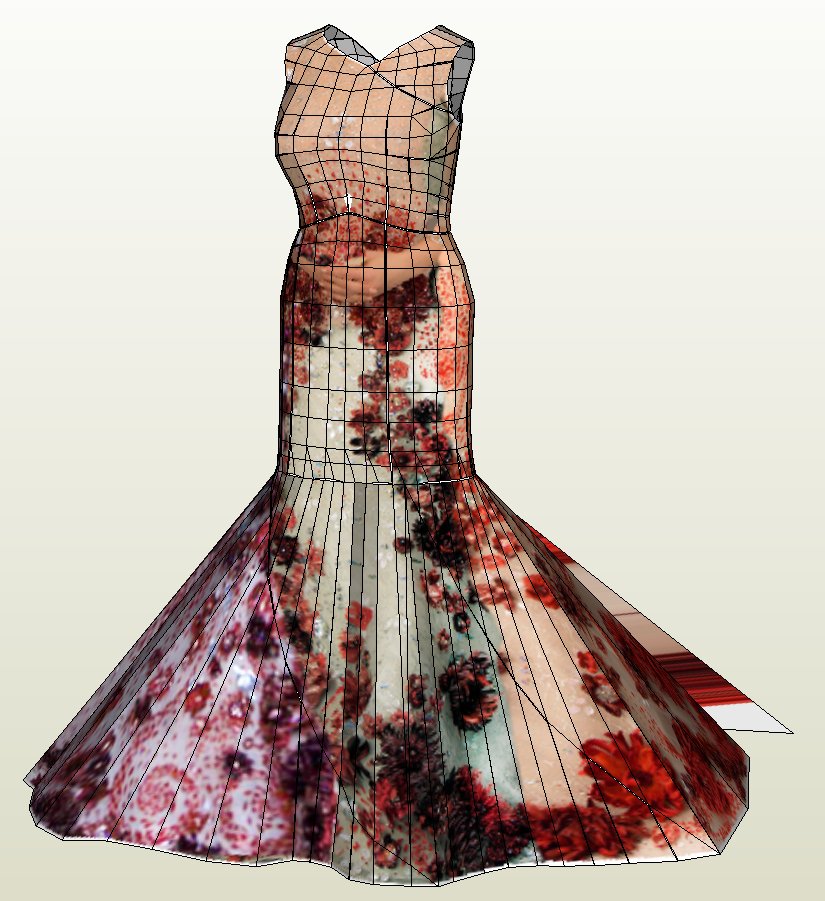
I created a 3D model of the gown in Blender (twice – first with the wrong, then with the correct shape). The 3D figurine I used to „dress up“ is pretty much a 3D „me“, proportionally matching my own height as well as circumference measurements.
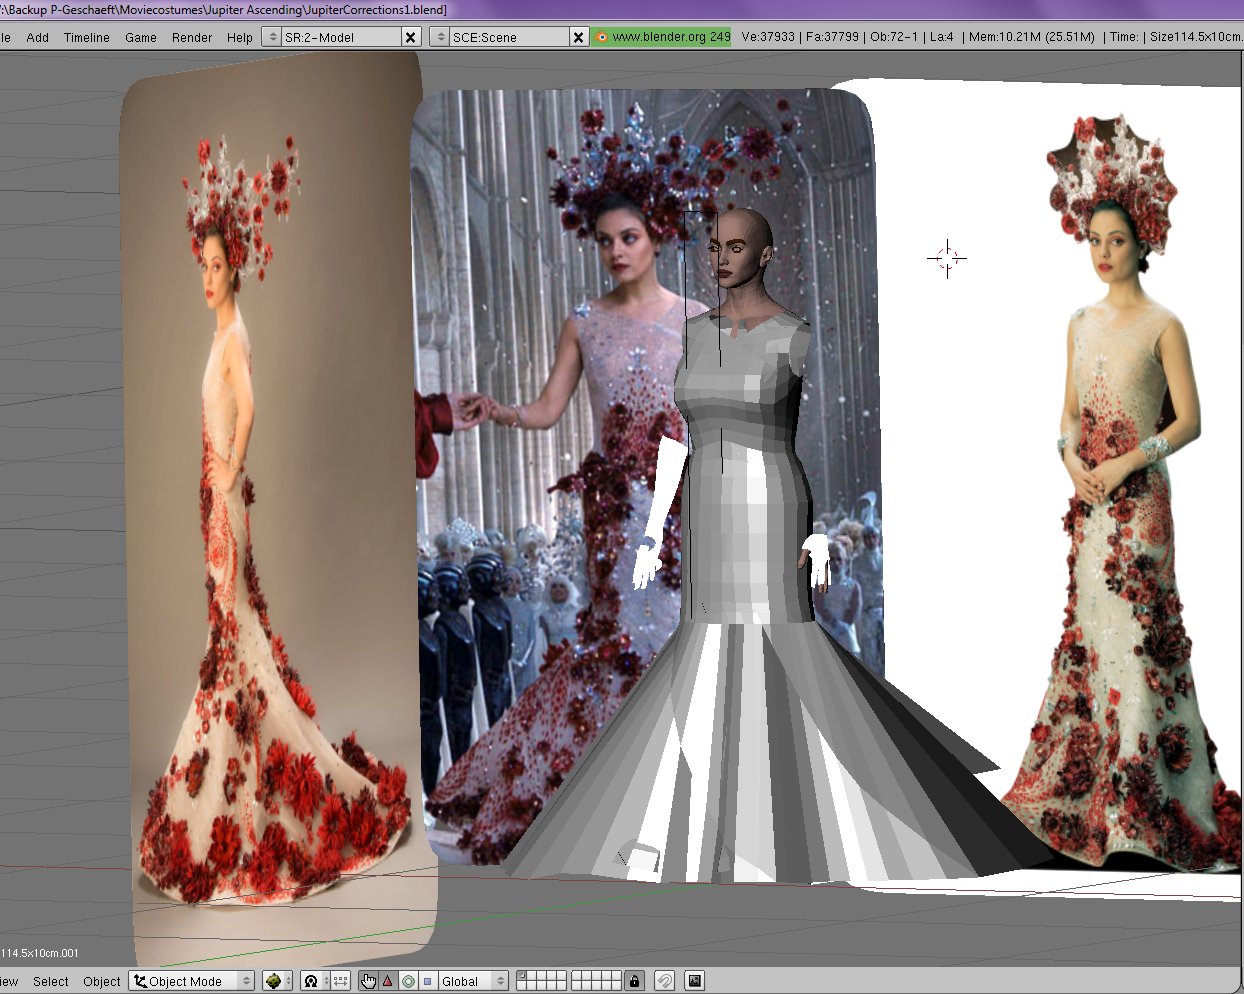
Then I textured that dress model in DeepPaint3D (again, twice!). DeepPaint3D is a software which has long been discontinued, but which I have been using for 15 years and which still does the job extremely well.
After that I exported the model with its textures to Pepakura – again, twice.
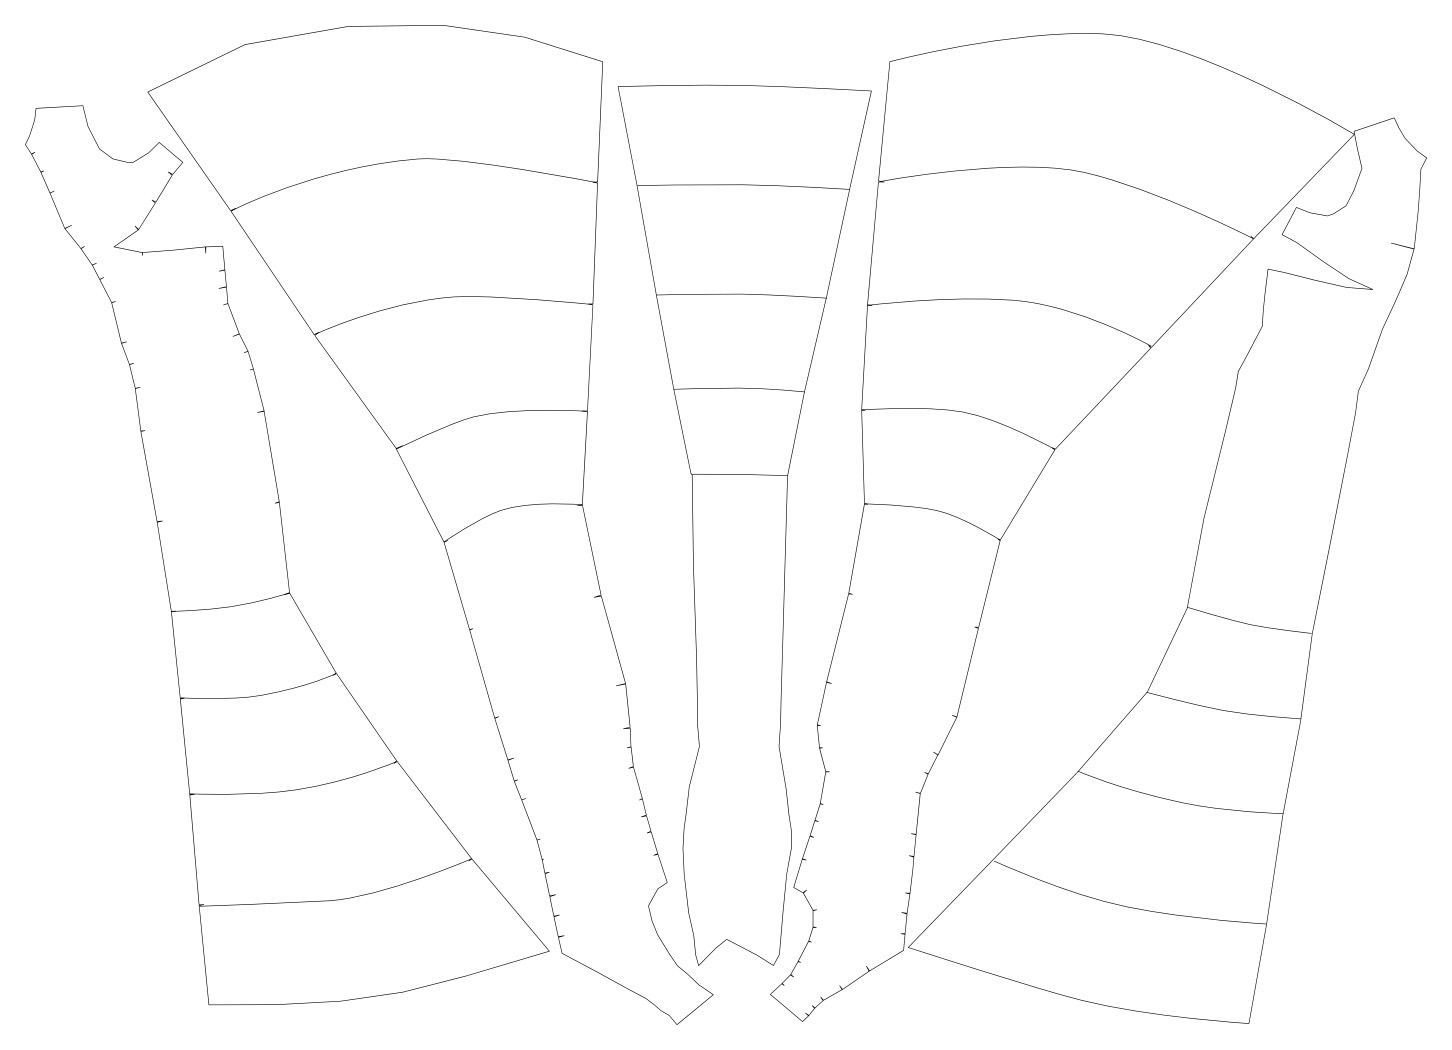
Here’s the EXTREMELY surprising and confusing dress pattern I came up with – this is the „correct“, not the „wrong“ version.
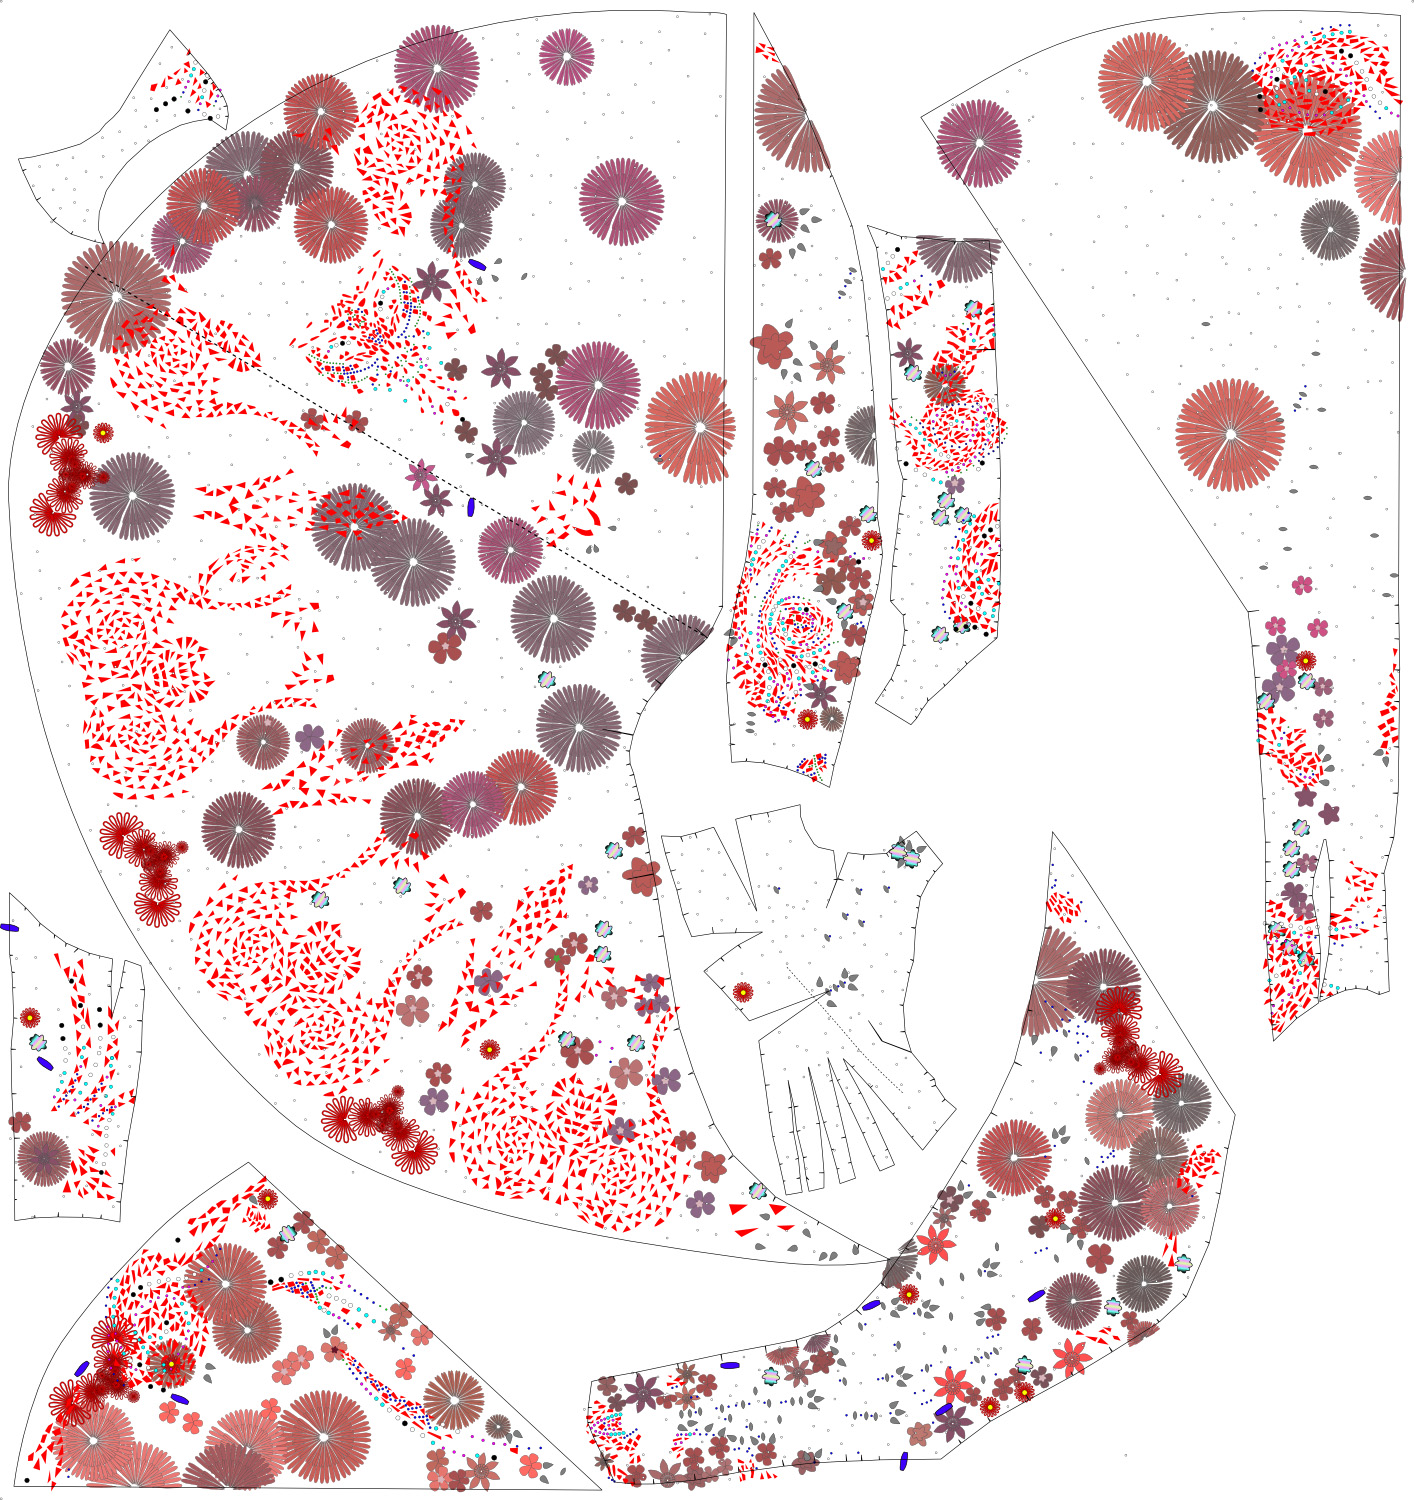
New pattern, taking the „extending fan“ as well as the side gusset into consideration.
New underdress pattern, taking the support of the now much wider skirt (hem circumference of the gown’s – not the underdress‘ skirt! – is over six yards!) into consideration.
Count this time:
– 73 Eclipse crystals,
– 99 pear-shaped crystals,
– 49 SS40 flatbacks in Siam,
– 98 SS34 flatbacks in Siam,
– 159 SS30 flatbacks in Siam,
– 222 SS20 flatbacks in Siam,
– 402 SS16 flatbacks in Siam,
– 157 SS12 flatbacks in Siam,
– 1316 SS16 flatbacks in crystal,
– 10 Swarovski 3024 „Dufflecoat“ buttons,
– 2798 red shapes and
– 210 flowers.
The considerably low amount of rhinestones is easy to explain – the „red shapes“ motifs along the edge of the extended „fan“ do not have any rhinestones in them – in my pattern, that is; in reality there ARE rhinestones; and I will add them to the actual gown as I create it – in the end, I used somewhere between 25,000 – 30,000 rhinestones on the entire gown and headdress.
Also, of course, the pattern does not take any rhinestones on the flowers into consideration.
The underdress with the built-in hoopskirt, by the way, is not supposed to be a separate dress. It serves as a lining for the gown, and is joined to it at neckline and armholes.
Making the gown
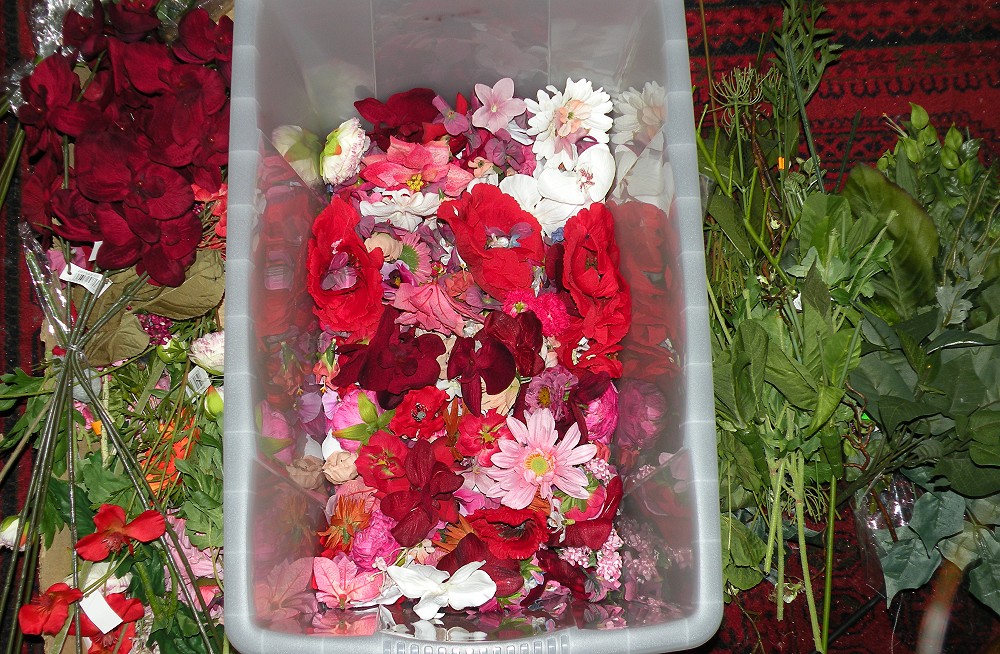
I’ve become Morticia Addams! Except that I want the blossoms, not the stems.
Cutting off the blossoms from the stems of silk flowers for the gown from left (still intact) to center (box to collect the blossoms) to right (stem trash).
Oh the advantage of having parents who are florists wholesalers!
I am aware that the flowers on the original gown were created by Angel Armor – they do have a blog post on how they created the flowers here. However, creating the flowers individually by hand would have been more than I could take, given that the rest of the gown also takes a lot of work. So I opted for using ready-made silk flowers and dye them.
In case you’re wondering, YES, silk flowers can be dyed using a certain kind of silk paint (Marabu Silk – not „Marabu Silk Art“, but „Marabu Silk“!) which also works on polyester (as modern „silk flowers“ are NOT made of silk but polyester fabric!). So any flower color between white and burgundy red works for this project. Which is a good thing as it gives me a larger variety of flowers to chose from.
I still have to buy *some* flowers, though – some of the blossoms on the gown are almost eight inches large (!), and my parents don’t carry any silk flowers THAT large, no matter in which color.
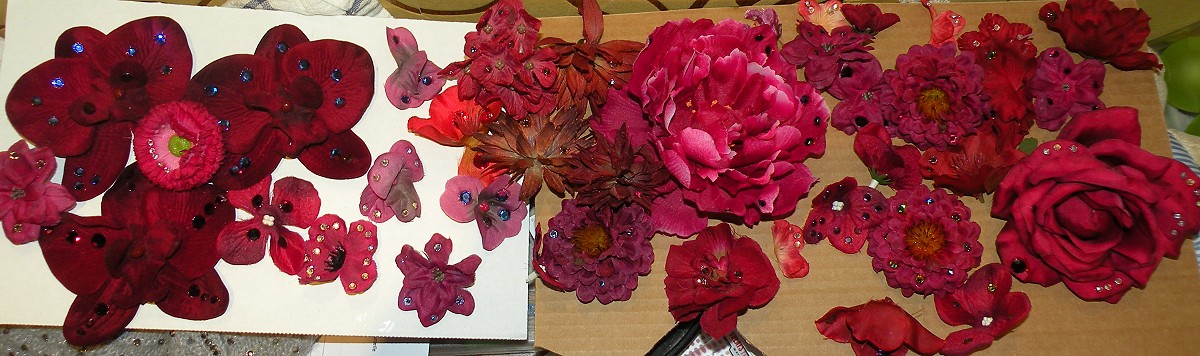
Some of the dyed flowers which I have started to decorate with crystals.
Not finished by far; neither by number of flowers nor by number of crystals per flower, lol!
The underdress
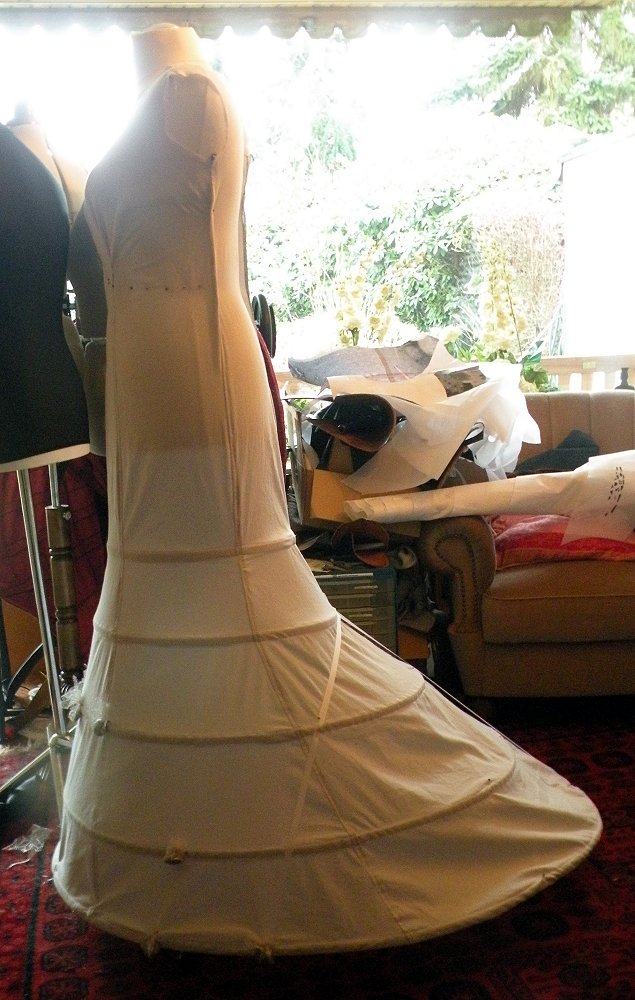
Leveling the underdress with fishing sinkers along the front and sides as well as ribbons on the back of the hoopskirt to make the back of the ellptical crinoline „float“
The fabric
I suspect that the original gown has an overlay of either Chantilly- or Solstiss lace with metallic threads in it; mainly because of the „eyelash“ selvage which can clearly be seen along the neckline. I was unable to find that fabric. However, I eventually came up with a layering idea that involved no less but four fabrics:
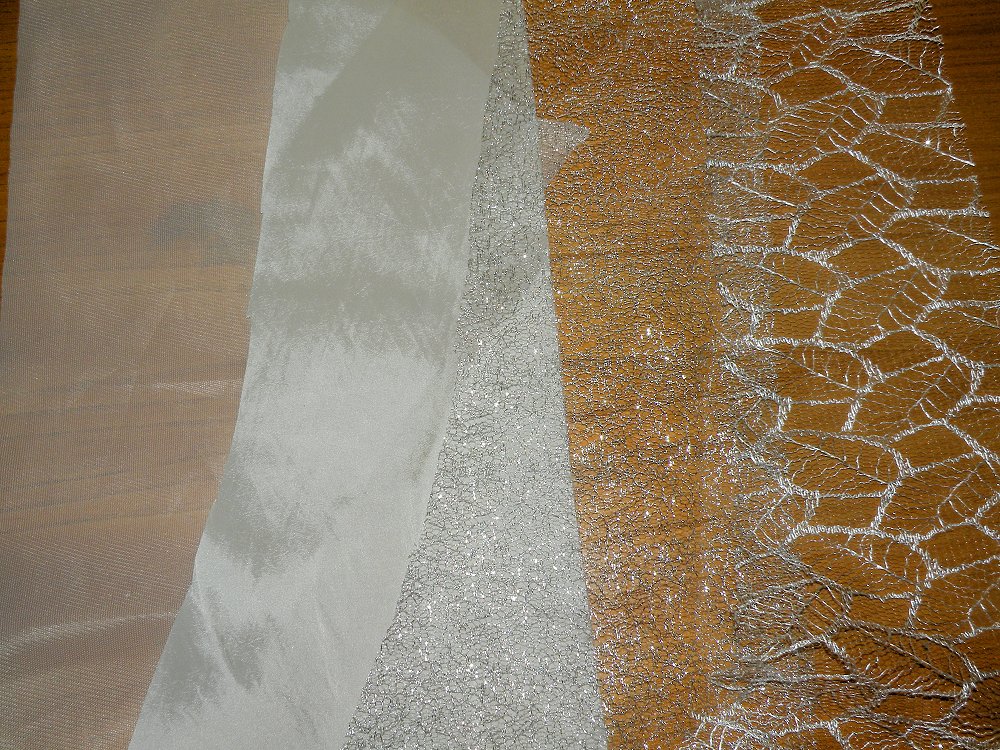
Left to right: Stiff crinoline fabric; ivory taffeta, silver mesh tulle, leaves lace.
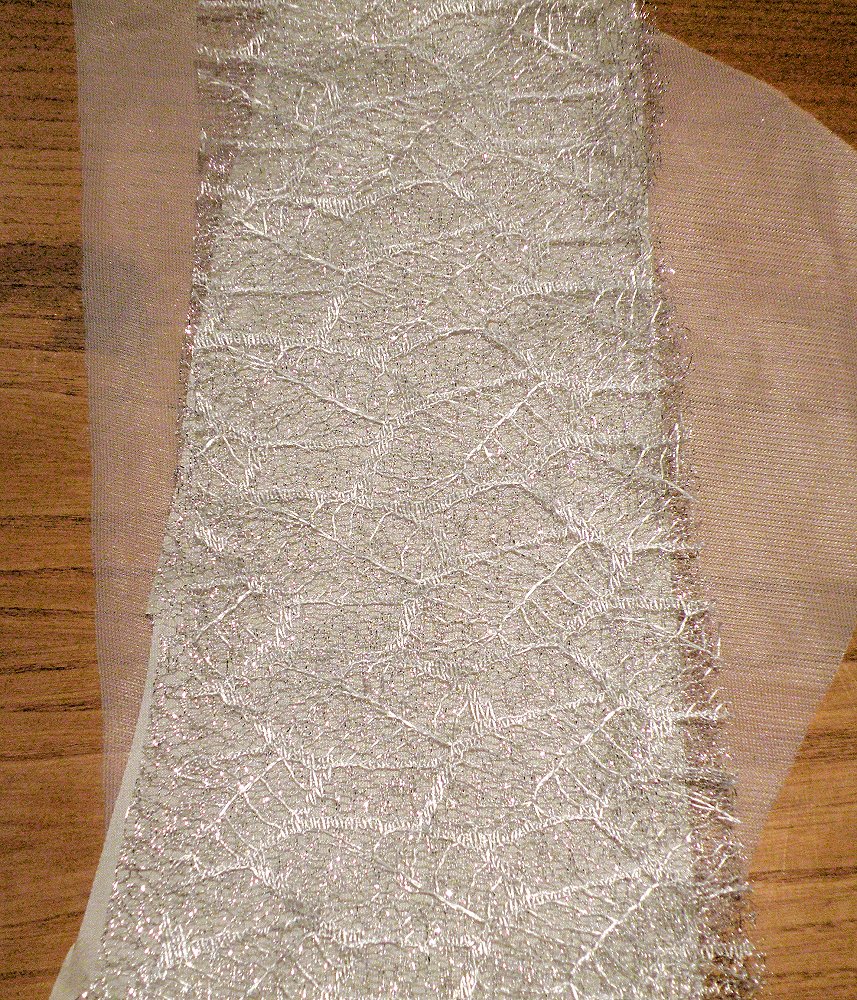
If layered on top of each other, they look like this.
The crinoline fabric gives the rigid body, which is particularly important on the skirt. The ivory taffeta makes a less white backing than the crinoline fabric does (because the base color of the dress is ivory, not white!). The silver mesh tulle is responsible for the sparkle; and the leaves lace gives the texture to that layering.
While not being THE original fabric, I think that these layered fabrics imitate the look of the original fabric rather well.
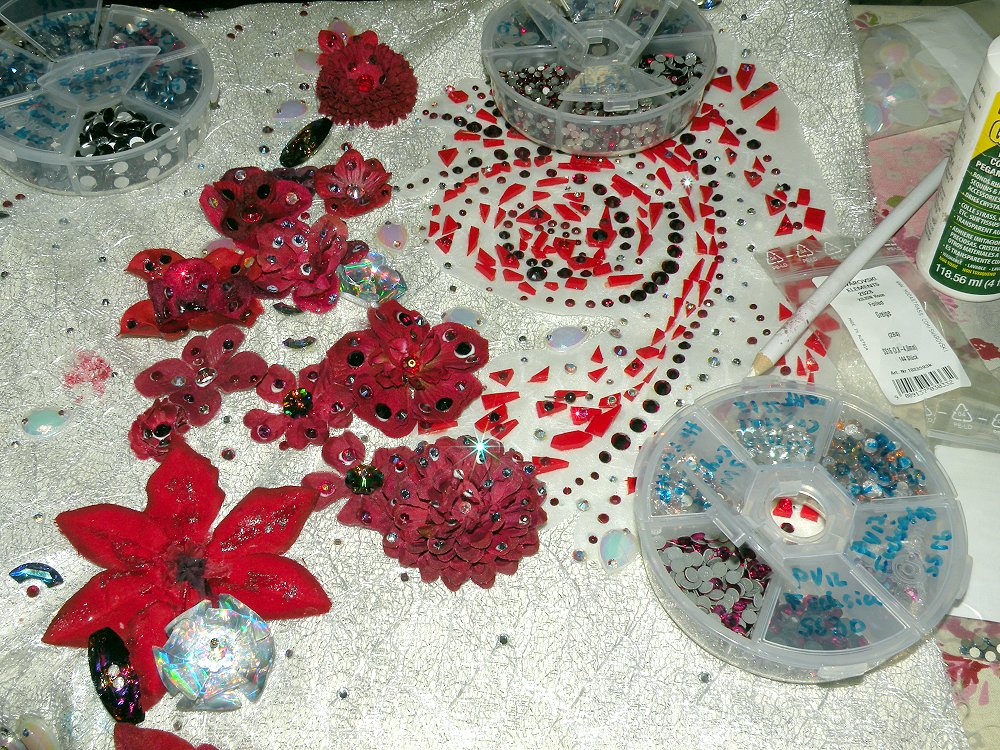
The crystals
I am starting with the hotfix rhinestones, which are the flatback and Eclipse crystals. I am setting those to the not yet sewn pattern pieces, because that’s easier than to do it when the dress is sewn up.
Setting of the crystals in progress
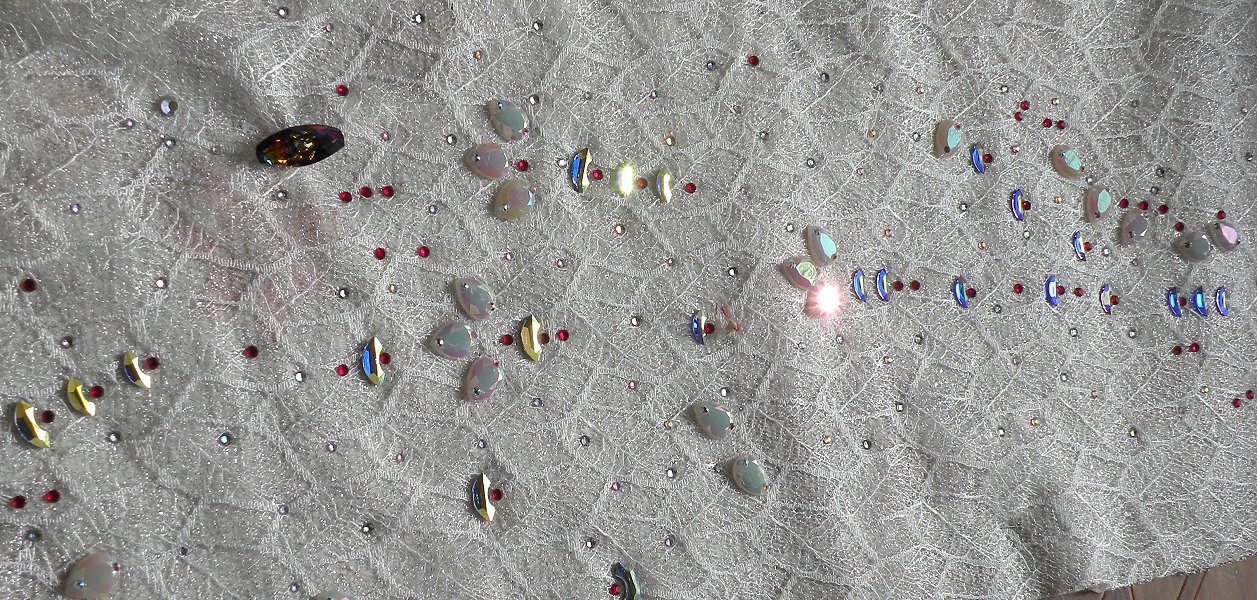
More progress; now with dufflecoat buttons and Jelly AB drops.
Slowly but surely the fabric pieces turn into sparkle beasts!
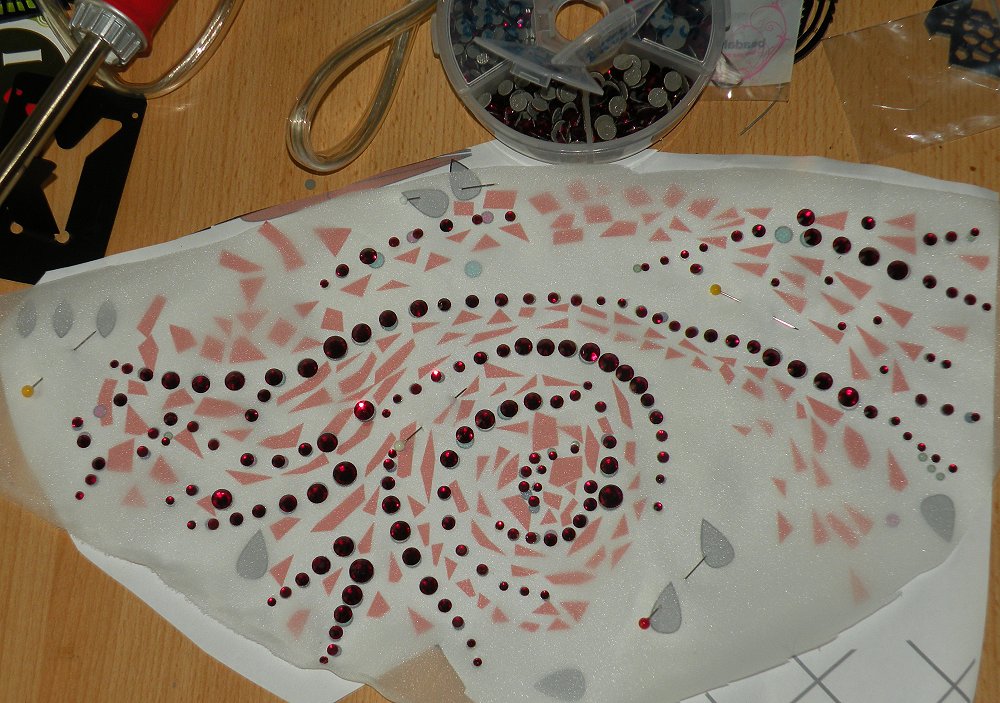
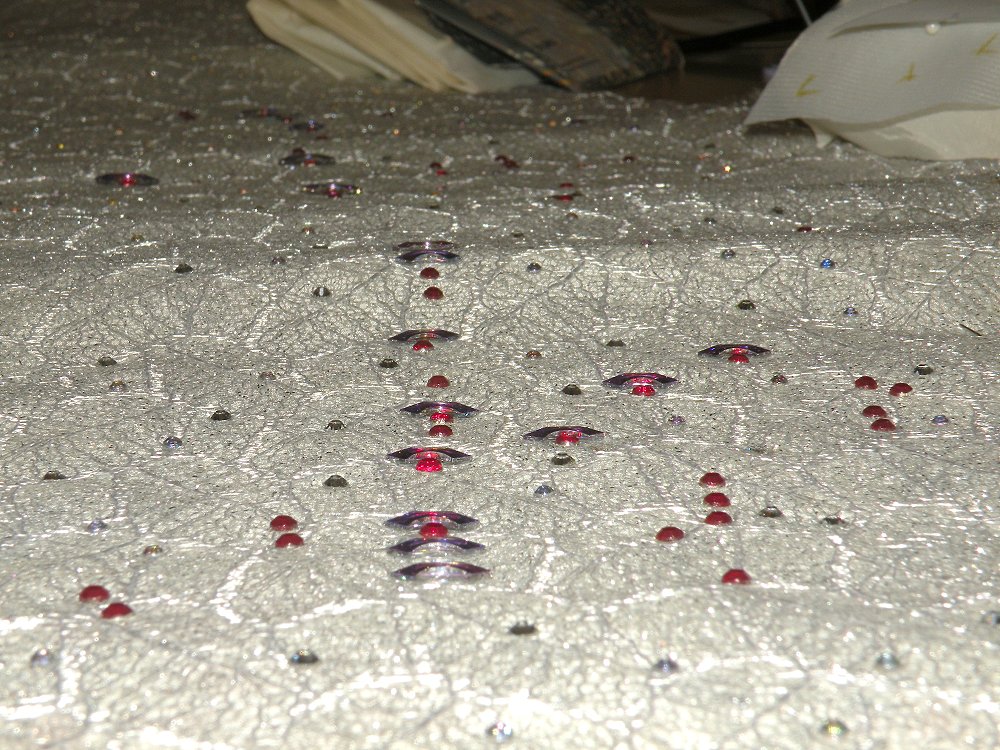
Starting to set the crystals on the organza pieces, which will later be attached to the gown. This is the „spiral“ on the hip.
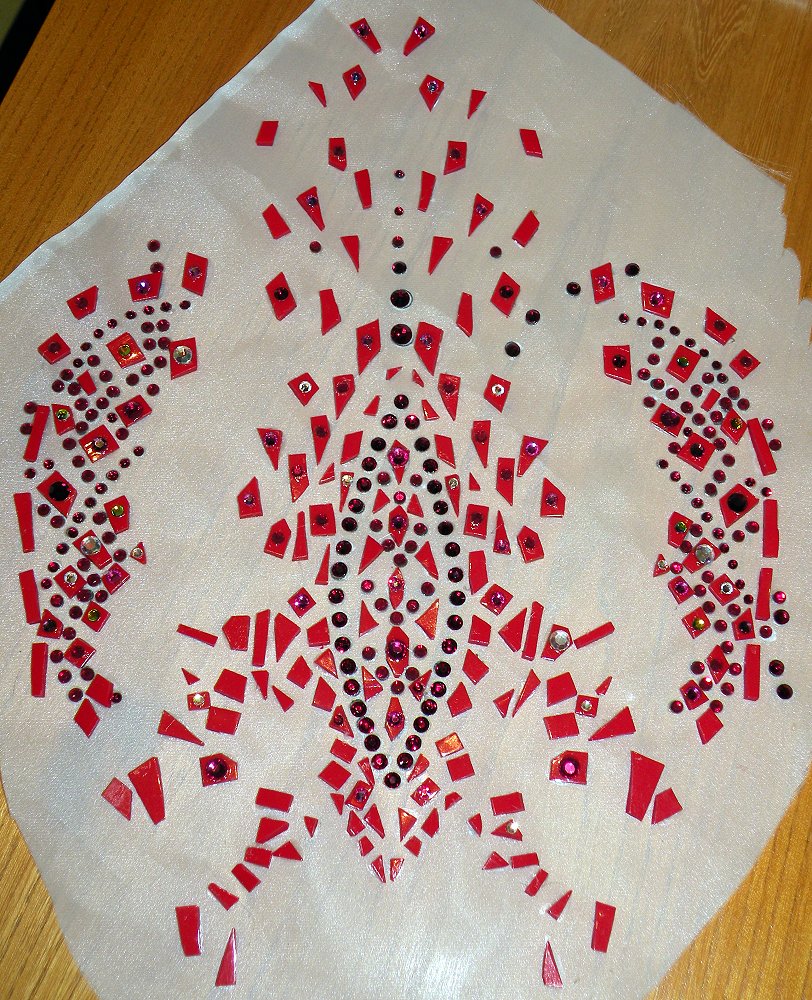
Center front top piece crystal setting in progress, already with the „red shapes“.
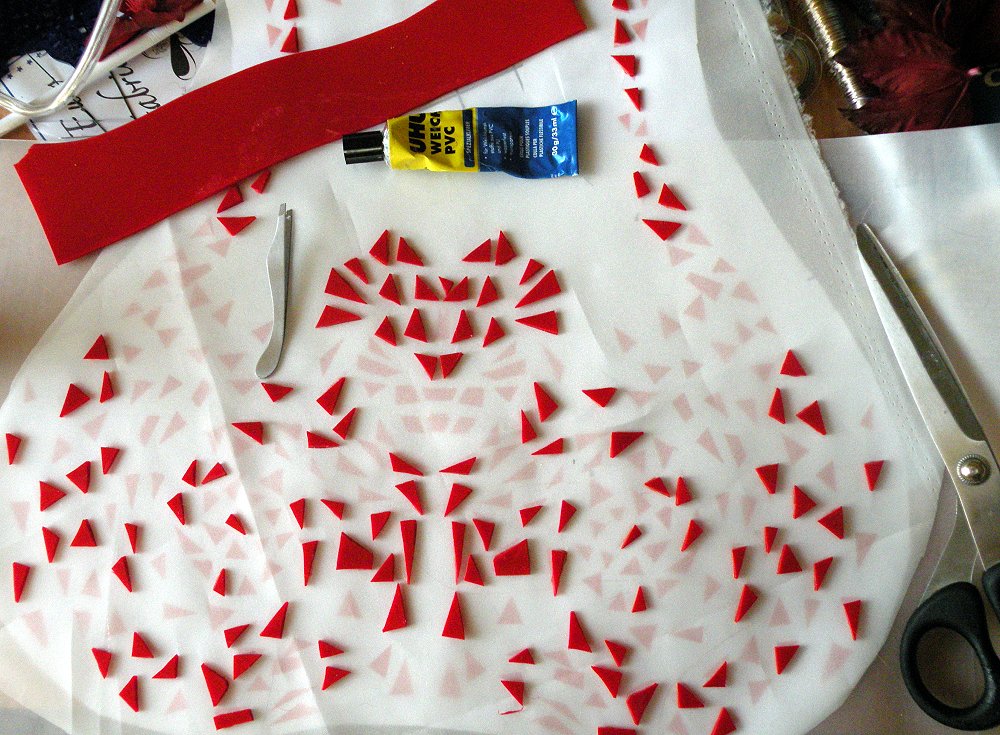
Speaking of the red shapes, here’s the progress on setting those.
I am using flexible opaque PVC, 3mm thick, for those – that’s the kind of PVC used for flexible flap doors.
It’s easy to cut, the only drawback is that it can only be glued down (or upon, as in „setting rhinestones on it“) using a special kind of glue for flexible PVC.
And yes, EACH of the shapes is hand-cut and hand-glued to the organza.
In case you’re wondering: That’s a thin translucent silicone mat between the organza and the printed template. The glue (just like pretty much every glue except those specifically for silicone…) will not permanently stick to the mat, allowing me to pull the organza piece off when I’m finished.
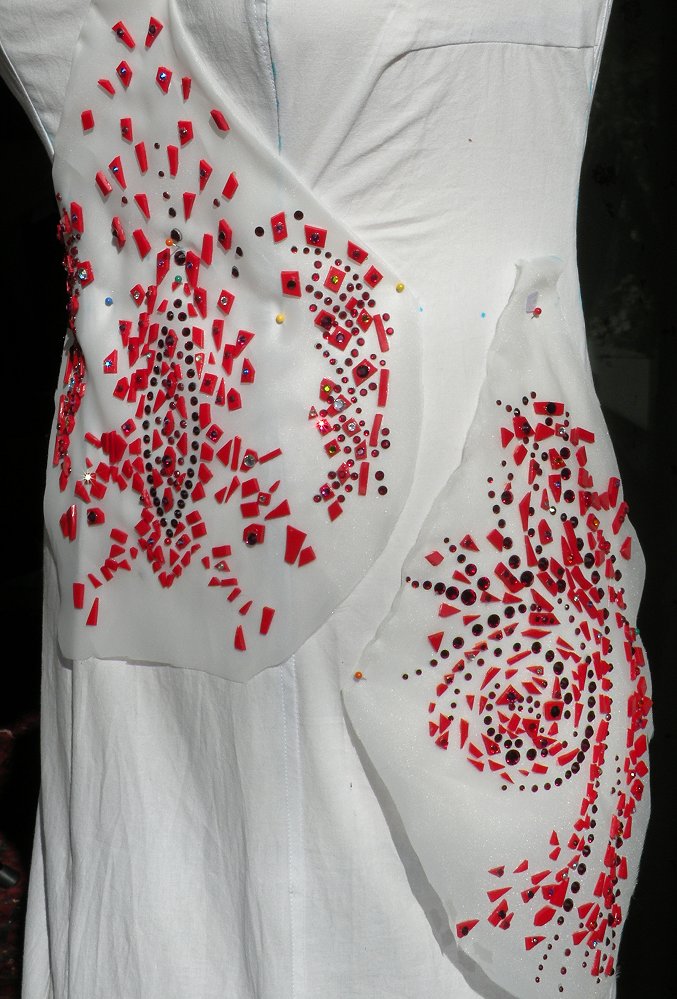
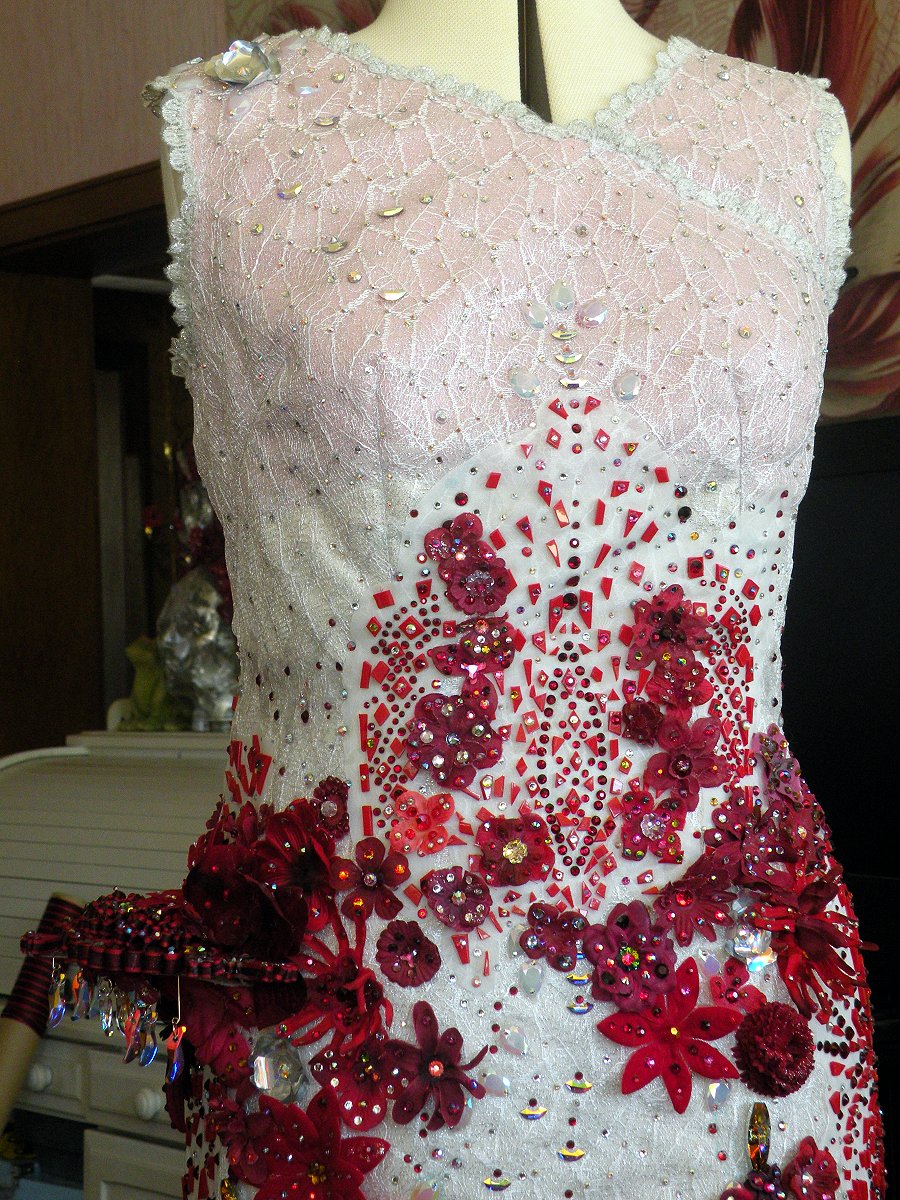
Finished (…red shapes- and rhinestones wise…) center front and hip pieces test-pinned to the dress mannequin, which still wears the underdress.
I could finally assemble parts of the gown (front, back left and right and the huge half circle of the side; just so I have pieces which still remotely fit on a table to work on…), added the organza overlays and have now started to set the flowers with the rhinestones on them.
Some of the flowers are glued on, some are sewn on; depending on their size – all flowers larger than 1.5 inches have to be sewn on; smaller ones can be glued to the fabric.
This is a slow process. I am trying, but not always manage, to set ten flowers every day. At that speed, it will take way over a month to set all of them – if, and only if, I do it every day.
That is actually my mantra while working on this gown – „JUST TEN MORE“. I repeat it over and over when I set rhinestones and drops, create the little silver hologram flowers or attach flowers to the fabric.
Because, seriously, „Just ten more“ sounds so much better to my brain than „Just 20,000 more rhinestones, just 280 more flowers, just 50 more hologram flowers to cut“.
It’s also making me set more crystals than I think I could do – each time I think about sleeping, eating, doing whatever I SHOULD do instead of working on the gown – „Just ten more crystals, then I’ll stop.“
It works – seriously. Ten are so easy to manage.
In the workflow process, I often pin the partially finished pieces to my dress mannequin and take a photo which, in position, is similar to one of the reference pictures of the original gown; then compare it to the reference photo.
That way I can quickly compare if there are major differences and if I have to rework any crystal / drops / flower placements.
Dress front: Mostly finished, except for armholes.
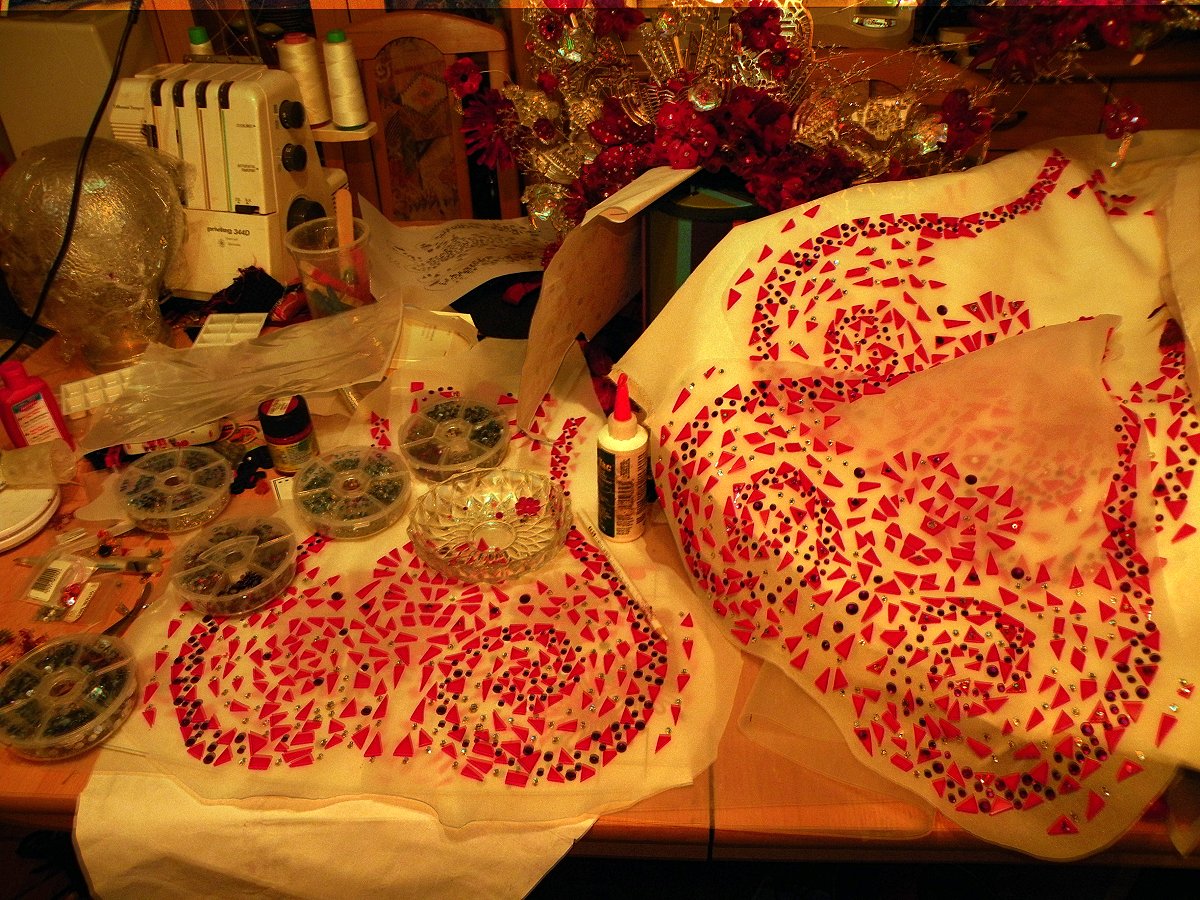
Setting the red shapes and crystals on the four double swirls which are on the gown (one double swirl obviously missing in this picture).
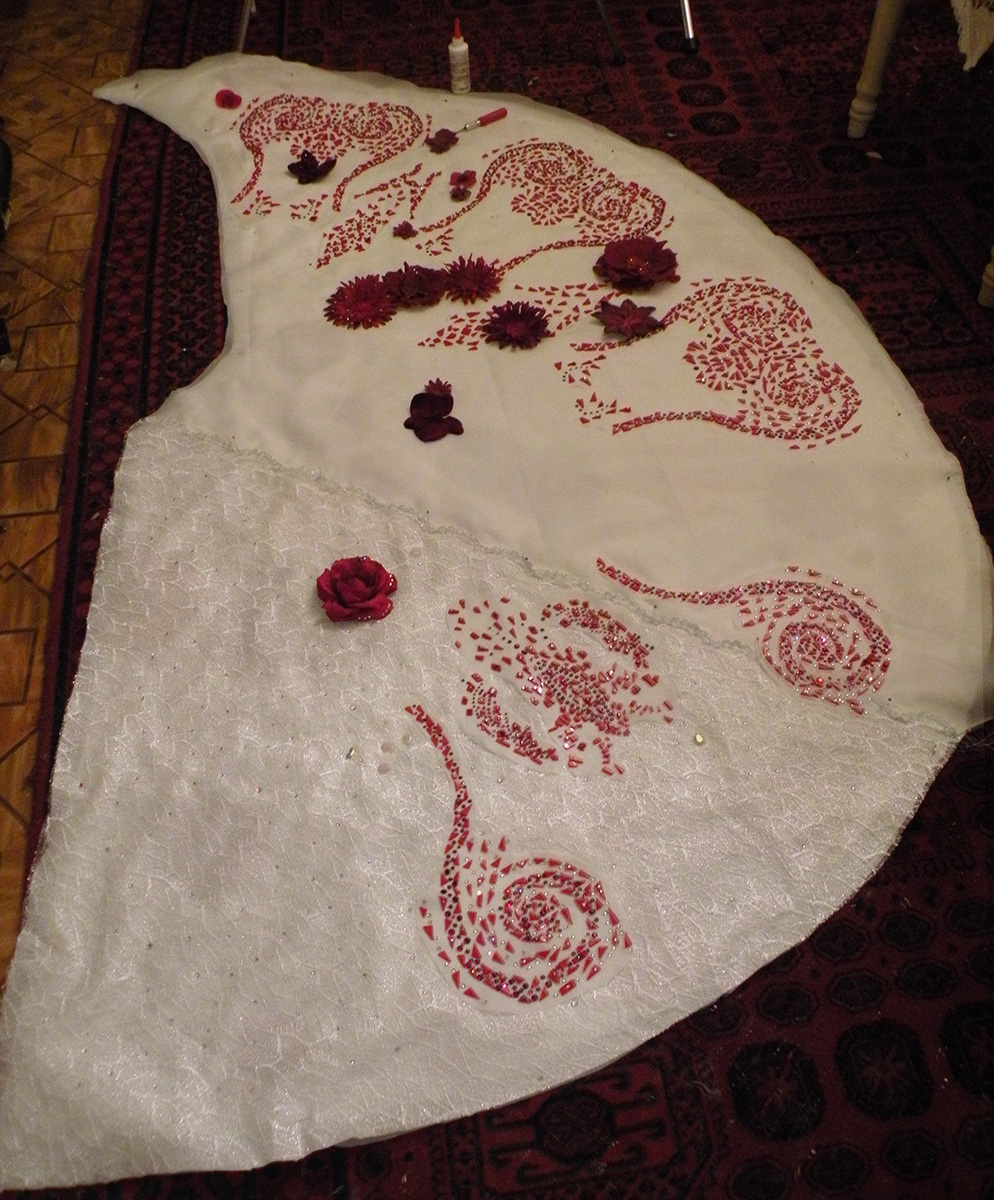
Finally working to set the organza pieces with the red shapes and rhinestones as well as flowers on the largest pattern piece of the gown.
It’s is also the largest single pattern piece I EVER worked with – 60 inches wide and 84 inches long; taking up most of the space of my living room floor.
This piece forms the huge, godet-like insert which basically forms the entire right and back side of the gown.
Close to finishing, more or less.
I still need to cover the seam that connects the large piece to the gown with flowers, have to add some more large flowers to the side of the gown and one more piece of organza with PVC shapes to the side and back and maybe – just maybe – add the dimensional decorations, of which I’m not sure whether I can finish them in my given time frame, which is until mid-May. Oh and also hand-sew the hem on the gown.
SO proud of what I have finished so far!
Some more photos.
By now I have covered the large seam with flowers and have added the last organza pieces with PVC shapes. Still need to sew the hem – and, of course, add the dimensional decorations, which I am working on at the moment.
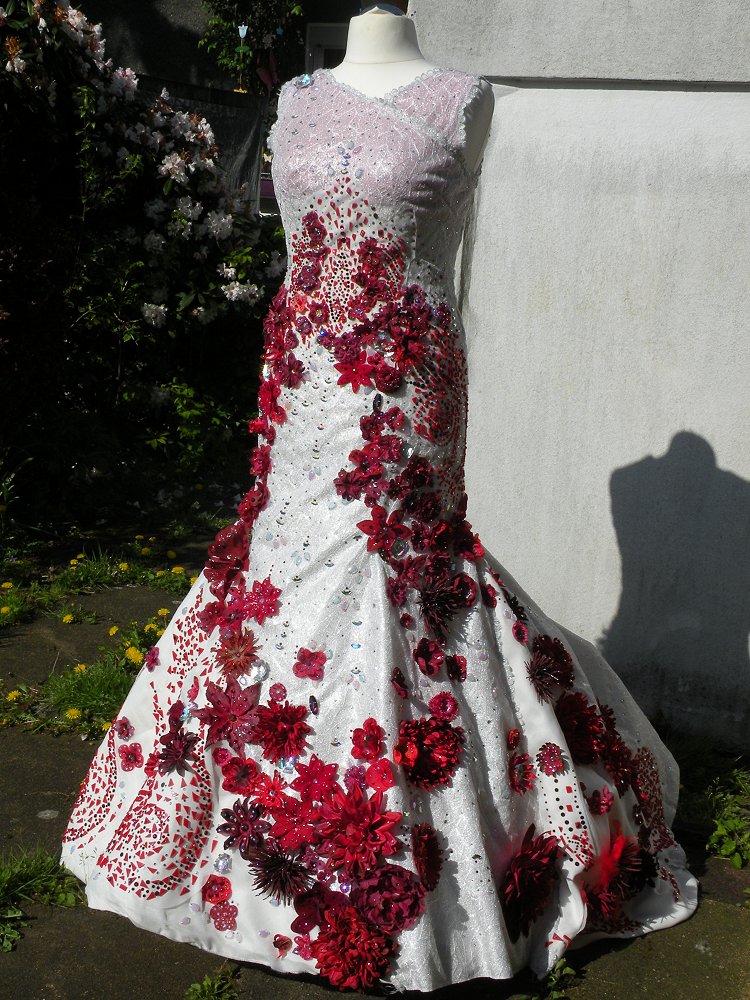
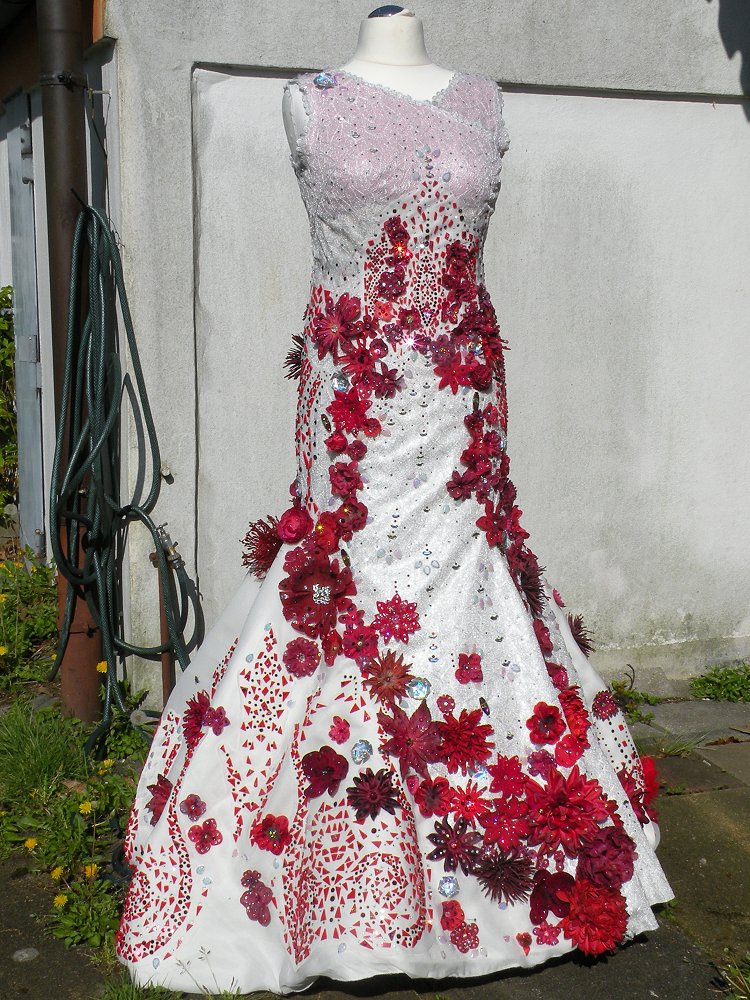
And here’s the, well, pretty much finished gown.
Actually it IS finished, but I still have some rhinestones left and still want to add them to the gown – but other than that, it indeed IS finished!
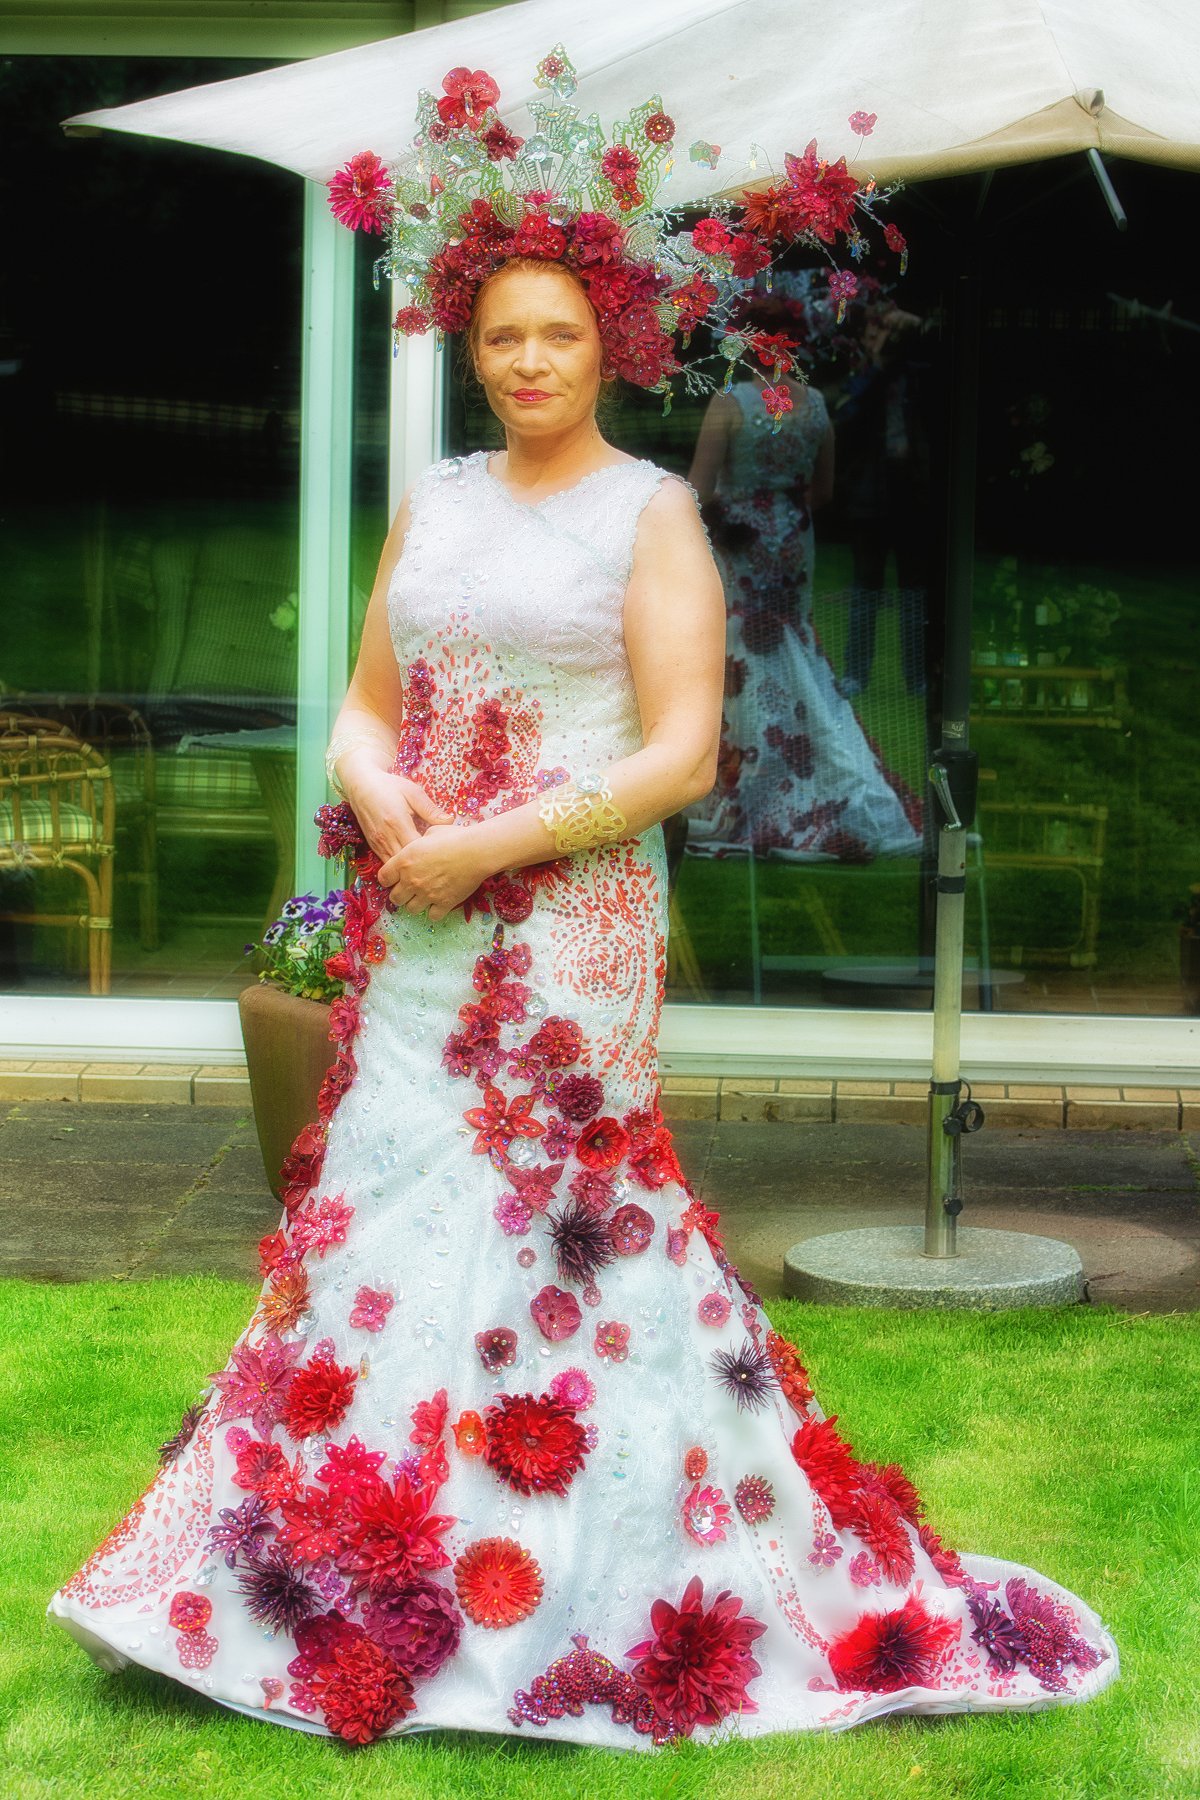
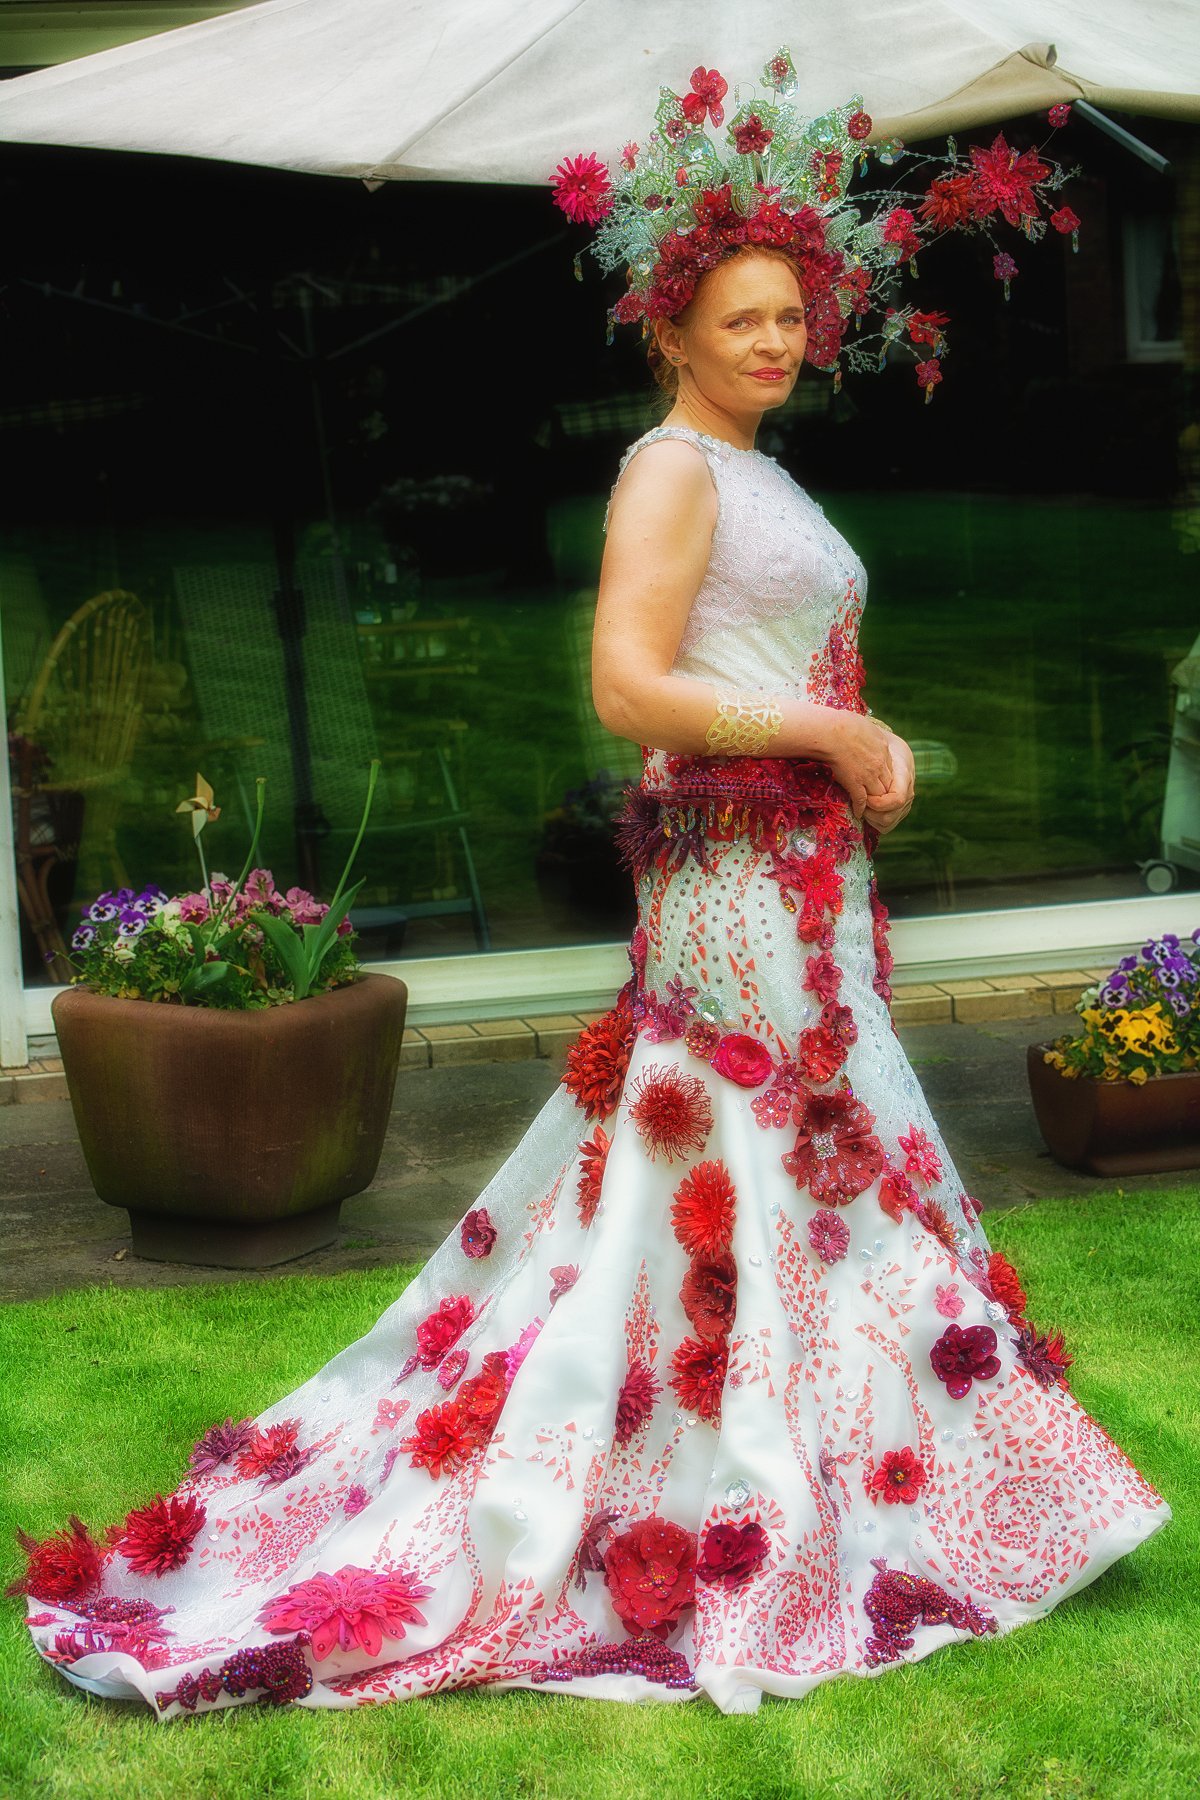
…eventually, I went totally nuts to become Queen of the Universe.
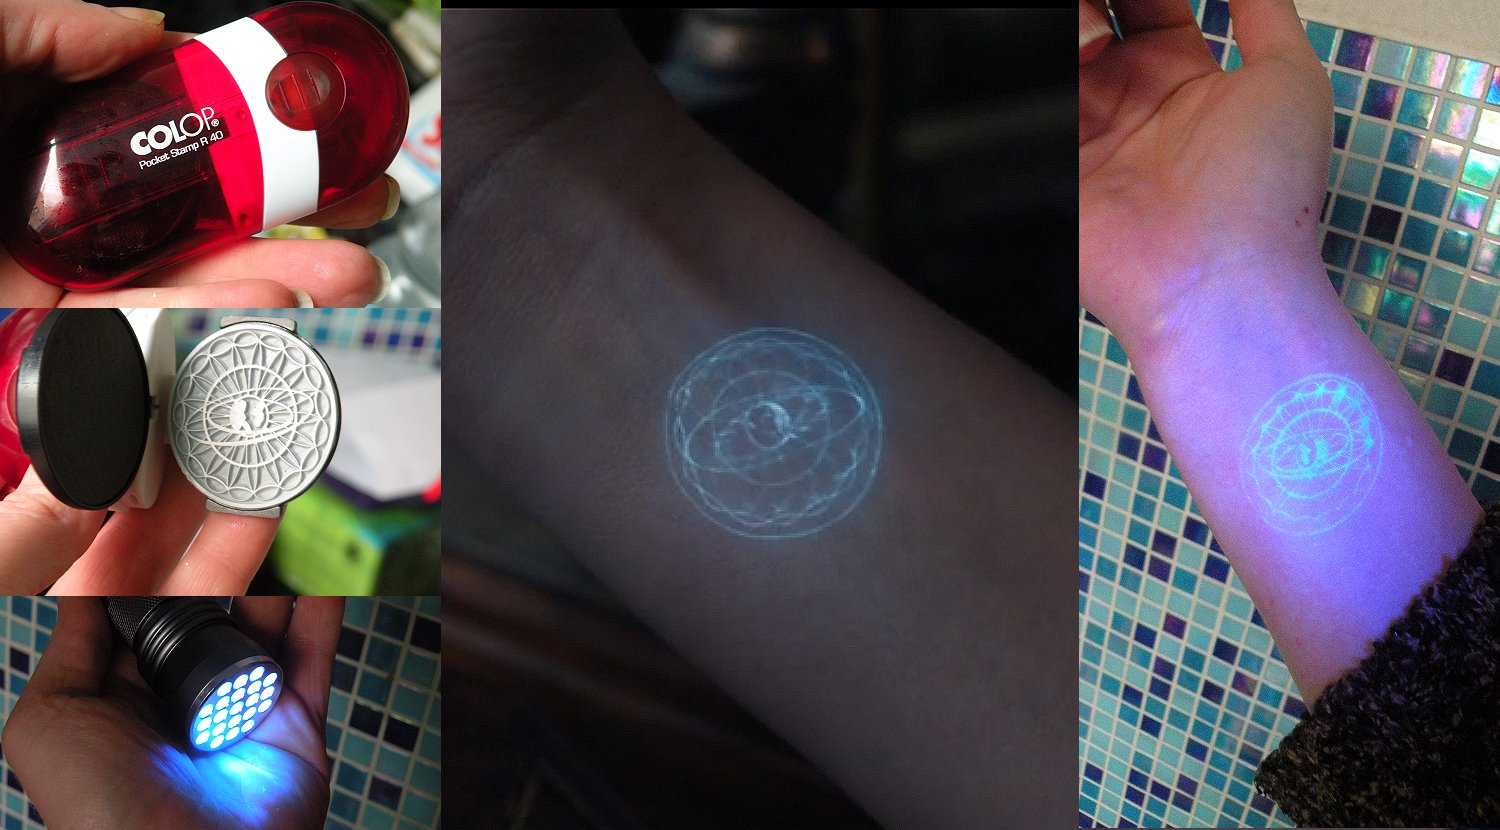
I had a pocket stamp (top left) lasered (center left) with the original „Queen of the Universe“ glowing tattoo design (center), and, with the aid of a UV pocket lamp (bottom left) I now AM the rightful heir to Seraphi Abrasax and Queen of the Universe from Jupiter Ascending (right).
„The things you do for a perfect costume!“, lol.
Thanks to a good friend on Facebook for giving me that idea to enhance my performance by innocently posting a picture of an UV tattoo last week!
Conclusion: What I learned from making this gown (still updated as I „learn along“!)
I think I should start by saying that I love to learn new things – like techniques, new materials or even machines to use. I am easily bored by projects that do not force me to learn new things.
That having said, in 38 years of sewing, I think that THIS is definitely the project during which I learned most.
Here’s what I learned by making this gown:
- Preparing and creating files to be sent to a laser cutter to cut acrylic glass.
- Acrylic glass does not like if you try to hotfix rhinestones to it.
- Do NOT peel the protecting film from the FRONT of acrylic mirror glass before glueing it back to back. That saves you from having to painstakingly remove (read: hours of polishing) any glue stains from that mirrored front surface. Instead, you just have to peel the protecting film (which now has glue stains) after the glue has cured.
- Preciosa’s „Viva 12“ and Swarovski flatback rhinestones are absolutely indistinguishable in terms of sparkle and appearance. No other rhinestone comes even close to those two brands.
- Using a hotfix rhinestone picker. So far I had always glued my rhinestones; specifically for this project I bought a hotfix picker.
If you need to know, both have advantages and disadvantages. With the picker, you need to wait until the stones have heated up – which takes between 4 and ~40 seconds depending on the size of the stone. With glue, you have to wait until the glue has dried before you can move the fabric you are working on.
By now I went through two hotfix pickers: A regular one and a vacuum picker. If I had to recommend either of them, it would DEFINITELY be the vacuum picker! - Way too much about Swarovski colors and shapes, and also that Swarovski doesn’t produce all colorways and / or shapes infinitely.
For example, they stopped producing the dufflecoat buttons in „Crystal Volcano“ as well as the „Eclipse“ crystals in „Crystal AB“ just before I started on this project in 2014, and I was basically lucky to find some that some dealers still had. - Creating flowers from silver holographic film, which, in turn, is difficult to find if you want the type that looks like a CD and have no idea what you’re supposed to search for. Yes, „holographic film“ is easy to find; but only the type that looks a bit like „cracked ice“. The „looks like the backside of a CD“ type is more difficult to find, seriously.
- Large textile flowers are surprisingly difficult to find.
- Fishing sinkers are brilliant if you want to keep a hoopskirt from tilting forward. Also, you can use a surprising amount (read: weight) of them if the hoopskirt tends to tilt A LOT.
- Kittens love large shiny rhinestones and want to steal them. They will even try to pry them from fabric if the crystals are already attached to it.
The only solution is to sacrifice some of your rhinestones and firmly glue them to a cat toy using epoxy resin. You should have that toy at hand when the kitten is on a mission to steal your stones while you set them. - Flexible PVC as used for flap doors can be used on a gown to create funky decorations.
- Cutting polyester organza with a soldering iron to create smooth finished edges without sewing. Also, that this can be done on a ceramic glass cooktop without harming it.
- A plotting company that cheaply prints on very large paper sheets saves you much work and nerves if you have generated a pattern on your computer, which would otherwise require you to glue over 100 pages of regular small paper sheets if printed on your home printer.
- Creating ribbon flowers the way chinese frog buttons are created.
Other people’s reproductions and / or other interesting things:
- Emmalie-Kate is creating a reproduction with which she „focused on creating accurate flowers“. I said it before, I’ll say it again: KUDOS to everyone who decides to create the 300+ flowers for that gown – I would not have that patience! And with the right dye / silk paint, even those nylon flowers can be dyed to be color-wise accurate matches for the original ones.
- Frederica La Noir is currently creating the most accurate reproduction I have seen so far. She even makes her own flowers!
- Aurelia Isabella’s reproduction
- Warpaint & Unicorns has a tutorial on how to make the headdress, which I find – shall we say – interesting.
The part that I find interesting isn’t exactly the tutorial itself but the template for the silver shapes she offers.
I’m pretty sure that she did not come up with the idea for those very unique shapes, which, in case of the larger piece, combines the top part of the „Obelisk“ earrings with the larger piece of the „Temple Talisman“ necklace part. Instead, I am very sure that she used this picture to develop her shapes:
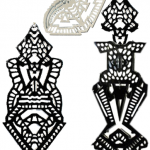
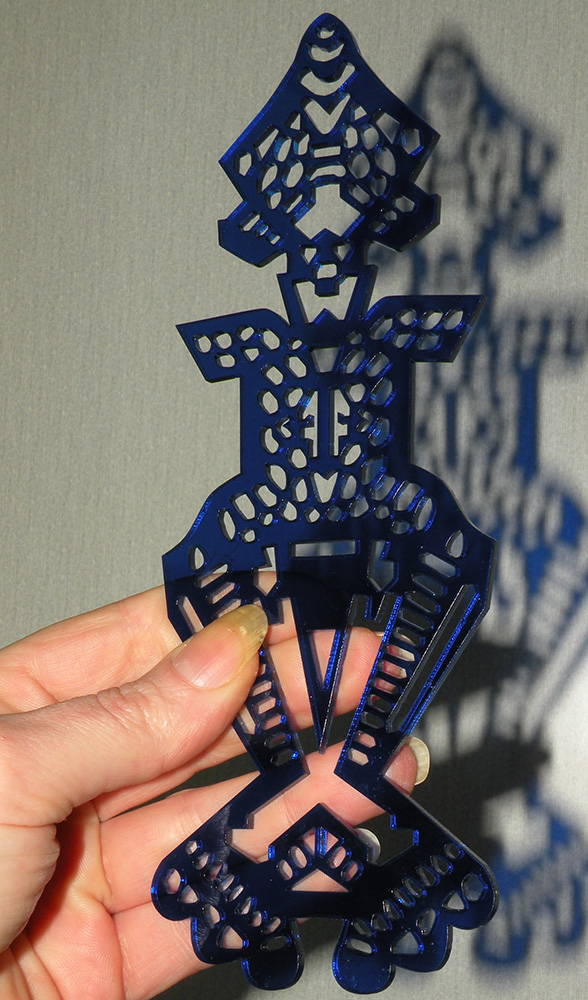
which, coincidentally, I developed (and posted on this website) on the 28th of November, 2014. This was my first draft for having the shapes laser-cut, which I had done in blue transparent acrylic just to see how they would turn out:
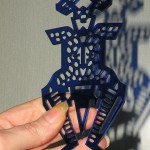
This photo was taken and posted on my website on the 12th of December 2014.
I have taken off both of these images later, when it became clear that the shapes weren’t quite correct, which made me redo my vector graphics for the laser cutting files. That must have been around mid-January 2015.
The reason that makes me sure that her headdress shapes, which, again, she claims, „recreated the designs by tracing two of the piece I found for the towers on the crown“, is the very unique combination of the two pieces with the „W“ cutout between them. This is, actually, NOT what is on the headdress. It’s what I thought there COULD be, which I then developed myself by photoshopping it. Also, her version, just like my early draft, has the center portion of the „Temple Talisman“ necklace FIXED to the surrounding frame, when, in reality, that triangular shape at the center is actually a PENDANT within the outer frame. Again, pretty much exactly the same on hers and mine.
Long story short, the tutorial is not bad and will be helpful for many people; and the resulting headdress is rather good.
I’m just (not just a bit) miffed that she’s not naming her obvious sources.
And yes, I know that there’s a (huge!) possibility that someone will call me mean, jealous and cranky for writing this, but seriously? This plagiarism is just TOO obvious. Again, *I* am listing and linking to my sources. Why doesn’t everyone else? Oh wait, it’s because you get more compliments if you claim that you „made it all by yourself“, sure. - CraftyMel’s reproduction
EDIT:
By now I received and accepted an apology from Mel, see comments to this page. So what I wrote before, see below, basically just serves as evidence for what I wrote before; to not make the comments to this page appear out of context. Here is what I wrote before:
I think this person emailed me about the vector file for the headdress. At that point, I already had the „will not send out vector file because counterfeit jewelry“ note on my website for several days. Weird!
Even more weird, she apparently now basically posts her costume progress everywhere on the internet – including Reddit – and never mentions where she got the inspiration from, or found out about the Eclipse Crystals which she also uses, or the template picture that she obviously used to create her vector file (mine, to be very clear here – that part is safe to say because there is something in that image, which only I will recognize, that differs from the original jewelry).
See, that is one of the reasons why I can’t stop repeating that if you LEARNED something from my website, please let others know WHERE you learned it. I plainly just don’t like people who pretend they „invented and did it all by themselves“ when it’s very apparent that they did not.
Because, you see, I list my sources. I spend hours documenting research results and everything I do, I write down the mistakes I make and what I learned from them – and I share all of that for everyone to see, learn, avoid those mistakes and use that information.
I think the least I can ask for is that I am given credit for that work, which, if I may remind you, actually COSTS me (the maintenance of the web server, to be precise – which, in case you thought that, is not even remotely covered by the small Google ads I have on the website), not you, who benefit from it.
Edit: I am getting a lot of traffic right now – from Facebook as well as from Reddit. I’ve basically been called an asshole, a bully, a horrible person and a bitch for writing this – read the comments to this posting. Seriously, I can live with that because I don’t think I did anything wrong for calling someone out who pretended that my page and what she learned from it basically do not exist. And as for the name calling – folks, seriously, YOU are the bullies.
Yes, she changed that by now. Still, I will not take this text off the page, because she tried to justify what she did by saying „imitation is the sincerest form of flattery“. That may be true; but only if you let people know WHAT exactly you imitated and what helped you doing so.
Also, she claimed that she did not read that red box of text. Well, guess why? I colored it RED after receiving your email; the text was there before that. - Jupiter Ascending Wedding Makeup Tutorial
(Note: the lipstick used in that tutorial is way too red and also otherwise wrong – the original makeup uses different lipstick colors on upper and lower lip. Otherwise, the tutorial is not bad!)

If you would like to see your reproduction of this costume linked here, please let me know!
Hallo!
Ich bin die Jupiter Cosplayerin von facebook (wenn du dich erinnerst… XD)
Muss jetzt auch hier einfach noch mal sagen wie unglaublich genial ich deine Arbeit finde!
Du arbeitest so detailgenau, ich glaub ich hab noch nie einen vergleichbar arbeitenden Cosplayer gesehen!
Ich bin so gespannt auf das Endergebnis, mach bitte bitte weiter so! ^3^
Merci vielmals 🙂
Aber leider kann ich kein Stück cosplayen; ich mache nur Kostüme und trage sie. Deswegen bin ich kein Cosplayer, sondern nur Costumer. Zum Glück braucht man bei der wunderbaren Jupiter kein großes Posen und „playen“ hinlegen 🙂
Naja. ich glaube der Begriff „Cosplayer“ bzw. eben das „play“, ist bei sehr vielen in der Szene weit hergeholt.
Ich selbst „playe“ auch nur dann wenn der Character eine sehr eigene Persönlichkeit hat, die man immer so darstellen kann, dass die Leute nie glauben man sei gerade selbst hochnäsig oder verletzend o.Ä. Bei Jupiter ist es genau so. Viel zu playen gibt es da tatsächlich nicht.
Anders wäre es da z.B. bei Balem Abrasax, weil man den einfach so geil spielen kann, ohne dass das Missverständnis aufkommt man wäre in echt so. XD Und btw Balem: So wies aussieht werde ich auch den noch cosplayen, weil er mich einfach so fasziniert hat! ^-^
Das ist wohl wahr! 😀 Ich fand die deutsche Synchronstimme von Balem außerordentlich bescheuert. Im Englischen klingt er „bedrohlich“; im Deutschen eher wie ein heiserer Eunuch.
So richtig übel finde ich eigentlich nur, wenn die Leute ihr Kostüm – also das, was sie tragen – als „Cosplay“ bezeichnen. Immer, wenn jemand sagt, er / sie „arbeite an seinem / ihrem Cosplay“, stelle ich mir dann immer jemanden vor, der Stunden vor dem Spiegel steht und posen übt, lol…
Nein, das ist kein Cosplay, das ist ein Kostüm… was man dann damit macht, wenn man es trägt – eventuell in Verbindung mit Props – kann Cosplay sein (muß es aber wie gesagt nicht); aber die Kleidung an sich ist ein Kostüm, Costume oder kurz – wenn’s denn unbedingt sein muß – ein „Cos“ 😉
Your progress is absolutely stunning so far, I’ve been obsessively following this page because I LOVE this dress and I can only hope that *if* I attempt this reproduction, it turns out a tenth as beautiful as yours. I apologize for any drama my Reddit comment may have caused
Thank you so much! 😀 I hope that my reproduction will do the original gown justice.
Except of course for the size; which I cannot reproduce as movie accurate as possible because I am actually planning to wear the gown myself, lol.
Your Reddit comment did not cause any drama; it’s just that apparently some people thought that you were me 😉
Haha I wish, it’s pretty obvious by my Reddit profile that I’m nowhere near as skilled as you. You’re a huge inspiration though, thank you and please keep doing what you do!
Thank you 🙂
The term „crosshairs“ is also a slang for „brought into my focus/attention“ here in the U.S., just so you are aware. I don’t think you understood that, so I wanted to tell you. I can’t personally speak for that person, but as an American I can say with 99.99% that was what he meant.
Thank you for explaining. Still, I think it’s a rather threatening manner of telling someone something. Along with the name-calling, twisting my words and apparently not even reading the page, it still worries me. At any rate, I think that the kind of comments this person made are NOT professional at all – something he claims to be.
The gown is coming along beautifully! So excited to see the finished product! Amazing job, on everything you’re doing! 🙂
Thank you 🙂 So nice to read a friendly comment after many of the others that came in today 😉
Your comment about me was brought to my attention via a reddit comment saying I should site my source. They were right and I agreed with the comment. I’m sorry I did not add a link to your site on the places I had shared the images. I have added the link to each picture in the imgur that had the headdress and as a comment on my Facebook page. I’m surprised that page even came up, as most of my followers are friends and the post had a pretty low reach. I did link to your page on my personal page when I first found it, so I did share it at least once. Even though you seem to think it was intentional, in all honestly it was overlooked previously because it was 1:30am and I am a sleep deprived new mom. I had no intention of being a jerk or anything and I’m doing my best to remedy it by correctly sourcing everything now. At one point I believe I did thank my husband for helping with the flowers and my friend for helping make the headdress. I didn’t intentionally snub you, I guess I was focusing on my appreciation for the manual labor and overlooking your equally difficult and vast amount of intellectual help, an error which I am attempting to fix now. Also, you may not believe when I say I didn’t see the part about not sharing the headdress when I emailed you, but you may note that I emailed you immediately after I saw it (within hours of my original email, in fact) apologizing for not seeing it. Maybe I was so excited looking at your photos that I didn’t thoroughly read the text. Again, I am sorry to have bothered you unnecessarily.
Lastly: I don’t condone any of the name-calling that is happening in the comments. Please be nice, people! I messed up and I deserved to have it brought to my attention, even if I would have preferred it in a less public way.
I have seen what you wrote on Reddit, Mel.
And I accept your apology which you wrote down here; even if it seems that some people who commented here seem to think you apologized *to me* in other places as well, which is just not the case (at least not that I know of).
As I wrote in my reply to the last comment about why I react the way I do, please do read my „Padmé Dinner dress“ page; which will perhaps give you (and others) a better understanding of why I react the way I do.
I KNOW that I did not create the dress / headdress for you, as I did for the person mentioned on the Dinner dress page; but it’s basically the same – someone else wanted something from me, I gave it to them (and be it just line art – which was free, after all!), and they „forget“ where it came from (though that person even went a step further).
I know who those comments come from, and I think it’s safe to say that all of them are a result of you posting [friends only] on Facebook. You, however, are not to blame for them – I really don’t think that you told your friends to name-call. They are solely responsible for their actions and the language they use.
And by the way, I know all too well about sleep deprivation. I have been a single mother for fifteen years now, from six weeks before my son was born. I work at night, sleep when he’s at school, basically don’t sleep on the weekends, and I never had anyone to babysit him since he was born, except for once a year when he’s with my parents.
So there, I know what you’re talking about – can’t remember when I last had, say, eight hours of sleep 😉
Thank you for accepting! I hope we can all move forward in a more positive light now.
I think some people were under the impression that the Reddit comment was from you, so my apology to that was directed at you, which is not the case.
Nope, the Reddit comment was not from me; seriously not. If I would have wanted to write there, I would have done it using a name that you would have recognized.
By the way, you may want to keep one of your friends at bay. My first language is not English, but I think he just threatened to shoot me when he sees me – something I take VERY serious.
That is the reason why I will edit what I wrote on the link to your image gallery, but will not remove what I initially said, and I will also not remove the comments made here today. They show too well how quickly „wanting to „help“ a friend“ runs out of control.
Yeah, I figured out the reddit wasn’t from you after I researched a little bit.
Like you mentioned before, I have no control over what my friends are saying, in fact I asked them not to post at all, and have just asked again not to. And as for the friend in question, if it’s any consolation, he does not own a firearm, has no plans to travel anywhere out of the country and chose a poor euphemism for „brought to my attention“. He’s also being a jerk.
Thank you.
I don’t know about your friend – maybe I overreacted. But even if my son is 15 by now, I’m still the only parent he has, and plan to do that as long as I can (or rather, as long as he lets me). That includes protecting BOTH of us from possible harm. I generally see red if someone threatens me; it’s a precaution because, well, let’s say it like this – there was a time before my son when I was not as cautious, and I paid a few prices for that before I learned. His Facebook map shows quite a few places in the world he traveled to; including Europe. So…
P.S.:
You calling the guy who created your headdress frame a „jerk“ is something my brain needed to process. I thank you for that, because it shows me that you do not condone the kind of comments he leaves. I really cannot thank you enough. Perhaps it’s because both of us have mother’s instincts and know what’s right and what’s wrong. At any rate, thank you again.
I don’t intend to resort to name calling or low blows. I’m just legitimately confused at the track you decided to take with this. You obviously are passionate about what you do and want to share that passion with the world. That is amazingly admirable and the costuming and cosplay community would be even richer with more people taking the time and effort to share their process like this. No one is arguing that you aren’t talented and thorough. I guess my confusion comes in with the attitude that you have decided to take. „Imitation is the sincerest form of flattery“ only goes so far, I understand that. Seeing someone else pass off your work as their own must be frustrating. But in an environment where you are specifically constructing instructions to be used by other people, the idea that you would automatically assume the worst seems pretty drastic. You had her email on file; what is the benefit of public shaming when you could have easily *amicably* resolved this by emailing and requesting research credit? She still made her dress with her own two hands, she isn’t a thief. She simply didn’t source as she should have; a fact that she has since publicly admitted and apologized for. And yes, you can claim she only did that because of your aggressive call out, but there’s no way to really know that is there?
What you make is beautiful, but the way that you’re treating people in both your original post and in your comment section isn’t.
She apologized? To me? Yes, in a comment that was made 15 minutes after yours; which you cannot know about since I have not published and replied to it yet (but will in a few moments).
Just for the records, „she“ went public without credit. „I“ went public for that. Very simple.
And by the way, you may want to look up what I wrote on my „Padmé Dinner Dress“ page. Read the page, seriously. Maybe, just maybe, you will get a better understanding as to why I am always prepared to expect the worst.
I was reading through, rather impressed with what I was seeing, but after seeing how much of a horrible person you are, you deserve to be shut down. I thought your techniques and points were great and that when I make my costume I would keep some of the points you made in mind, but after what I read about what you said about CraftyMel I refuse to even look at your page again. Its cyberbullying, mean, and makes you just look like a truly ugly person.
So tell me, where did you get your inspiration?? Oh the movie! Where did craftymel get hers, THE MOVIE! Just so happens you made the head dress first and she used your method! We are all cosplayers/costumers/FANS and this is a prime example of the hatred people with not so much experience who are trying to learn new things have to go through constantly. You post all of your experiences and techniques to teach people how to do things but then get mad when they use it?? So what if she didn’t credit you in her posts? Just be happy you gave someone help on something they may not have known how to do before. After looking at hers and yours, there is a big difference. How horrible of a person must you be to „call someone out“ on not citing you. What if it was a total accident and they just forgot? You have now shown people that rather than just emailing her and saying, hey saw you used my techniques and stuff can you cite/link me to your page?…. It would keep you from looking like a horrible person! In the end, you didn’t come up with the dress idea and therefore its original creator could come back at you for using some of their techniques and tricks. Would you like them telling you how horrible you are for using their layout? Didn’t think so!
I’ll be linking this horrible page all over the stop cosplay haters/hate cites I can find… At the least people who follow you need to know how much of a bitch you really are behind the scenes!
Wow, what a wonderful reaction – thank you so much 🙂
Please DO let me know where the creators of the original gown / headdress shared ANY of their techniques and tricks. Or any of the actual materials used on the gown, like, sizes and numbers of Swarovski crystals. I don’t think they did; I had to research all that and wrote it down on my page, so others would not have to research as much as I did.
You’re right, how absolutely horrible of me to share my research.
And how horrible of me for, uhm, actually naming and linking to those people who were involved in the creation of the original headdress. You know, I only did that to show some respect to the original creators who, after all, gave me a beautiful gown to research and reproduce.
More horrible of me, even, to expect that anyone should be grateful for all that research, or the line art for the shapes of the headdress, which, if created from scratch, takes quite a few hours as well. You’re right, I’m such a bitch!
In case you think that Mel „forgot“ to thank me, that would be interesting; because she did NOT forget to thank everyone else involved in the creation of her gown.
Anyway, looking forward to link to your reproduction as well! Must be a change from sewing scarves, bows, pillows and plushies 😉
So you’re a better person then superpony becasue she sews bows and you „costume“?
Wow- you’re not even pretending to be civil anymore.
Nope. Where did I say that? Please copy and paste. And do NOT try to interpret something into my words that isn’t there. I usually write what I mean. You know, after all, English is NOT my first language.
Please also let me know why, the fuck, I would even WANT to keep it civil if she starts calling me a bitch? In my dictionary, that is still a cuss word.
So, since we are siting sources here, can you tell me where else this person is posting this „Stolen work“ of yours on the internet besides a single reddit post? And while we are at it perhaps it is unadvised to post a photo of your proprietary work on the open non-copy-righted medium of the INTERNET.
Now… for my .02: I’ve helped to build costumes that walk the runway at Victoria’s Secret Fashion show the last 4 years running. I build costume props that sell for thousands (feel free to look me up). And in this instance you sound like a pretentious ass. But don’t take my word for it, I’ll quote Adam Savage (in case you don’t know who that is, he has a TV show with a few friends on Discovery Channel called „Mythbusters“)
„Chill out. I’ve worked in special effects for 20 years. And everything I know is for anyone who asks (given my own time constraints of course). In the SFX industry this is the default, in my experience. I have run into plenty who hoard their techniques/knowledge, but they are in the minority.
Look at it this way: nobody can corner the market on YOU. That’s your domain.“
Adam is absolutely right. And the free exchange of knowledge is the same in the PROFESSIONAL costume and prop community as well. When you make claims about not sharing and about demanding „Sourcing“ you just come-off grandiose and …. asshole-ish.
So in summery: Be flattered, you got to it first and made a cool design for some laser cut pieces that got used on a part of a costume. Stop being a self important attention seeker. People will be far more likely to follow more and likely even teach you something that you in your vask costuming knowledge, might not even know. And most importantly learn to be humble. Even those of us who build for the likes of P!nk, Lady Gaga, Victoria’s Secret, Cher, and Celine Deon know there is more we can learn and we are always happy to share. And honey you aren’t better than any of us.
Oh, actually, I have linked her image gallery; not the Reddit post. I also know her Facebook page; which I don’t want to link to since that would reveal her real name, which is neither given on Reddit nor on her image gallery. So there, two pages besides the Reddit posting.
Also, you are wrong. Whatever you post on the internet IS copyrighted. It is copyrighted from the moment of creation to the person who creates it.
EDIT: One other thing you are wrong about is that I ever called it „stolen work“. It’s not stolen; it’s uncredited. That’s different to „stolen work“ – if she had posted my image file as being her work, that would have been „stealing“.
I actually do like to share. I like to help. I like to explain. I like to teach.
I do not like if people take that help, research, and what they learned and pretend that they did all that by themselves.
You can call me „asshole-ish“; but unless you have a website with more information on how to make things, how to analyze a costume, analyzing what was originally used on a costume etc. etc. etc., you have no idea what you are talking about concerning „documentation“, „analysis“, „sharing“ and „simply asking for credit“.
Creating stuff for [name-dropping] is one thing. Telling others how to do it and to document every single step of what you do, and even in a language that isn’t your own, is something else.
And by the way, *I* learn something new every day. Mostly it’s „learning by doing“. The things I learned (and still learn!) while creating even just THIS gown is overwhelming; see my list at the bottom of the page. I am not at ALL better than anyone else; and I don’t „know it all“. I love to learn new things.
Edit: By the way, your posting doesn’t have anything to do with the fact that you created the frame for Mel’s headdress, does it? I mean, it’s not like she didn’t mention you on Facebook as the one who did.
Wait wait wait… So… You show *3* links. One of which is a Image HOSTING site for one of the other two and the last is a personal social media page… Wow. Your evidence is staggering.
And you are absolutely right, you didn’t Say it was stolen… You inferred. Which is just like „saying it“ but with less words and more sanctimonious attitude.
You „like“ to share you say… And you hold the copyright to everything on your page you say. Well A) this shows me you are either bullshit posturing or you don not understand sharing and copyrights. What’s the case number for your copyright filing? Does Kym Barret know? If you don’t immediately recognise that name I am ashamed FOR you. Your assertion is not how „copyrights“ work at ALL. Ascertaining a copyright requires a filing with the government. In a twist of Irony why not look up the story if Jupiter Ascending’s screenplay and learn how your bullshit idea of how copyrights work could hurt you too.
To me the saddest and most telling part about you as a person is that you are angry that Mel took a picture from the internet and made a copy of it. Tell me… What did you do with this dress?… You took a picture from the internet and YOU MADE A COPY.
You are so Naive about this # 1 To infringe someone’s „copyright“ you need to profit from the copy. Otherwise it is classified as homage or a recreation for personal use. There is someone I didn’t see YOU credit. How bout Kym Barret? SHE designed the dress and made it for the film…and by your very „copyright“ claim you infringe HER.
I call you asshole-ish because you ARE. Those of us who are professional often, no FREQUENTLY, help those who are beginning or who don’t know the techniques. You managed to miss the ENTIRE point of my previous post. WE professionals share because it furthers the community. We LIKE when people re-create our work. Like Adam said, you cant recreate it JUST like I did. My flare makes mine just as special as Your flare makes yours. And as for having a website… Honey, I don’t need it. The people who know anything know who I am. And I don’t need the masturbatory self glorification, I don’t need a website to make me feel „Famous“.
And as for WHY I posted: ….
I hate bullies. And the public shaming you are doing is a bully move. You put yourself in my crosshairs by being an asshole about your „Link“ to CraftyMel’s reddit build.
At this point I’ve said all I need to say. Anything more you say that isn’t „you are right, I should apologise to CraftyMel and change the wording of my post“ will just prove you are a self absorbed attention seeking fuckwit who really does not want to help build a community so much focus on becoming „internet famous“.
And just so you know, I’ll link this on my Facebook to the prop and costume masters I know and am friends with as well as the CosPlay professionals I’m friends with to shine a clear light on how you treat people. If It were me… Well Id take a long hard look at how I treat people and wither I want the people in a community I purport to be a part of to see me treat ANYONE like this in public.
So let me reply to this one by one.
1. Reddit is not Imgur. They have different URLs, and are indexed seperately on Google. I discovered the Imgur site with my weekly Google search first. Are you saying that both are the same page?
2. Please copy and paste where I said that I hold the copyright to EVERYTHING on my page. I just have the copyright on images *I* created.
2a. You may want to read this. Particularly the part that says „In all countries where the Berne Convention standards apply, copyright is automatic, and need not be obtained through official registration with any government office.“ Please let me know how that requires „filing with the government“.
2b. Of course I hold absolutely NO copyright to Jupiter Ascending, or any of the designing / working artist’s work. I do, however, hold copyright for everything I have written on this page; and my images.
3. Made me laugh out loud – „You took a picture from the internet and YOU MADE A COPY.“ Oh wow. It’s that easy, really? You see a dress on the internet and make a copy? That sounds super easy. Please let me know how to do that. Without much research, materials sourcing, waiting for things to ship, the ability to make patterns and so on. Sounds like you have a Star Trek Replicator?
4. You entirely miss the point of my website. It’s not to „make me famous“. I don’t intend to be famous. In fact, for a decade, I created stuff JUST for myself and only wore what I created in my garden to take a few pictures. I never had friends during that time either. I just created because my brain tells me that I must. It often doesn’t let me sleep because of that. I rarely leave the house – usually just once per week to shop groceries. Occasionally to troop with the 501st or Rebel Legion; to do good things.
You think I create for „fame“? Think again.
4a. You say I didn’t credit Kym Barrett. Hit [Ctrl-F] on your keyboard and search for that name on this page. It’s right there, on top, along with Michael Cinco, Adam Dee and Angel Amor; who designed / created the gown.
5. „You put yourself in my crosshairs“ – Let me STOP you right there and clarify something. I am German, I am a single mother, and I am terribly scared (!) of any kind of weapon. I am VERY, VERY serious about this.
You are American, right? Does that mean that you exercise your right to own a gun? And can I expect that, in one of your future travels all over the world, you are planning to bring one along and put me in your crosshairs?
Just in case, I have just emailed your email address, Facebook page and name to my relatives. As I said, you DO scare me by THREATENING ME with something that IS PART OF A GUN.