Mrz 252013
 

Star Wars Episode 1 – Darth Maul

Analyse und Reproduktions-Tagebuch

In Arbeit, es fehlt also noch einiges und einiges andere ist noch nicht auf Deutsch übersetzt.
Besucht die Seite öfter, ich update fast täglich, sofern nix dazwischenkommt – und wenn ich update, dann meist „irgendwo in der Mitte der Seite“ (also woran ich grade arbeite)!

21

Darth Maul scheint auf den ersten Blick ein recht einfaches, schwarzes Kostüm zu sein. Ist es aber nicht. Tatsächlich ist es ziemlich kompliziert – es besteht aus mehreren Lagen – aber der Schlüsselfaktor für ein filmakkurates Darth-Maul-Kostüm sind die Stoffe und Farben – denn weder wurde nur ein einziger Stoff verwendet, noch sind diese Stoffe nur schwarz.

Ich traf ein Mitglied der 501st – Thomas – der mit seinem Darth Maul nicht so glücklich war, welches er von dem „großen asiatischen Kostümhersteller“ (*hust* Costumebase *hust*) bezogen hatte.
Als ich Thomas dann mal beim Troopen traf, wo er das Kostüm trug, wußte ich auch gleich, wieso der nicht so glücklich war.
Die Gesamtform war nicht schlecht (achtung, ich sage nicht, daß die Form richtig war – aber so richtig schlecht halt auch nicht!), aber das Schlimme war, daß das gesamte Kostüm aus demselben Stoff gemacht wurde.
Also: Untertunika, Mitteltunika, Tabard etc. – ALLES derselbe Stoff, und alles gleich schwarz.
Das ist für eine gute Reproduktion dieses Kostümes einfach falsch; und es ist auch weit davon entfernt, screen-akkturat zu sein.
Also stimmte ich zu, ihn mit einem screen-akkuraten Kostüm zu „versorgen“. Diese Seite dient als Analyse des Originals und auch als Dokumentation meiner Arbeit an der Reproduktion.

Ihr wollt jetzt wisse, wieso das Kostüm nicht „einfach nur schwarz“ ist oder komplett aus ein und demselben Stoff gemacht wurde? Na dann lest einfach weiter und folgt meiner Analyse des Kostümes von innen nach außen.

Die Untertunika

Ich fange mit dem an, was dem Körper am nächsten ist – die Untertunika.

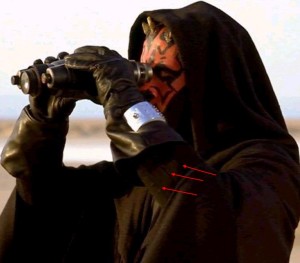
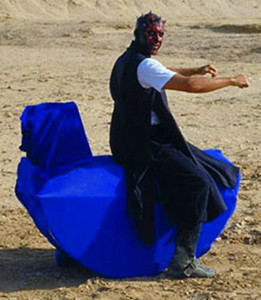
Es gibt da ein sehr interessantes Bild, und das ist dies hier:

Undertunic1

Wir ignorieren jetzt mal was weiße T-Shirt – das ist ganz offiziell nämlich nicht Teil des Kostümes 😉

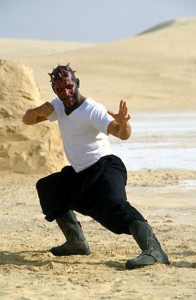
Allerdings ist es die schwarze Untertunika, die ebenfalls auf dem Bild getragen wird. Wie man sehen kann, sind die Armlöcher verhältnismäßig klein, während der Seitenschlitz der Tunika fast unverhältnismäßig hoch geht – etwa 10-15cm unter dem Armloch, um genau zu sein (anstelle von „bis zur Taille“, was viele Leute vermuteten).
Was man auch sehen kann, ist, daß die Vorderseite der Tunika mittig geteilt ist (beobachtet, wie sich die Vorderseite auf dem falschen Hoverbike drapiert!), während die Rückseite stattdessen eben nicht geteilt ist.

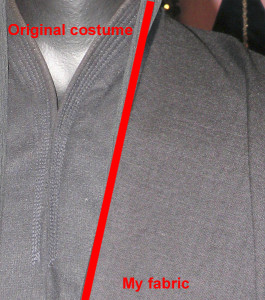
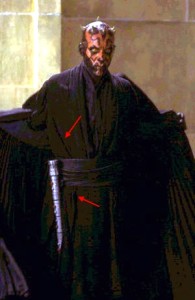
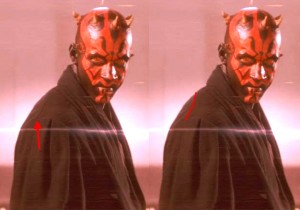
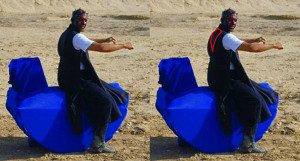
Da ist aber etwas an diesem Bild, was ich entdeckt habe, als ich in Photoshop mal ein bisserl mit der Beleuchtung herumgespielt habe – und das ist das komische Dreieck auf der Rückseite (links zeigt das Originalbild, rechts habe ich das Dreieck mit roten Linien markiert):

MaulTriangle

Das ist KEIN Lichteffekt. Wie ihr auf dem Boden sehr gut anhand des geworfenen Schattens sehen könnt, kommt das Licht von oben rechts, also kann sich hinter dem Kopf auf dem Rücken kein „Licht-Dreieck“ befinden.
Thomas, für den ich das Kostüm mache, hatte die Idee, daß das eventuell ein Stuntkostüm sein könnte, bei dem irgendwie ein Harness versteckt wird; aber so was sieht meiner Erfahrung nach anders aus (mit zwei rechteckigen Löchern am Rücken, aber nichts, was einem Dreieck ähneln würde).
Was *ich* vermute, ist, daß das ein dreieckiger bestickter Bereich ist, ähnlich den Linienstickereien am Kragen (zu denen ich gleich noch komme).
Thomas fing dann gleich an, sich die Haare zu raufen und meinte, daß ich das Dreieck vergessen sollte, da man es ja doch nie sieht.
Ich hab allerdings irgendwie immer Probleme, kleine Details zu vergessen, auch wenn man sie nie sieht, wenn das Kostüm komplett angezogen ist… *kicher*…
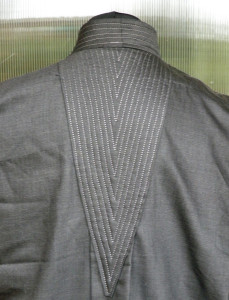
…und deswegen sieht die obere Rückseite meiner reproduzierten Untertunika jetzt eben so aus (Foto gemacht bei Tageslicht mit Blitz, damit man die Linienstickerei besser sieht – und ja, ich komme auch noch zu der anscheinend falschen Farbe…):

BackArrow

Dieses aufgequiltete Dreieck hat keinen wirklichen Zweck. Es ist nur dekorativ und befriedigt mein Bedürfnis, das hellere Dreieck einfach zu HABEN. Wie ich schon sagte, das hier ist nichts, was man sehen kann, wenn das Kostüm getragen wird, da Darth Maul IMMER die mittlere Tunika über der Untertunika trägt.

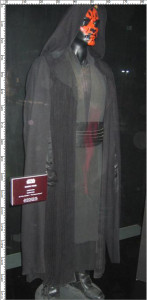
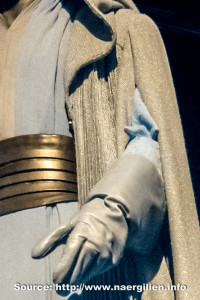
Was man im folgenden Ausstellungsbild recht gut sehen kann, ist die Farbe und Struktur des Stoffes, der für die Untertunika benutzt wurde:
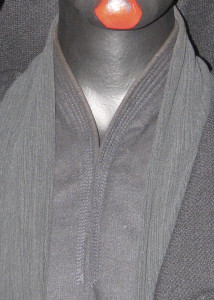
Die Farbe ist anthrazit, während die Kragenstickereien etwas heller sind. Auch sieht man an der Kante eine leicht bräunlichere Farbe.
Die Struktur des Stoffes ist ganz klar gewebt, allerdings ist die Webung leicht filzig und meliert. Das ist ein fast hundertprozentiger Bildhinweis darauf, daß es sich hier um einen gewebten Wollstoff handelt, der nach einer Wäsche eben genau diese Art von leicht filziger, melierter Struktur aufweisen würde.

Was die Linienstickereien betrifft, dazu komme ich jetzt. Hier ist ein Ausstellungsbild des Originals…:

UndertunicStitching

Wir ignorieren jetzt mal das (gecrashte) Tabard und den (gröberen) Mantel und konzentrieren und stattdessen auf die Mitte. Was wir dort sehen, sind fünf Linien auf jeder Seite des Kragens; ausgeführt in eher glänzendem (wahrscheinlich Viskose) Garn, die etwa 10cm unterhalb der Kragenöffnung zusammenlaufen. Beachtet, daß an eben diesem Ende die Linien nicht abrupt alle auf derselben Höhe enden, sondern daß es dort Variationen gibt,
Der Kragen ist übrigens ein Schalkragen – nur, daß er nicht runtergeklappt ist. Im Prinzip ist das derselbe Kragen, der auch auf Legolas‘ und Elrond’s Tuniken verwendet wurde – er ist nicht als einzelnes Stück an die Tunika angesetzt, sondern ist „ein Teil“ mit der jeweiligen Vorderseite der Tunika.

Ich werde euch nicht mein Geständnis ersparen, daß ich diesen Kragen zuerst furchtbar falsch gezeichnet hatte, worüber ich allerdings nicht weiter sprechen möchte.
Lasst es mich so ausdrücken; mein furchtbarer Fehler führte dazu, daß ich die Linienstickereien DREIMAL aufgetrennt (und somit VIERMAL NEU gemacht!) und die Naht am Nacken zweimal getrennt habe.
Und erst DANACH (also, zehn Stunden Fluchen später!!!) ist mir endlich aufgefallen, daß ich beim Entwurf des Kragens etwas falsch gemacht hatte, was mich dann endlich zu der Erkenntnis brachte, daß ich BEIDE VORDERSEITEN DER TUNIKA falsch zugeschnitten hatte.
Da mir das GRADE EBEN ERST AUFGEFALLEN IST (und es jetzt 5:23 Uhr morgens ist – ich kann NICHT schlafen, wenn etwas falsch läuft!), und ich dann schnell verifiziert habe, daß noch genug Stoff vorhanden ist, um die vorderen Seiten neu zu schneiden, kann ich jetzt endlich erstmal ins Bett gehen.
Morgen arbeite ich dann an der Tunika weiter, trenne alle Nähte auf, schneide neue Vorderteile zu und mache den Kragen richtig *seufz*
Und entschuldigt, daß ich mich hier mal aufrege. Ich bin nur müde und frustriert, weil ich auf meinen blöden Fehler einen ganzen Tag verloren habe, und meine einzige Entschuldigung ist, daß ich seit etwa 10 Jahren keinen Schalkragen mehr gemacht und deswegen wohl vergessen habe, wie’s geht.

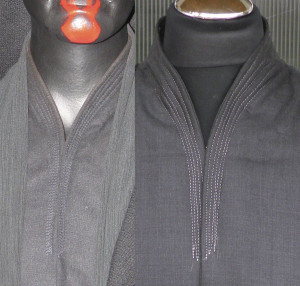
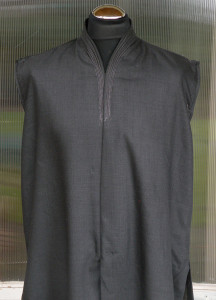
Und SO sollte der Kragen eigentlich aussehen (Foto entstanden, nachdem ich alles neu gemacht hatte…), verglichen mit der Originalfront.
Beachtet bitte, daß die Schneiderpuppe, auf der ich das hier präsentiere, etwa zwei Größen kleiner ist als der Kerl, für den ich das hier anfertige; also soeht’s aus, als wär’s zu groß – isses aber nicht. Die Farbe ist ein bisserl schwer zu fotografieren und sieht daher hier „daneben“ aus:

OrigReprCollar Collar3 Collar4Collar2

Was die anscheinend falsche Farbe angeht:

Hier ist ein Vergleichbild zwischen dem Originalstoff der Untertunika und der leichten italienischen Anzugwolle, die ich für die Reproduktion verwende. Ich habe meinen Stoff drinnen mit Blitz fotografiert, denn genau so ist auch das Original fotografiert worden, und um beide vergleichen zu können, mußte ich eben die Lichtverhältnisse nachstellen.
Interessanterweise variiert die Helligkeit ziemlich stark bei dem etwa Dutzend Fotos, die ich gemacht habe – denselben Effekt sieht man bei den Ausstellungsfotos. Für diesen Vergleich habe ich das Bild benutzt, was am hellsten ausfiel. Ich hätte auch jedes andere Foto nehmen können; aber dieses hier zeigt die Webung sehr schön, also habe ich dies ausgesucht.

UndertunicWoolCompare

Ich werdet wahrscheinlich zustimmen, daß die feine italienische Anzugwolle nicht grade die schlechteste Wahl für die Tunika im Bezug auf Farbe und Webart war 😉
Sie ist wirklich sehr leicht und – da Naturfaser – auch sehr luftdurchlässig. Um Thomas zu zitieren (als er den Stoff über den Arm drapiert hatte, um ihn tatsächlich mal zu fühlen): „Ich fühle den kaum!“

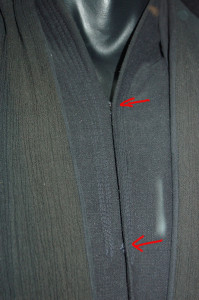
Hier ist noch ein Ausstellungbild, was recht klar zeigt, wie das Original vorn schließt:

UndertunicHooksEyes

Die roten Pfeile deuten auf etwas, das entweder Haken/Ösen oder Druckknöpfe sind. Was auch immer es ist, so schließt wahrscheinlich die gesamte Tunika vorne (etwa bis zur Taille).

Was die Länge der Untertunika angeht…

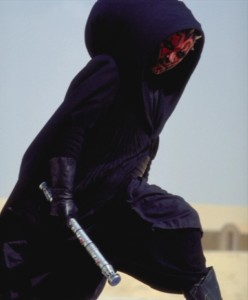
Wie ihr ja schon im ersten Bild sehen konntet (Maul auf dem falschen Bike), geht die Untertunika bis etwa zur Mitte der Wade. Allerdings SITZT er ja auf dem Bild: also ist die tatsächliche Länge noch kürzer.
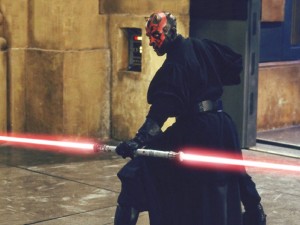
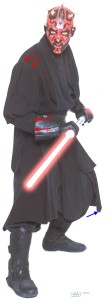
Hier ist ein Bild, welches die ungefähre Länge im Stehen zeigt.

darthmaul04

Wie ihr sehen könnt (und zwar auf dem Knie unter der Hand, die das Lichtschwert hält) ist die Untertunika nur wenig länger als das Knie; ich nenne das „unter-Kniescheibe-lang“.


Die mittlere Tunika (aka „Sith-Robe“)

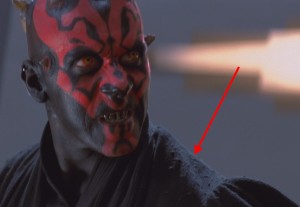
Over the sleeveless undertunic, Darth Maul is wearing what the 501st calls the ‚Sith Robe‘ in their standards. I prefer to call it the ‚middle tunic‘ (just to clarify the terms I will be using in this analysis).

The fabric used for that middle tunic is interesting. Look at this picture (the shoulder area – what’s close to the neck is the shawl tabbard, to which I will get later):

DarthMaulMovieInnerTunic

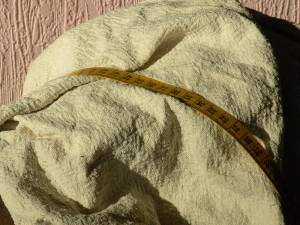
Now, that is a very nubby fabric with an almost bark-like structure. And actually, I have seen such a structure before. Here’s a picture of a fabric that has a likely structure (ignore the color – the measurement tape is there to indicate the size of that bark-like structure – it’s a centimeter tape; 2.54cm = 1 inch for those of you who need to convert!):

CrinkledWashed

Now, if you were thinking that this is either crinkle cotton or linen, you’re wrong. This photo shows a heavy, loose weave silk noil which was boiled and, in reaction to that, crinkled.
It’s almost impossible to find silk in that weave / weight any more – Aurora Silks has a similar weave, but it’s not exactly the same.

That aside, said picture from the movie shows another very interesting detail. Please click and look at it closely.
See something?
No?
Well the interesting thing is not WHAT you see but what you DON’T see. And that is…
drumroll…
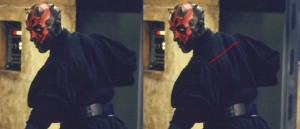
The middle tunic has NO SHOULDER SEAM. Which basically means that the front side pattern piece and part of the upper back are cut as one piece, then joined at the center back.
Actually you can see that upper back part being separated from the lower back part by a seam in this picture – left: original: right: red line indicates the seam. If you look back and forth between the two, you will be able to recognize it in the left picture too (particularly because of the slight gathering / pleating beneath the left side of that seam, caused by gathering of the lower part of the tunic along that seam):

middletunicbackseam

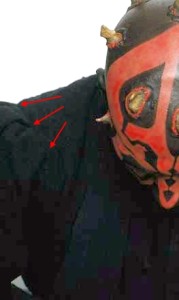
The upper parts of the sleeves are pleated. There are six pleats of which two are ‚facing each other‘, resulting in three deep pleats on each sleeve.
The lower part of the sleeve (the underarm) is also pleated, but those pleats (six around the arm, as far as I could count) are sewn into place. That’s why the lower sleeve is tight while the upper sleeve is bloused.
Here are four pictures to confirm the pleats on the upper and lower arm, indicated by red arrows (as usual – click to enlarge):

UpperSleevePleats LowerSleevePleats UpperLowerSleevePleats


The length of the tunic is indicated by a blue arrow in the very last picture – it ends approximately between the knee and mid calf.


There is a vertical pleat at the front of the tunic also. It’s apparently tucked away by the belt; however, not taking chances, I will sew it in place on waist level:

FrontPleat


The tabard

I am deliberately not talking about the plural, which would be ‚tabards‘ (and what the Jedi have). Darth Maul is wearing a single tabard, draped around the back of the neck like a shawl – which is why I named it the „shawl tabard“.

If you look at the middle tunic from the backside…

darthmaul04

…you will see that you, well, see nothing of the tabard (except a raised, turtle-neck like area around the neck). However, …

UndertunicHooksEyes

…looking at it from the front, the length-wise crinkled shawl tabard becomes very obvious (ignore the red arrows; that’s the same image as the ‚untertunic front closure‘ image from above).
What you can also see in this picture (and very well so!) is the non-crinkled lining of the shawl tabard, which you can clearly see on the edge of the tabard at both sides – it’s slightly more black (and less brownish) than the shawl tabard.


The sunray-pleated coat

Darth Maul’s coat has some very interesting features; besides something that strongly resembles Elizabethan hanging sleeves (I’ll explain that later) it also features full, sewn-in sunray pleating from approximately chest level down.

Let’s start with the fabric first.

The fabric is a really, really coarse linen. Let me show you how coarse that is by using my ‚proportional method‘.
The actor, Ray Park, is said to be 5ft 9in (175 cm) tall (which isn’t exactly tall for a man, but that, too, is something I will get back to later). Let’s have a look at that using a measurement tape.

MaulSize

As you can see, I’ve adjusted the height of this exhibit picture to fit a height of 175cm (1 inch = 2.54cm).

Since that picture is now too blurry to actually see threads, I’ll overlay it with a larger closeup; lining up the head and belt, aided by a lower opacity of the closeup layer.

MaulOverlay

From there I can zoom in REALLY close, and actually see not just the thread count but also the size of the pleating on top.
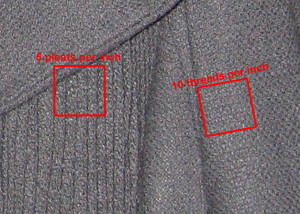
The following picture shows two squares, each being 1 inch x 1 inch large.

CloakPleatsThreadCount

As you can see, the thread count is approximately 10 threads per inch. That’s 10 threads per 2.54cm, making each thre4ad approximately 2.5mm thick. That IS coarse!
The pleats, on top, are 5 per inch; that’s approximately 0.5cm for each pleat.

However, as I already said, Ray Park is considerably small for a man. Thomas, who I’m reproducing this costume for, is considerably taller. As in: approximately 195cm (6ft 4in) tall.
Now, if the original actor is 175cm tall, that’s 100%. If the person I’m reproducing this for is 195cm tall, that’s ~111.5% compared to Ray Park’s height.
Which means that the thread thickness I need isn’t 2.5mm but closer to 2.8mm. And the pleating on top doesn’t have to be 5mm but almost 5.6mm. The difference MAY seem small, but it’s important to keep in mind to create a screen-accurate reproduction.

I’ve found a considerably coarse and heavy tussah silk, which will work perfect for this reproduction.

The shaping of the hood is interesting too – basically, each pattern piece (the hood is sewn from two pieces which are joined at the center, on top of the head) roughly resembles a half circle. The person I’m making this for compared the shaping to a windsock. Also, unlike the hoods on many Jedi robes, this hood isn’t gathered to fit the neckline.
You can easily see the actual shaping in this pic:

31

An elongated half-circle with a V-shaped point towards the front collar. Also, in case you doubt it, the following picture shows the seam on top of the hood very well:
Darth-Maul


Kommentar verfassen

Mrz 142013
 

~Please also have a look at my other Star Wars costume reproductions! ~

Star Wars Episode 1 – Darth Maul

Analysis & reproduction diary

21

Darth Maul, while at a short glance seeming to be a simple, black costume, isn’t so very simple at all. In fact, it’s pretty complicated; consisting of many layers – but the key factor to a screen accurate Darth Maul costume is the fabrics and colors – neither was there used just one fabric on the various parts, nor are the fabrics used just plain black.

I met a member of the 501st – Thomas – who wasn’t exactly happy with his Darth Maul costume, which he acquired from „that big Asian reproduction company“ (*cough* Costumebase *cough*).
When I met him during a trooping wearing said costume, I could exactly tell why he wasn’t so happy.
The overall shape was not bad (mind you, I’m not saying it was correct; but it wasn’t that bad either!), but the worst thing was that the entire costume was made from the same fabric.
As in: Undertunic, middle tunic, tabard etc. were ALL made from the same black fabric.
Which is plainly wrong for a good reproduction of this costume; and it’s far from being screen accurate. So I agreed to make him a way more screen accurate costume. This page serves as an analysis for the original costume and a walkthrough for my reproduction.

By now I can also scientifically back up the statement that many different fabrics were used on the original costume – please see my infrared photos from the Star Wars Identities exhibit (and the description of them, of course).

You want to know why the costume isn’t just black, or why it’s not all the same fabric? Well, just read on and follow my analysis of the costume inside to outside.

The pants

Alright, so this analysis is completely messed up compared to the actual order in which I created the reproduction – because actually I made the pants last, before the coat.
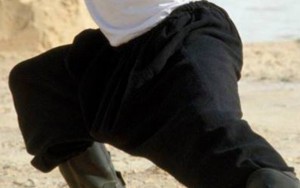
Darth Maul (obviously!) wears pants. Now, you can’t actually see so very much of them since they’re mostly hidden by the other layers; however there’s this behind-the-scenes picture (apparently known among the 501st as the „casual Friday“ picture, lol):

MaulPants

As you can probably see, the shape is that of Harem-style pants. with the inseam going down to almost the knees and very flared legs.

Here’s a closeup of that picture:

MaulPantsCloseup

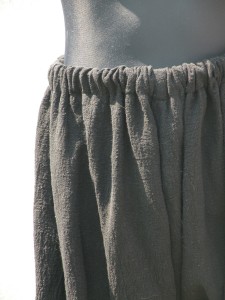
The waist actually seems to be made up with a tunnel, into which either an elastic banding or a drawstring has been inserted. Not my personal choice when it comes to pant closures – I consider all kinds of tunnel closures „lazy“ – but, well, that’s just the way it seems to be on the original costume.
Now, if you would scroll down to the middle tunic, aka Sith Robe, you would already know the texture of this pants fabric – it’s very similar to the Sith Robe outer fabric.
This is what my reproduction fabric looks like in a closeup:

DarthMaulPantsCloseup
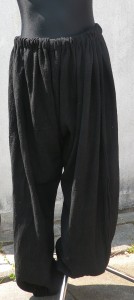
And here is another picture of the finished reproduction of those pants – as usual: Those DO sit weird and badly on the dress mannequin because a) that dress mannequin is several sizes smaller than the person I’m making this costume for and b) the dress mannequin „stands“ on one single leg; making it practically impossible for pants to drape properly.

DarthMaulPants1

Material amount:
It took 3 meters / 3.3 yards of fabric to make these pants.

The undertunic

I will start with the one thing that’s closest to the body – the undertunic.

There is one very interesting image, and that’s this one:

Undertunic1

Let’s just ignore the white T-shirt – that’s not officially part of the costume 😉

However, the black undertunic is. As you can see from the picture, the armholes are rather small; while the side split of the tunic is rather high – it goes up to approximately 4-6 inches below the armhole (instead of ending at the waist, as many people supect).
What you can also see is that the front of the tunic is split (see how the two front panels drape over the ‚mock bike‘), while the back in fact isn’t split.

There’s something about this picture I discovered when changing the levels (lightning) of it in Photoshop – and that’s this weird triangle on the backside (left shows the original image; I’ve marked the triangle with red lines on the right side):

MaulTriangle

This is NOT a light effect. As you can see on the floor, the light would come from the top right side; so the triangle can’t just be a lit area of fabric.
Thomas, who I’m making this costume for, suspected that this may be the result of being a stunt costume – aka something to hide a harness under – but that would look different from my experience (with two rectangle holes in the back, opposed to a triangle shaped insert).
What *I* suspect this to be is a triangular stitched area, stitched with the same kind of line embroidery that is used on the collar / front (to which I will get in a moment).
Thomas immediately started tearing his hair and told me to forget the triangle because it will never be seen.
I, on the other hand, have a very hard time forgetting such small details; even if, as already mentioned, said small details will NEVER be seen on a fully worn costume… *snickers*…
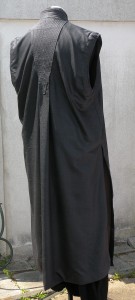
…and that’s why the upper backside of my reproduced undertunic looks like this (photo taken in daylight with flash just to make the line embroidery pop – and yes, I’ll get to the apparently „wong color“ in a moment as well…):

BackArrow

That quilted-on triangle doesn’t really have any purpose. It’s just decorative; satisfying my obsession to simply HAVE that ‚lighter triangle‘. As I already said, it’s something that can never be seen when the costume is worn, since Darth Maul ALWAYS wears at least the middle tunic over the undertunic.

Anyway, what you can also see pretty clearly in the next exhibit picture is the color and structure of the fabric used:
The color is anthracite, with the stitching being a bit lighter. Also you can see a more ‚brownish‘ area along the edge.
The structure of the fabric is clearly a weave, but slightly fuzzy and mottled. This is an almost safe indication that this is a wool weave, since that would become slightly fuzzy when washed but retain the very slightly mottled coloring.

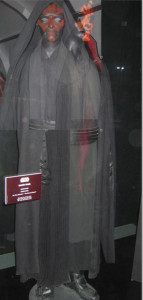
Concerning the line embroideries, I will get to the collar stitching now. Here’s a picture from an exhibit where the costume was shown:

UndertunicStitching

Ignore the (crinkled) tabard and the (more coarse) coat for the moment; concentrate on the very center of the picture. What you see are five lines of rather shiny (probably rayon embroidery thread) stitching along the collar, coming down to a point approximately 4 inches down the neck opening. Note that in said point, not all those stitched lines end at the same level – it’s rather random.
The collar is a rolled collar by the way – just that it’s not rolled. This is basically the same kind of collar that Legolas‘ and Elrond’s (Pre-Council) tunics feature.

I will not spare you my admission that when I first cut the Darth Maul tunic, I made a HORRIBLE mistake concerning the cut of that collar, which I refuse to elaborate further.
Let me put it this way; my horrible mistake forced me to first redo the collar line embroideries THREE TIMES, then to adjust the seam along the neckline TWICE.
Just AFTER all that (and TEN HOURS OF CUSSING LATER!) I FINALLY noticed that I had simply CUT THE COLLAR WRONG – which resulted in me realizing that in effect, I had cut BOTH FRONT SIDES OF THE TUNIC WRONG.
Since I realized that JUST A MOMENT AGO (and it’s 5:23 in the morning as I’m typing this – I CAN’T sleep if something is wrong until it is right!), and know that I STILL have enough fabric to recut both front sides, I can now FINALLY go to bed.
Tomorrow I will continue working on the tunic, ripping seams, cutting new fronts, and redo the collar properly. *sigh*
And sorry for shouting and venting, I’m just tired and frustrated for having lost almost an entire day on a stupid mistake; and my only excuse is that I haven’t drafted a shawl collar for approximately ten years and forgot how it works.

Here’s what it should look like (after, as I said, redid the entire front…) compared to the original in the first picture.
Note that the dress dummy on which I display the tunic is two sizes smaller than the guy I’m making this for; so it looks as if it’s too large (while it’s actually not). Color looks a bit off; it’s hard to photograph:

OrigReprCollar Collar3 Collar4Collar2

As far as the apparently wrong color in the pictures is concerned:

Here’s a comparing picture between the fabric that was originally used on the undertunic and the Italian suit weight wool fabric which I am using for the reproduction. I’ve photographed my fabric indoors with a flash; because that’s how the original costume was photographed, just to really be able to compare color as well as weave.
Interesting enough, the color (brightness-wise) varies greatly between the approximately dozen photos I’ve made – we see the very same effect on the exhibit photos. For this comparison I’ve chosen the photo that turned out brightest. I could have chosen any other photo as well and could have compared it to a different exhibit photo; but this one showed the weave exceptionally well, so I picked it.

UndertunicWoolCompare

You will probably agree that the suit-weight, fine Italian wool wasn’t exactly the worst choice concerning weave and color 😉
Also, it’s very lightweight and – since it’s a natural fiber – also extremely breathable. To quote Thomas (when he had the fabric draped over his arm to actually feel it): „I can barely feel it at all!“

Here’s another exhibit picture with a very clear sign of how the front of this tunic closes:

UndertunicHooksEyes

The red arrows point to what looks like two hook and eye closures! Either that or those are sewn-on snaps of which we just see the very edge. At any rate, that is probably how the entire front of the tunic closes (to approximately waist level where the front split would open, as shown in the last picture).

Concerning the length of the undertunic…

As you could see in the first picture (Maul sitting on the mock bike), the undertunic goes to approximately mid calf. However, he is SITTING in that picture; so the actual length is shorter (because if he would be standing, the angle would change).
I found one picture that shows the approximate length when standing.

darthmaul04

As you can see (on the knee that’s below the hand holding the double light saber), the undertunic actually is just a bit longer than knee-length.

Here are a few pictures of the completely finished undertunic  – again, it DOES fit badly on the dress mannequin since the mannequin is WAY too small:

UndertunicFinFront UndertunicFinBack

By the way, materials amount:
My Darth Maul undertunic reproduction takes up 6.5 meters / 7 yards of material – 3 meters of the Italian suit-weight wool, another 3 meters of fine silk habotai lining, and half a meter of stabilizer for collar and armholes.

The middle tunic (aka ‚Sith robe‘)

Over the sleeveless undertunic, Darth Maul is wearing what the 501st calls the ‚Sith Robe‘ in their standards. I prefer to call it the ‚middle tunic‘ (just to clarify the terms I will be using in this analysis).

The fabric used for that middle tunic is interesting. Look at this picture (the shoulder area – what’s close to the neck is the shawl tabbard, to which I will get later):

DarthMaulMovieInnerTunic

Now, that is a very nubby fabric with an almost bark-like structure. And actually, I have seen such a structure before. Here’s a picture of a fabric that has a likely structure (ignore the color – the measurement tape is there to indicate the size of that bark-like structure – it’s a centimeter tape; 2.54cm = 1 inch for those of you who need to convert!):

CrinkledWashed

Now, if you were thinking that this is either crinkle cotton or linen, you’re wrong. This photo shows a heavy, loose weave silk noil which was boiled and, in reaction to that, crinkled.
It’s almost impossible to find silk in that weave / weight any more – Aurora Silks has a similar weave, but it’s not exactly the same.

That aside, said picture from the movie shows another very interesting detail. Please click and look at it closely.
See something?
No?
Well the interesting thing is not WHAT you see but what you DON’T see. And that is…
drumroll…
The middle tunic has NO SHOULDER SEAM. Which basically means that the front side pattern piece and part of the upper back are cut as one piece, then joined at the center back.

It was brought to my attention that some very „clever“ people thought that there was a shoulder seam anyway – Uhm, no.

Here’s a picture that (left) shows what they think to be a shoulder seam (I’ll explain with the ‚right‘ part of the image why it’s not in a moment):

Maul-BackShoulderSeam

That isn’t a shoulder seam. A shoulder seam would go from the center top of the shoulder (where the center sleeve pleat is in this picture…) towards the side of the neck.
However, as you can pretty clearly see in the ‚right‘ part of the picture where I have marked that „seam“ with a red line, this
a) doesn’t go from the center top of the shoulder (but a bit to the back from it), and
b) it also doesn’t go to the side neck, but to the center back.

That’s why this isn’t a shoulder seam. I first thought it may be a quilted down line, but I was wrong (and still need to tell Thomas about that 😉 ).
That „shoulder seam“ presumption got me thinking after telling Thomas about the quilted line, and I dug out all my reference pictures again; and that’s when I started to compare the sleeve pleat placement to the placement of that weird „I wanted to be a shoulder seam but am none“ thingie. Here’s what I found out:

Look at the last picture again. WHERE is that alleged „shoulder seam“? – Right – it’s BETWEEN the center- and back pleat on the sleeve. Correct?

Now just read on and look at the NEXT picture. Where is that separation seam of the upper back part positioned, compared to the sleeve pleats…?

Right, between the center- and back pleat of the sleeve. So that’s STILL not a shoulder seam; it’s STILL the separation seam on the backside 😉
(And BTW – if you think you found errors in my examination of the original costume, it would be awfully nice if you could tell me (I really mean *me*) about your findings.
Because seriously?
Personally I find it totally childish to write something like „whoohooo I finally found something she did wrong!!!“  (not exactly the wording that was used, but you get the point…) on a forum that I can’t even access, let alone by people who don’t sacrifice their time and webspace to provide an in-depth analysis about how the costume was constructed… like me….

…but then again it also totally contributes to my personal amusement to find out that your alleged findings are wrong because apparently you can’t count sleeve pleats (or determine the position of a seam between them, that is) 😉 ).

You can see that upper back part being separated from the lower back part by the aforementioned seam much better in this picture – left: original: right: red line indicates the seam.
If you look back and forth between the two, you will be able to recognize it in the left picture too (particularly because of the slight gathering / pleating beneath the left side of that seam, caused by gathering of the lower part of the tunic along that seam):

middletunicbackseam

I don’t know why that ’separation seam‘ on the back seems ‚higher‘ in the first picture and ‚lower down‘ in the second picture – different tunics maybe? Stunt tunic? Weird body pose? No idea.
But from the placement of the seam between the pleats on the sleeve, it must be the very same seam.

Anyway, here’s that upper back seam on my reproduction:

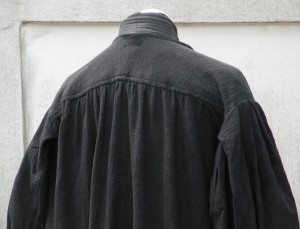
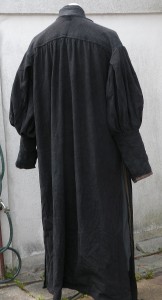
SithRobeBack2

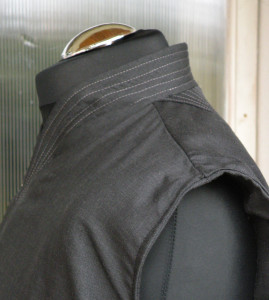
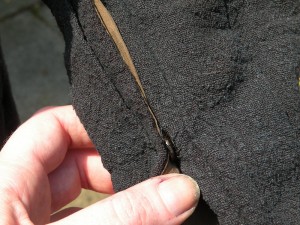
If you REALLY have sharp eyes, you’ll notice a tiny velcro patch at the base of the neck. The counterpiece is sewn to the shawl tabard, to keep it in place (but STILL keep it detachable!).

The upper parts of the sleeves are pleated. There are six pleats of which two are ‚facing each other‘, resulting in three deep pleats on each sleeve.
The lower part of the sleeve (the underarm) is also pleated, but those pleats (six around the arm, as far as I could count) are sewn into place. That’s why the lower sleeve is tight while the upper sleeve is bloused.
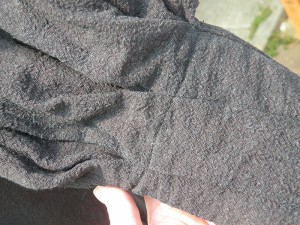
Here are four pictures to confirm the pleats on the upper and lower arm, indicated by red arrows (as usual – click to enlarge):

UpperSleevePleats LowerSleevePleats

Here’s how I constructed my sleeve – and yes, from shoulder to wrist, that is indeed one single piece of fabric; pleated into the armscye at the outer shoulder with the six contering pleats, and again all over the underarm with six pleats. The underarm sleeve closes with three black snaps.
Note that I did indeed have to edit some of my pictures – as in: lighten them – because otherwise you wouldn’t have been able to see anything, black on black.

SithRobeSleeveConstruction SithRobeSleeveClosure

The length of the tunic is indicated by a blue arrow in the m following picture – it ends approximately between the knee and mid calf.

UpperLowerSleevePleats

There is a vertical pleat at the front of the tunic also. It’s apparently tucked away by the belt; however, not taking chances, I will sew it in place on waist level:

FrontPleat


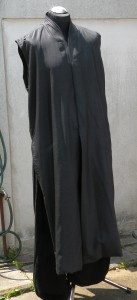
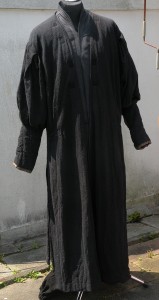
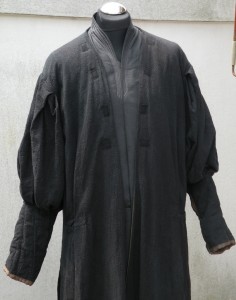
Here are a few pictures of my finished reproduction middle tunic, aka Sith Robe. Again, the small velcro patches (which are not just at the base of the neck but scattered over the front sides) serve to attach the shawl tabard; and you can only see them because in these photos, the shawl tabard is not attached:

SithRobeBack1 SithRobeFront2 SithRobeFront1

Material amounts:
I used 6 meters / 6.6 yards of the outer material, 6 meters / 6.6 yards of silk noil as interlining and another 5.5 meters / 6 yards (less than the other materials because the lining sleeves are more narrow than the outer sleeves) of habotai silk for the Sith Robe.
So all together, what you’re seeing on my reproduction Sith robe is 17.5 meters / 19.2 yards of fabric.

The tabard

I am deliberately not talking about the plural, which would be ‚tabards‘ (and what the Jedi have). Darth Maul is wearing a single tabard, draped around the back of the neck like a shawl – which is why I named it the „shawl tabard“.

If you look at the middle tunic from the backside…

darthmaul04

…you will see that you, well, see nothing of the tabard (except a raised, turtle-neck like area around the neck). However, …

UndertunicHooksEyes

…looking at it from the front, the length-wise crinkled shawl tabard becomes very obvious (ignore the red arrows; that’s the same image as the ‚untertunic front closure‘ image from above).
What you can also see in this picture (and very well so!) is the non-crinkled lining of the shawl tabard, which you can clearly see on the edge of the tabard at both sides – it’s slightly more black (and less brownish) than the shawl tabard.

The sunray-pleated coat

Darth Maul - Infrared
An infrared photo of the original sunray-pleated coat, showing the texture / weave of the coat material.
See more infrared- and color photos of the original costume on my Star Wars Identities photos page.

Darth Maul’s coat has some very interesting features; besides something that strongly resembles Elizabethan hanging sleeves (I’ll explain that later) it also features full, sewn-in sunray pleating from approximately chest level down.

Let’s start with the fabric first.

The fabric is a really, really coarse linen. Let me show you how coarse that is by using my ‚proportional method‘.
The actor, Ray Park, is said to be 5ft 9in (175 cm) tall (which isn’t exactly tall for a man, but that, too, is something I will get back to later). Let’s have a look at that using a measurement tape.

MaulSize

As you can see, I’ve adjusted the height of this exhibit picture to fit a height of 175cm (1 inch = 2.54cm).

Since that picture is now too blurry to actually see threads, I’ll overlay it with a larger closeup; lining up the head and belt, aided by a lower opacity of the closeup layer.

MaulOverlay

From there I can zoom in REALLY close, and actually see not just the thread count but also the size of the pleating on top.
The following picture shows two squares, each being 1 inch x 1 inch large.

CloakPleatsThreadCount

As you can see, the thread count is approximately 10 threads per inch. That’s 10 threads per 2.54cm, making each thre4ad approximately 2.5mm thick. That IS coarse!
The pleats, on top, are 5 per inch; that’s approximately 0.5cm for each pleat.

However, as I already said, Ray Park is considerably small for a man. Thomas, who I’m reproducing this costume for, is considerably taller. As in: approximately 195cm (6ft 4in) tall.
Now, if the original actor is 175cm tall, that’s 100%. If the person I’m reproducing this for is 195cm tall, that’s ~111.5% compared to Ray Park’s height.
Which means that the thread thickness I need isn’t 2.5mm but closer to 2.8mm. And the pleating on top doesn’t have to be 5mm but almost 5.6mm. The difference MAY seem small, but it’s important to keep in mind to create a screen-accurate reproduction.

I’ve found a considerably coarse and heavy tussah silk, which will work perfect for this reproduction.

The shaping of the hood is interesting too – basically, each pattern piece (the hood is sewn from two pieces which are joined at the center, on top of the head) roughly resembles a half circle. The person I’m making this for compared the shaping to a windsock. Also, unlike the hoods on many Jedi robes, this hood isn’t gathered to fit the neckline.
You can easily see the actual shaping in this pic:

31

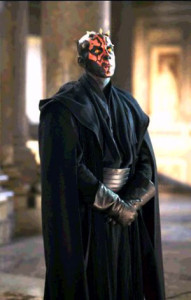
An elongated half-circle with a V-shaped point towards the front collar. Also, in case you doubt it, the following picture shows the seam on top of the hood very well:
Darth-Maul

Then, of course, there’s the pleats on the cloak.
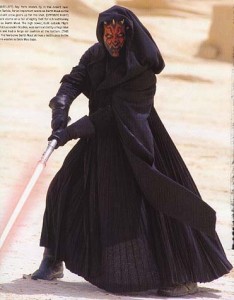
The standards of the 501st assume that they’re not sewn in… but I know better from just looking at a picture.
This one, to be precise:
e253

Look at the center front bottom of the picture.
What you see there is two things:
First, the fabric, against the bright sand, is slightly see-through; which is rather normal for coarse linen or silk fabrics, since the threads that the fabric is woven from are thick, but not close to each other.
The other thing however is even more interesting: You see the lines of the pleating.

For what I am going to explain now, I need you to experiment with a fabric that has a similar appearance (being slightly see-through when held against the light).
Take that piece of fabric, which is preferrably made from natural fibers like silk, cotton or linen, and iron pleats into it. As in, like so: /\/\/\.
Now stretch the fabric back out (because that is what we see in the image above), hold it up against the light and see through it again. I will tell you what you will NOT see: Lines.
However… if you put in a seam along each ‚folded edge‘ of the pleats, just 2mm / 1/16 inch away from the folded edge, and THEN hold it up to the light… you will see lines.

Let me use other words: It’s impossible to see the lines of the pleating, which can clearly be seen in the image above, without basically „setting“ each pleat on each fold with a seam *very* close to the edge of the folded-over edge.

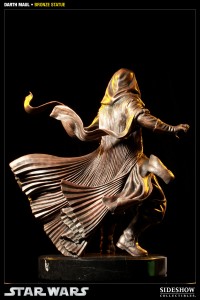
That having said, I started counting pleats. Since that proved to be rather impossible on the original costume – no matter if action shots, like the one above, or exhibit photos, I opted for using a photo on which I could actually count pleats… on Sideshow’s Darth Maul bronze statue; this one, to be precise:

sideshowBronze_400025_press04

As you can hopefully see, you can see (or rather: pretty well guess) the center back, as well as all the folded-over layers to the right side front.
And that’s how I counted the pleats – and came up with fifty per side, or one hundred for the entire coat. Note that „one hundred“ means: 100 times this: /\, not just / or \ of the pleat.
Which, on the other hand, means: 200 seams.
I crashed to my keyboard and cried bitterly when I realized that, lol.

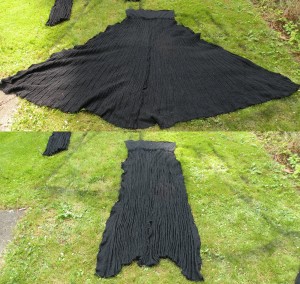
Unfortunately I did not exactly take photos while making the coat. In fact, I think I only have two photos, where I laid the coat body out on the lawn outside to make it „more black“ by using black silk paint; since the thick fabric didn’t take regular dye so well. And since the coat is HUGE, the lawn in the garden was the only large enough surface to do so.

CloakBackSpreadDown

The upper part of the photo shows the cloak’s backside „spread out“, the lower part of the photo shows what it looks like when it just hangs down. Never mind the unevenness of the hem; that problem was solved later.
I didn’t quite manage to do 100 pleats and sew 200 seams. That’s because even though I had 14 yards of fabric (!), that amount STILL wasn’t enough to capture the actual width of the coat.
So my version of the coat „just“ has 180 seams, or 90 opposed to 100 pleats. Unless you would really start to kneel down and count them, though, I don’t think the 10% difference in pleats makes very much of a difference, lol.


By the way, in case you should ask yourself:
The entire costume took up over 45 meters (or 50 yards) of fabric; of which I barely have any scraps left. No kidding.


~Please also have a look at my other Star Wars costume reproductions! ~

  41 Responses to “Star Wars – Darth Maul”

Comments (40) Pingbacks (1)
  1. How much would something like this run? I’m very interested in acquiring one of these costumes.

  2. It’s not about money, nor the time. It’s of elegance and grace. I’d ask for a darth maul screen accurate design from you because it’s art. It can be found nowhere else. I suffer from PTSD and my seamstress skills are nullified due to that hindering fact. Please email me to tell me you won’t replicate one more of these outfits, not for a fan. But for someone who used this character to survive years of abuse, and neglect

  3. Very nice attention to detail

  4. Beautiful work and staggering research!
    I read other comments saying you wouldn’t be bothered to make the whole costume again,
    Could you be swayed to make pieces of it? The undertunic especially I am having an impossible time finding in a screen accurate fashion 😳

  5. Hi would you sell Darth Maul costume and ship international? Like Philippines?

  6. Just fell upon this thread/blog, whatever you call them. LOL. I used to dress up as Darth Maul back when the movie first came out. Shaved head, full make-up, eyes, horns… The costume was just a cheap halloween costume. I have recently become part of the 501st Legion Canadian Garrison (ANH Stunt Stormtrooper) and am considering reprising my role as Darth Maul and become 501st certified. I like the detail you have put into the costume. This is going to help my wife immensely when she makes this costume for me. Nice job!!

  7. Hello. I am looking to have the Darth Maul costume made, and after doing much research into this, your analysis of the costume is the best by far. Would you be willing to make this again for me? Can you send me a rough quote?

Kommentar verfassen