Navigation for these costumes:
My motivation – Connor Kenway – Aveline de Grandpré – George Washington
– in progress, so what you’re reading here is just my initial research plus a bit of the beginning of the making. I will add more over time as I make progress on the costumes!
Please also note that, as described on the „motivation“ page, I make these costumes for my son, myself and my father. I am NOT selling them.
If you „desperately need one“ – make it yourself. I guess I’m providing sufficient information on these pages to enable you to do so, if you’re willing to put a bit of effort, learning and work into the costume. –
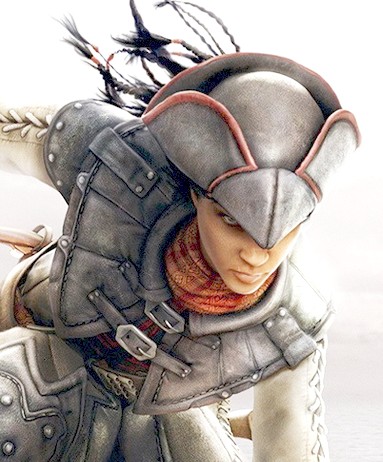
Assassin’s Creed III – Aveline de Grandpré
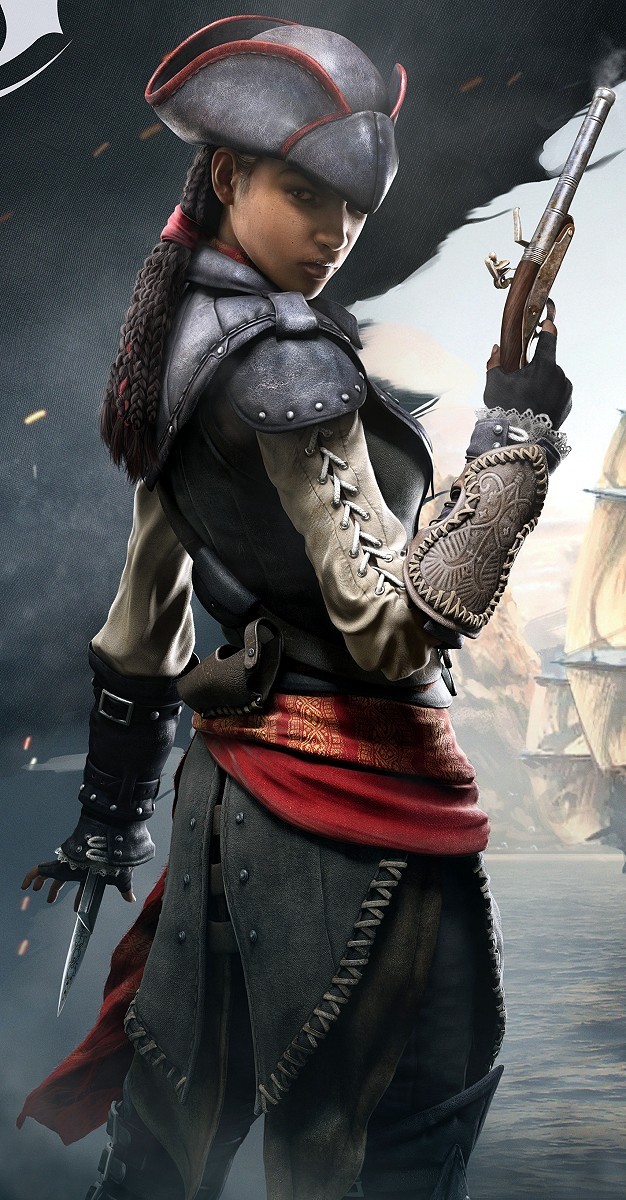
The Vest
My research for Aveline started with her black vest – that’s the sleeveless black garment with the tails on the back which she wears over her white-sleeved, laced up shirt (which is historically inaccurate, but I will get back to that later). Actually I guess that this is supposed to once have been a coat (with sleeves) because of the lapels at the front, but, well, it’s worn without sleeves which technically makes it a vest.
Anyway, the vest. The „body“ is made from rather coarse linen – for this I will cut up a 100 years old, hand-woven, coarse piece of linen that I bought at an auction. The leather for the lapels I will make with black stag leather, and the „undertails“ of her vest – very well visible in the picture above *beneath* the tails of the linen vest – will be black antiqued stag leather.
Note that I do not see any point in discussing my usage of real leather for these costumes with anyone. ONLY real leather, not man-made, artificial leather, will age properly and „look right“. I do not see any point in using fake leather because of this… because I want the costumes to look, smell and feel right and realistic.
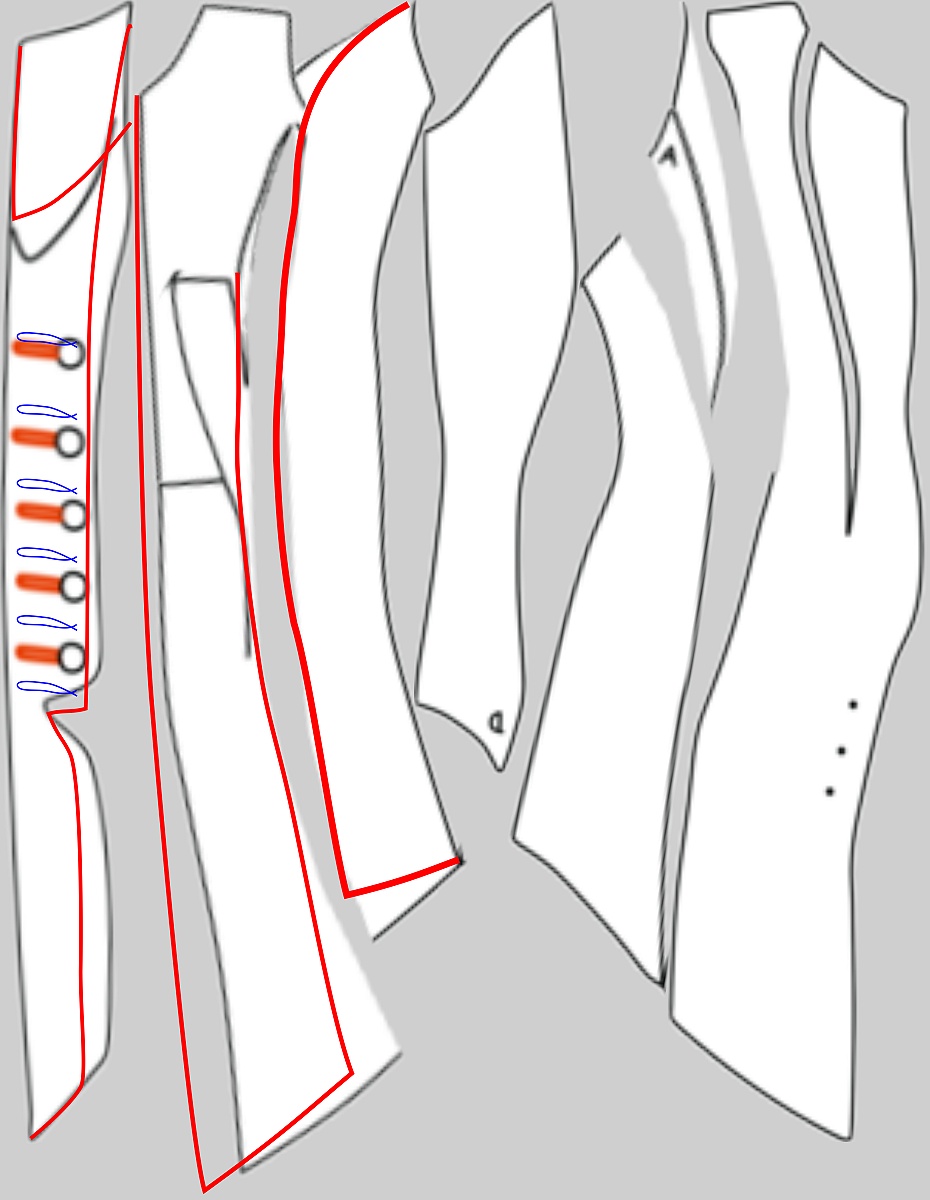
To make it I modified a pattern which was made available by someone on Deviantart – here, to be precise.
That pattern however is incorrect because of the number of panels on the backside bottom, as well as because of the fact that it shows one of the front panels as being ’split‘ at the top, which you can see not being the case on the original vest:

So instead of what you see on Deviantart, my modified pattern looks like this:
And here’s the result after sewing the linen parts together (and before dyeing). The leather parts are still missing because a) I don’t need them to be dyed and b) they wouldn’t withstand the higher temperatures in the washing machine:
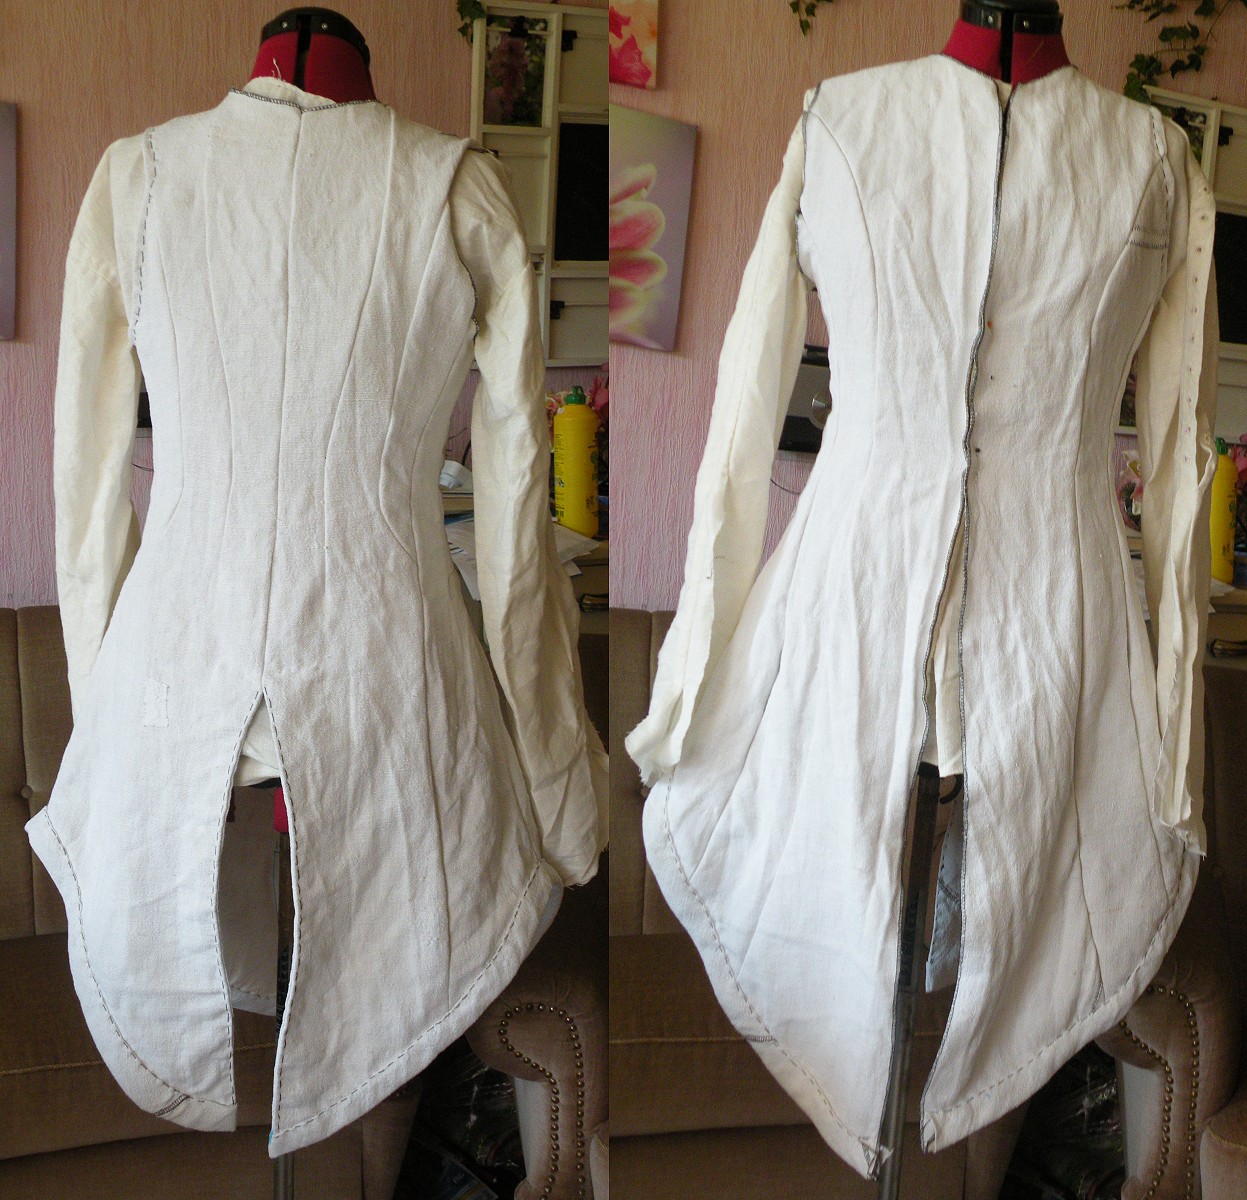 I particularly LOVE the way the upper back is cut, with one more panel than what’s to be seen on the bottom of the vest.
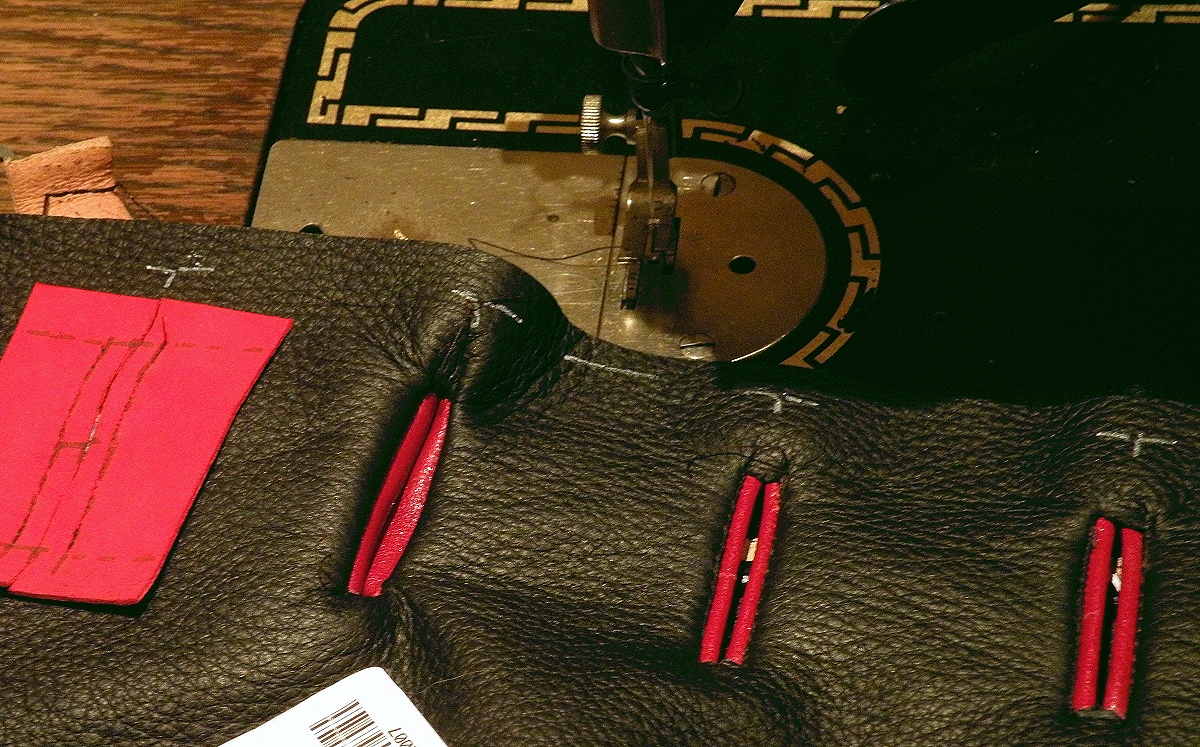
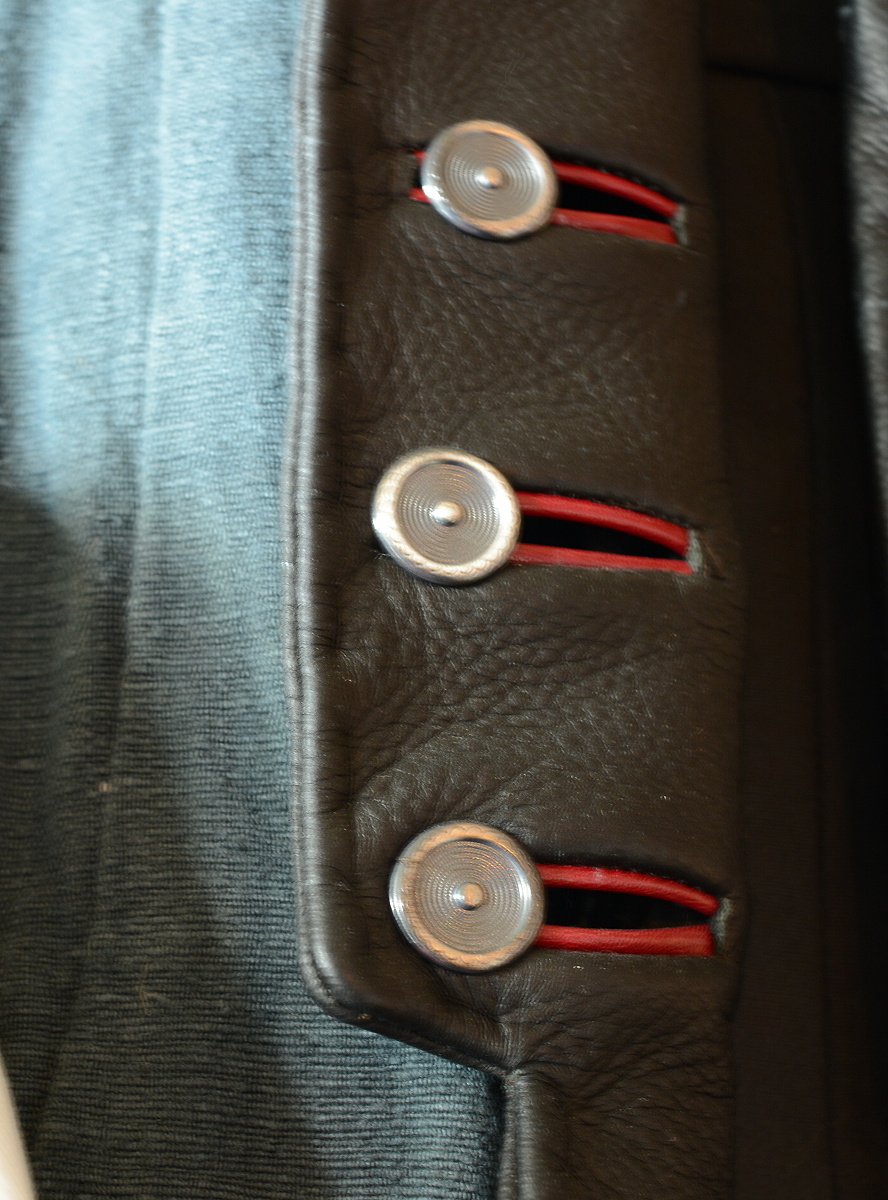
Binding the buttonholes for the leather parts of the vest.
Now, binding them means sewing through 4 layers of leather, together 3.6mm thick.
Brother Super Galaxie 3100 (aka ULT2003) from 2003 says: „Scrrrccchhhh!“ and refuses to cooperate.
Pfaff 31 from 1934 says: „What, is that supposed to be all?“ and sews through the material as if it was nothing 😉
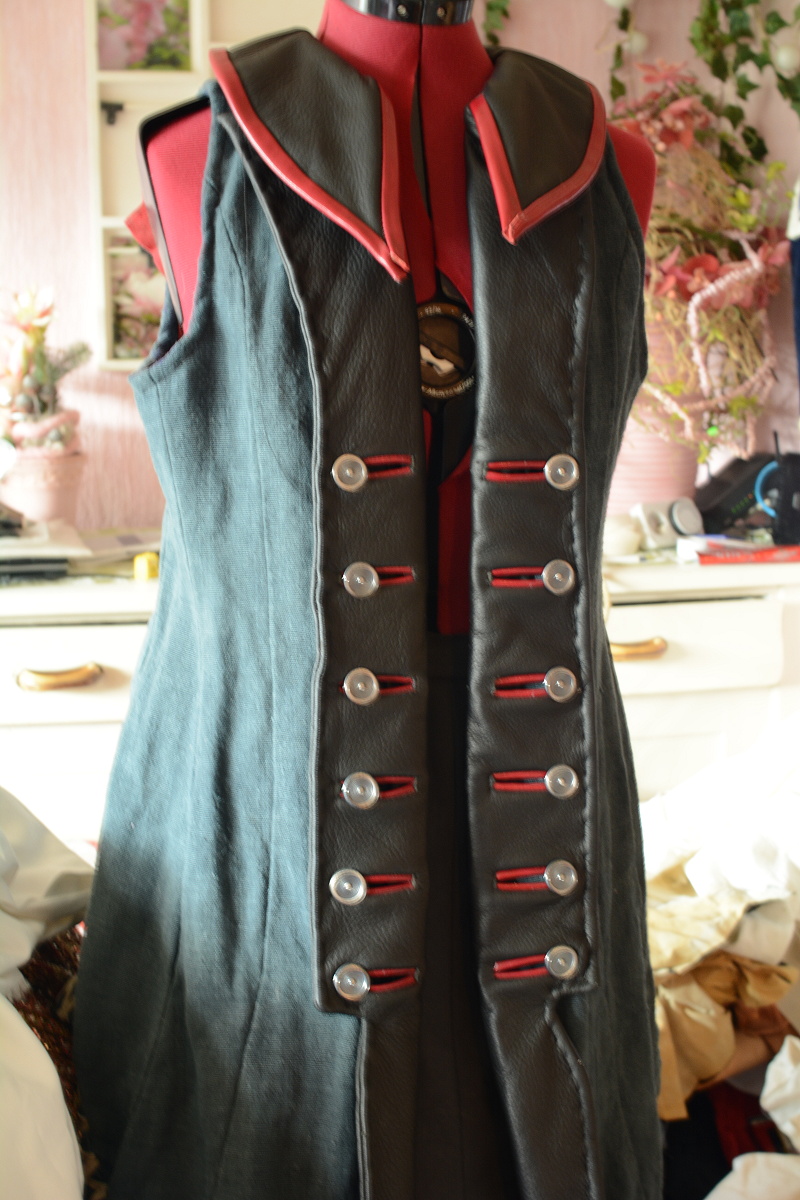
Here are two pictures of the mostly finished vest:
The Shirt
The shirt is, as previously mentioned, seen as the white, laced-up sleeves, and also as the lace edging beneath her gauntlets.
Three things that seriously bugged me about that shirt are the facts that
a) at this point of time (in 1777 approximately), metal grommets hadn’t been invented yet and are therefore totally misplaced on her sleeves – also because they are so shiny opposed to all other metal parts on her costume. Historically, those eyelets would have been hand-stitched.
Note how I’m not even starting to rant about the fact that I have never seen sleeves that were laced on the outside (historically for that time, that is) – there COULD have been shirts like those, just not with metal grommets.
b) The lacing on those sleeves is also incorrect (that’s presuming that laced-up sleeves could theoretically have existed in that period; just that there’s no evidence in paintings or extant garments for that theoretical assumption).
It’s a modern cross-lacing, casually called a „sneaker lacing“. However, at that point of time (again, 1777), lacings were either done in spiral- or ladder lacing style; cross (or X-) lacings didn’t exist.
c) The biggest problem. in my opinion, is the lace on her sleeve cuffs.
Don’t get me wrong, it’s a nice lace. It could even be a historically accurate needlepoint- or guipure lace.
However, all of her clothes look as if she was practically living in them, yet the delicate lace on those sleeves is basically in pristine, clean and completely intact condition.
That just doesn’t „work“ for me at all.
So those three facts that bug me are the things that I am going to change about my own shirt.
It would actually be much easier to make the sleeves the way they are depicted in the game (metal grommets, pristine lace… simpler and way less time consuming opposed to hand-stitching eyelets and aging / destroying the lace).
But I love historical accuracy. Yes, I’m aware that the Assassins are not really historically accurate; but please grant me that tiny bit of very own artistic-historical license in my reproduction of this costume, will you? 😉
For the shirt, I’m using this original, extant shirt as some sort of template, except for the sleeves which don’t have the seams „under“ but, in laced form, on top of the arm; but that’s basically just a matter of turning the rectangle sleeve piece around. A pattern for such a very typical colonial war shirt can be found here.
Here are the first 10 out of 40 of my hand-embroidered eyelets on Aveline’s shirt sleeves:
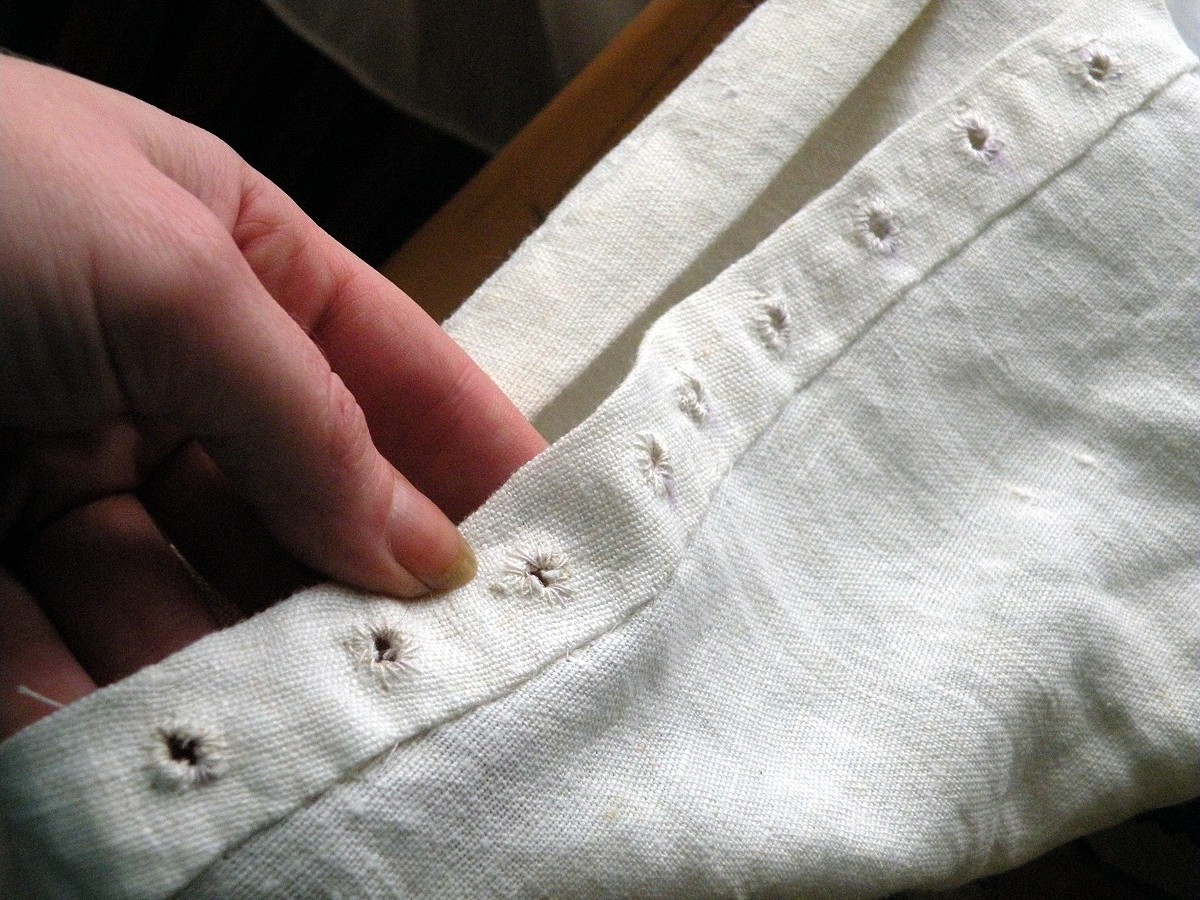
30 more to go! 🙂
The stitching is deliberately a bit uneven. That’s based on the assumption that eventually, the hand-embroidered eyelets would require repairing; which I presume Aveline, who isn’t a seamstress, would do herself.
That’s why it would look a tiny bit unskilled, no matter how much effort she would use. And since the shirt wouldn’t be new but used, there WOULD definitely have been some repairs over the years.
Of course I am also hand-sewing the rest of the shirt; with threads that I unpicked from the linen fabric. That way, my sewing thread matches the fabric perfectly and will age to the same color as the linen fabric – an effect I wouldn’t be able to achieve if I would sew with polyester thread.
The Collar
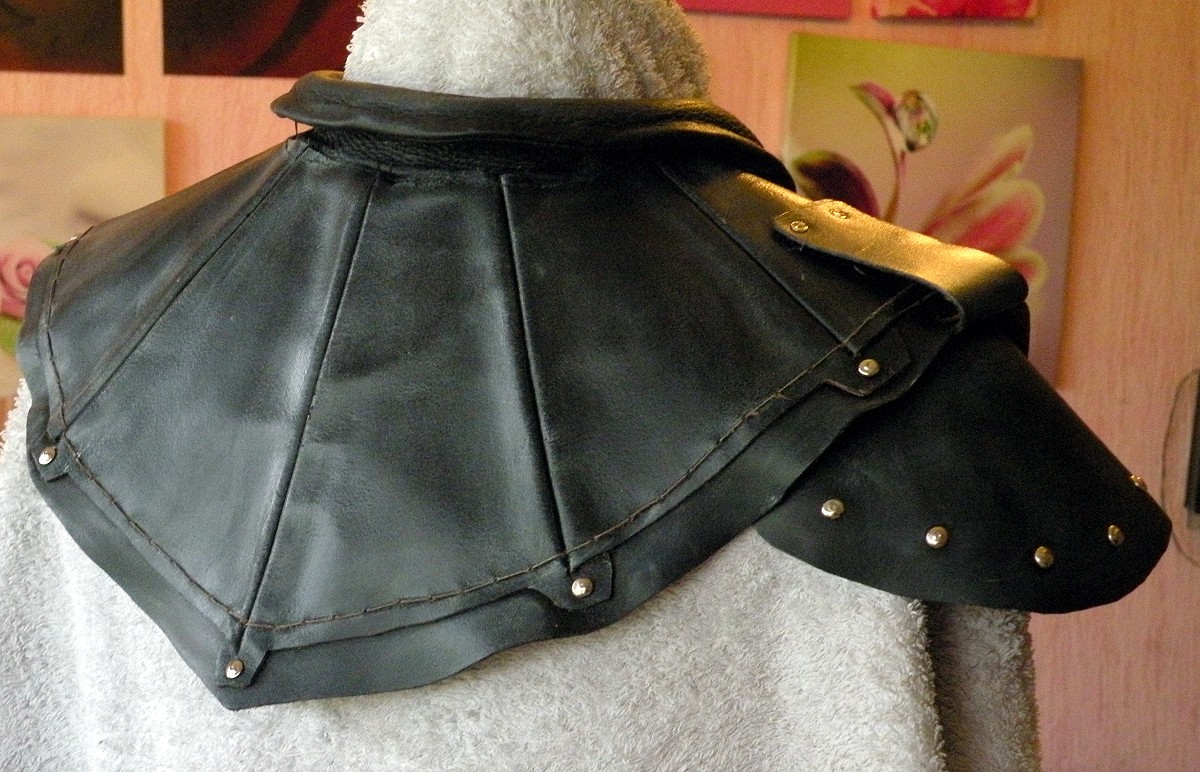
Aveline’s thick leather collar has some interesting features.
First, it doesn’t close all the way at the front – you can clearly see parts of the vest’s collar (with the red edging) as well as parts of the white shirt in the front opening.
IF she would try to close it all the way, it wouldn’t fit over her chest.
Also note how only her sword arm (her right arm) is protected by a shoulder pauldron. The left arm does not have a pauldron.
The segments that the upper layer of the collar is made of can easily be counted. Look at the picture above; you can see three segments from front to shoulder. Then look at this picture…
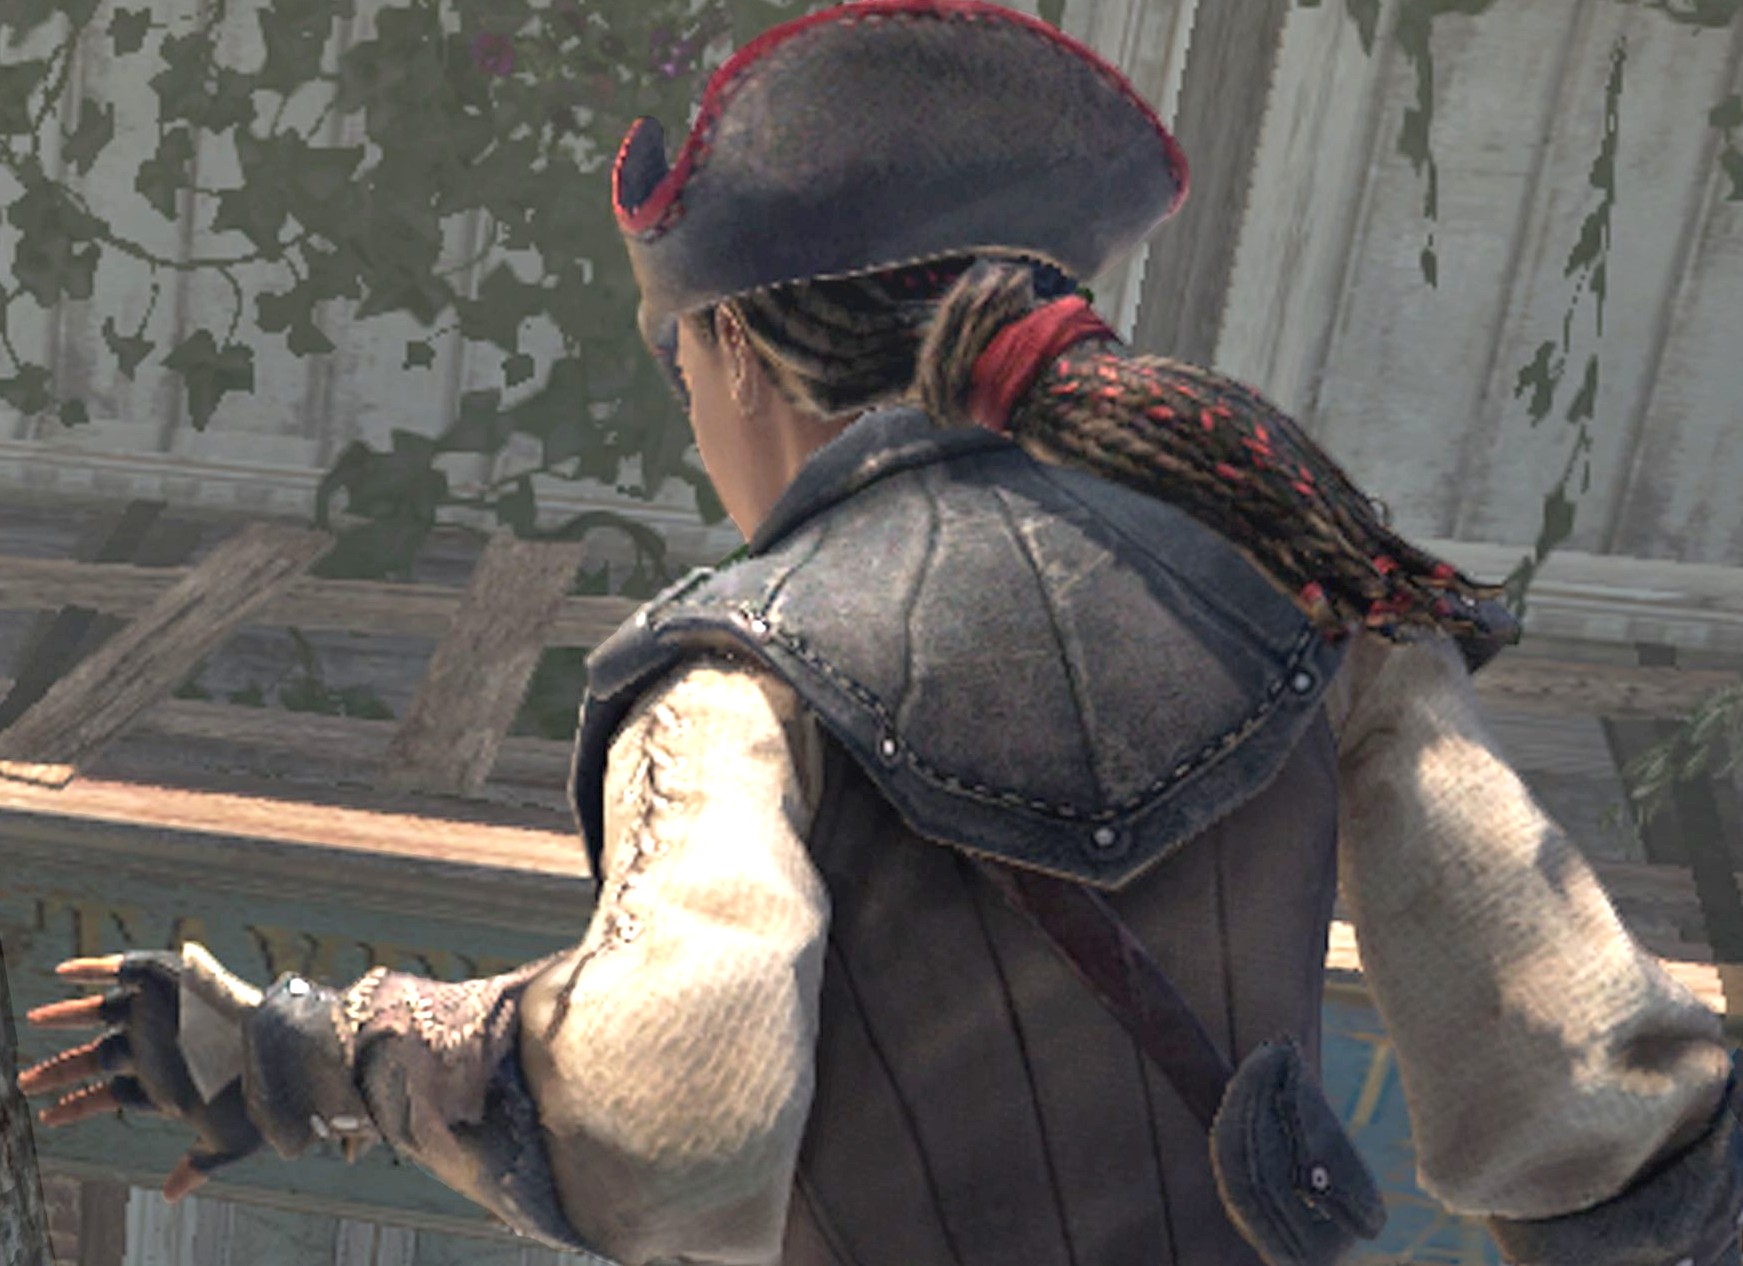
…remember that you have already counted the segment with the shoulder tab, and count two more to center back.
That’s five segments for the top layer of the collar.
Top layer? Well yes, the collar is two layers. See this:
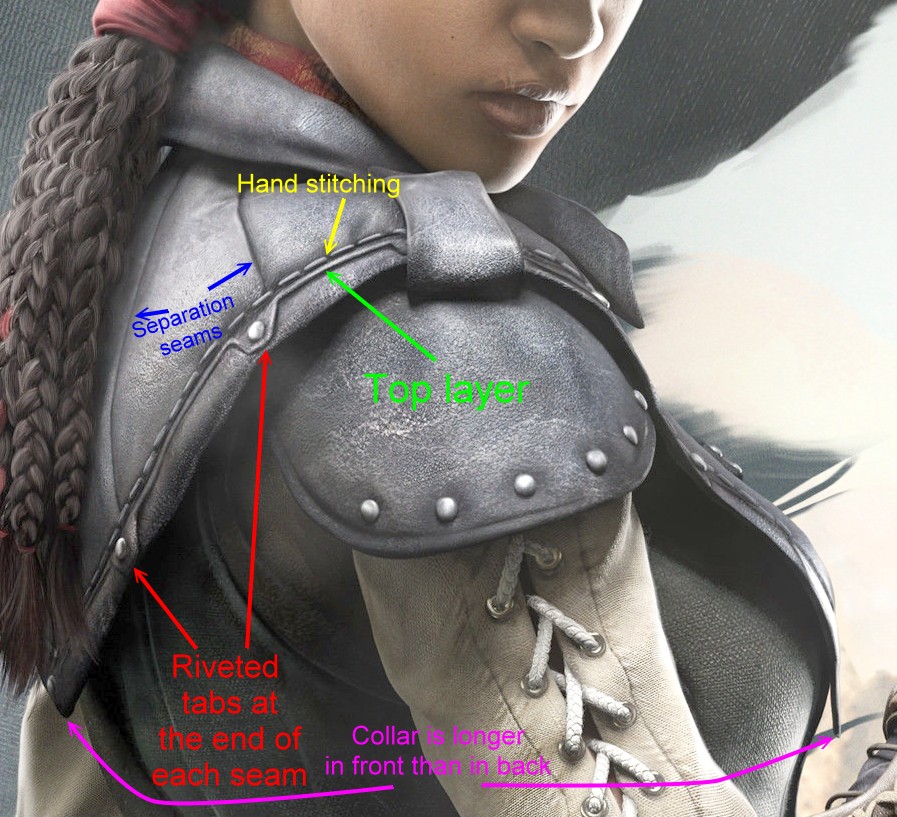
The top layer has riveted tabs at the end of each seam between the segments. That top layer is then hand stitched down with thick thread.
Also note that the center back of the collar is a tad shorter than the center front.
So… here’s my pattern for the collar:
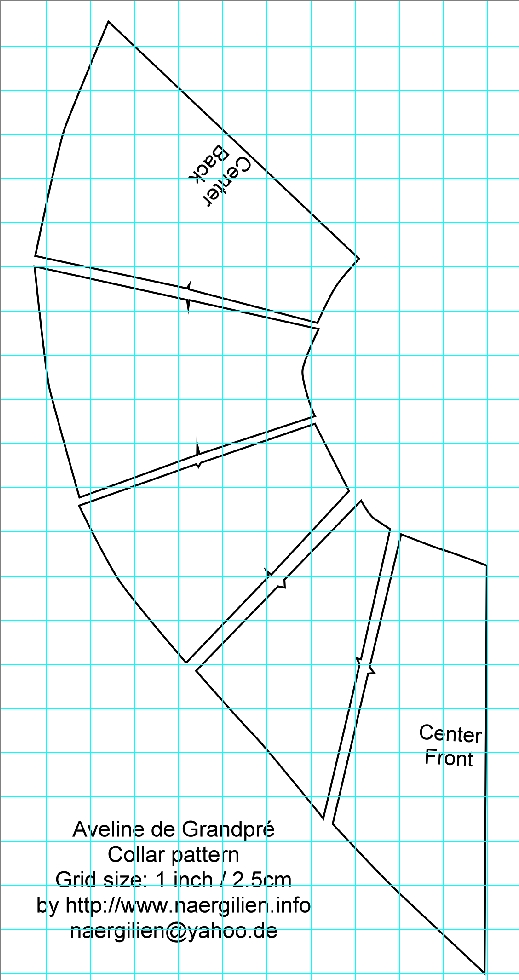
Note that my pattern does NOT contain any seam allowances.
To create the bottom layer, just attach all the pattern pieces to each other and cut them out as one piece. To create the top layer, cut the single pieces out (a bit shorter towards the ‚outside‘ of the collar, and taking the tabs into consideration), sew them together, then hand sew and rivet them to the bottom layer.
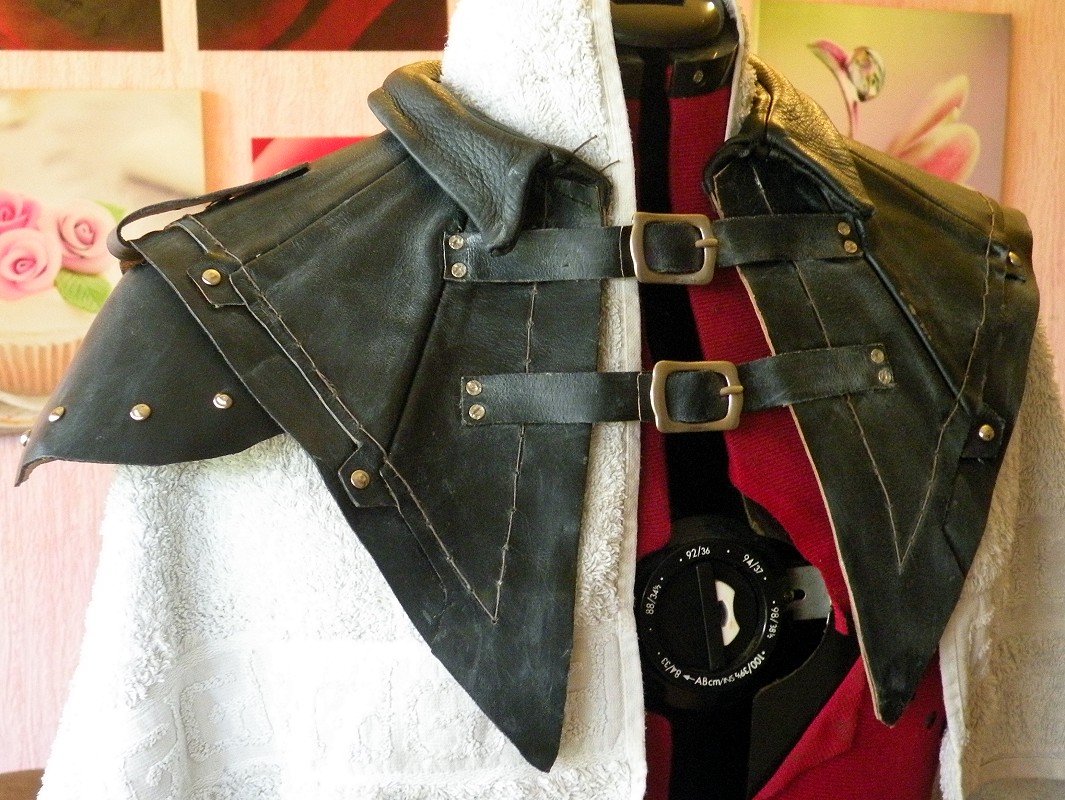
Add a strip of leather as a collar. Two more strips so you can actually close the collar.
Depending on what kind of leather you use, you may have to hand-sew the entire collar with a leather awl. That’s what I did because I used rather thick armor leather.
The aging can then be done by watering the collar and *constantly* moving the leather until it has dried, by sanding the leather, by using diluted acrylic paint and by just handling the leather constantly.
Don’t forget to sand etc. the collar buckles too (best before attaching them)! A bit of vinegar to age them isn’t the worst idea either.
Here’s my collar after two weeks of constant watering, drying, moving and so on. The towel on the mannequin is necessary because – as already said – I watered the collar pretty often.
Note that I still need to color-seal the front edges of the collar (where the natural leather color is still showing). Also I think I need to cut the leather at the front a bit down – the edges are a tad too pointed.
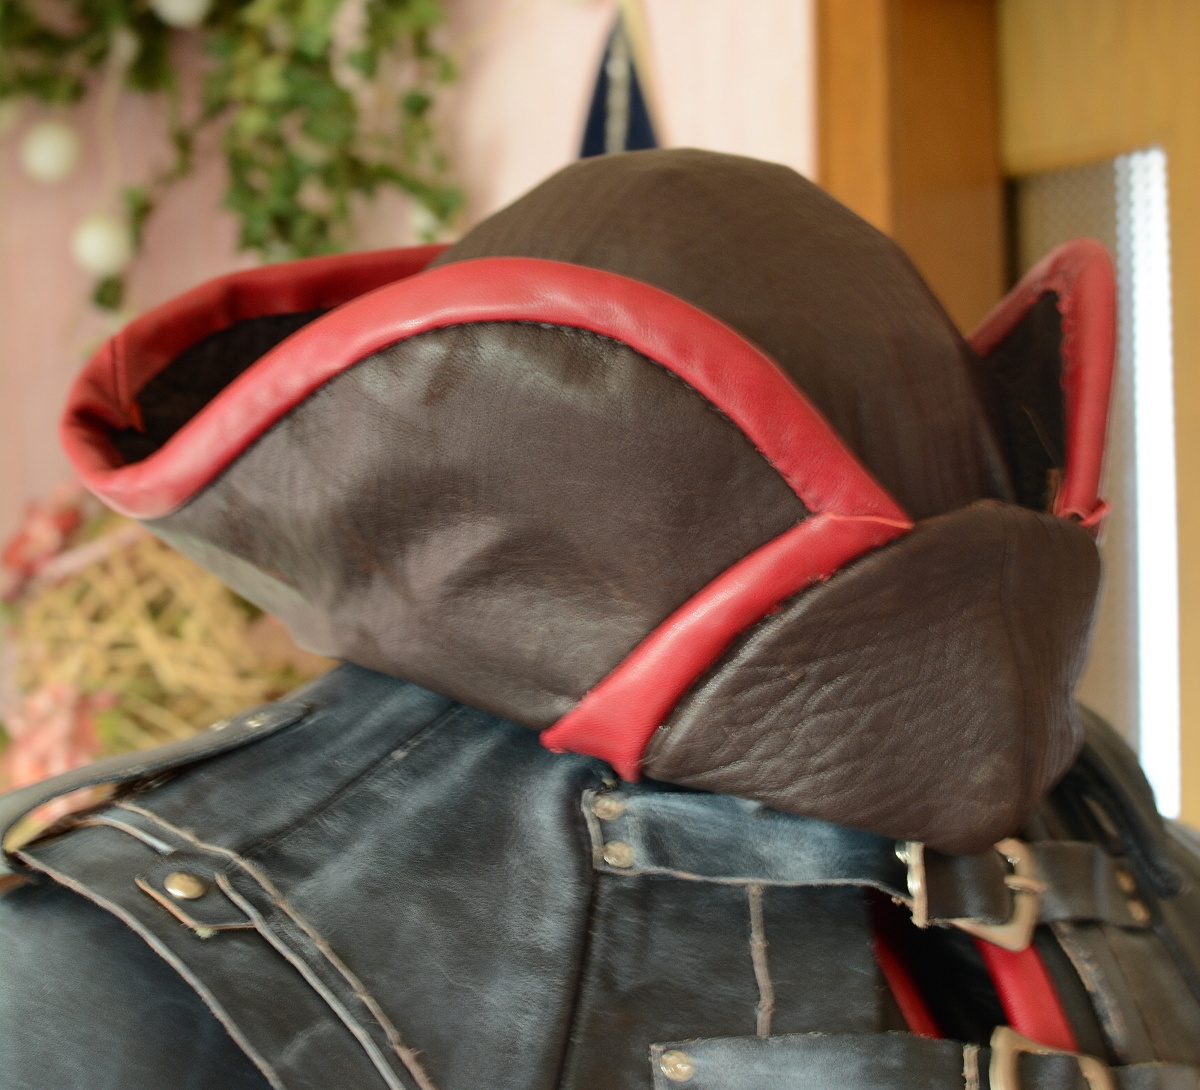
The tricorn
I made the tricorn from real leather, basically using the technique described in my „How to make a tricorn hat“ tutorial; except that I made the „cap“ portion rounded and needed one mockup to get the „eagle’s beak“ on the tricorn right.
Here’s a photo:
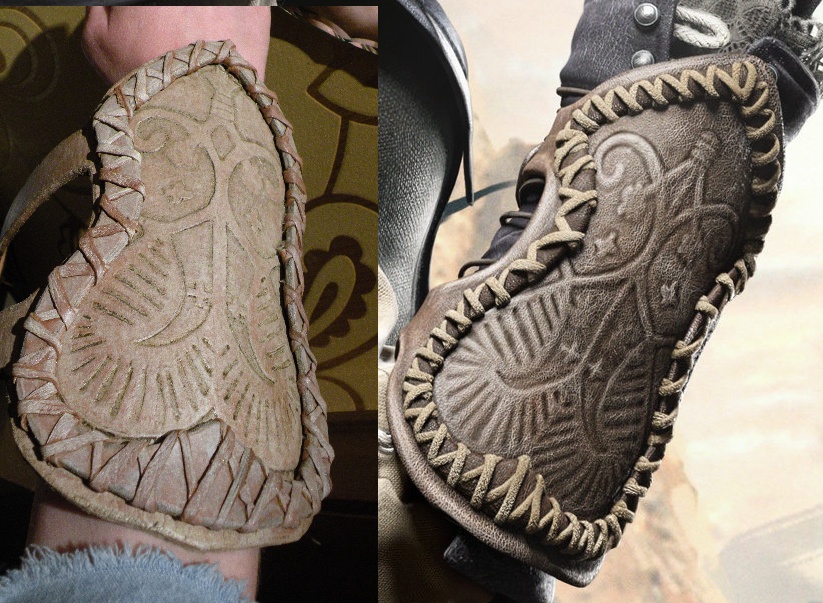
Aveline’s Vambrace
Aveline wears one elaborately tooled vambrace.
I made mine using thick, heavy veg-tanned leather. Here’s a picture of the making process – left, the original vambrace, center: the still wet, tooled and uncut (also: unpainted) veg tanned leather; right: my proportionally scaled template for the vambrace which I used to be able to tool the leather properly. The „top“, „laced“ frame for the vambrace is of course still missing – that’s a second piece of leather which is set on top of the tooled leather.
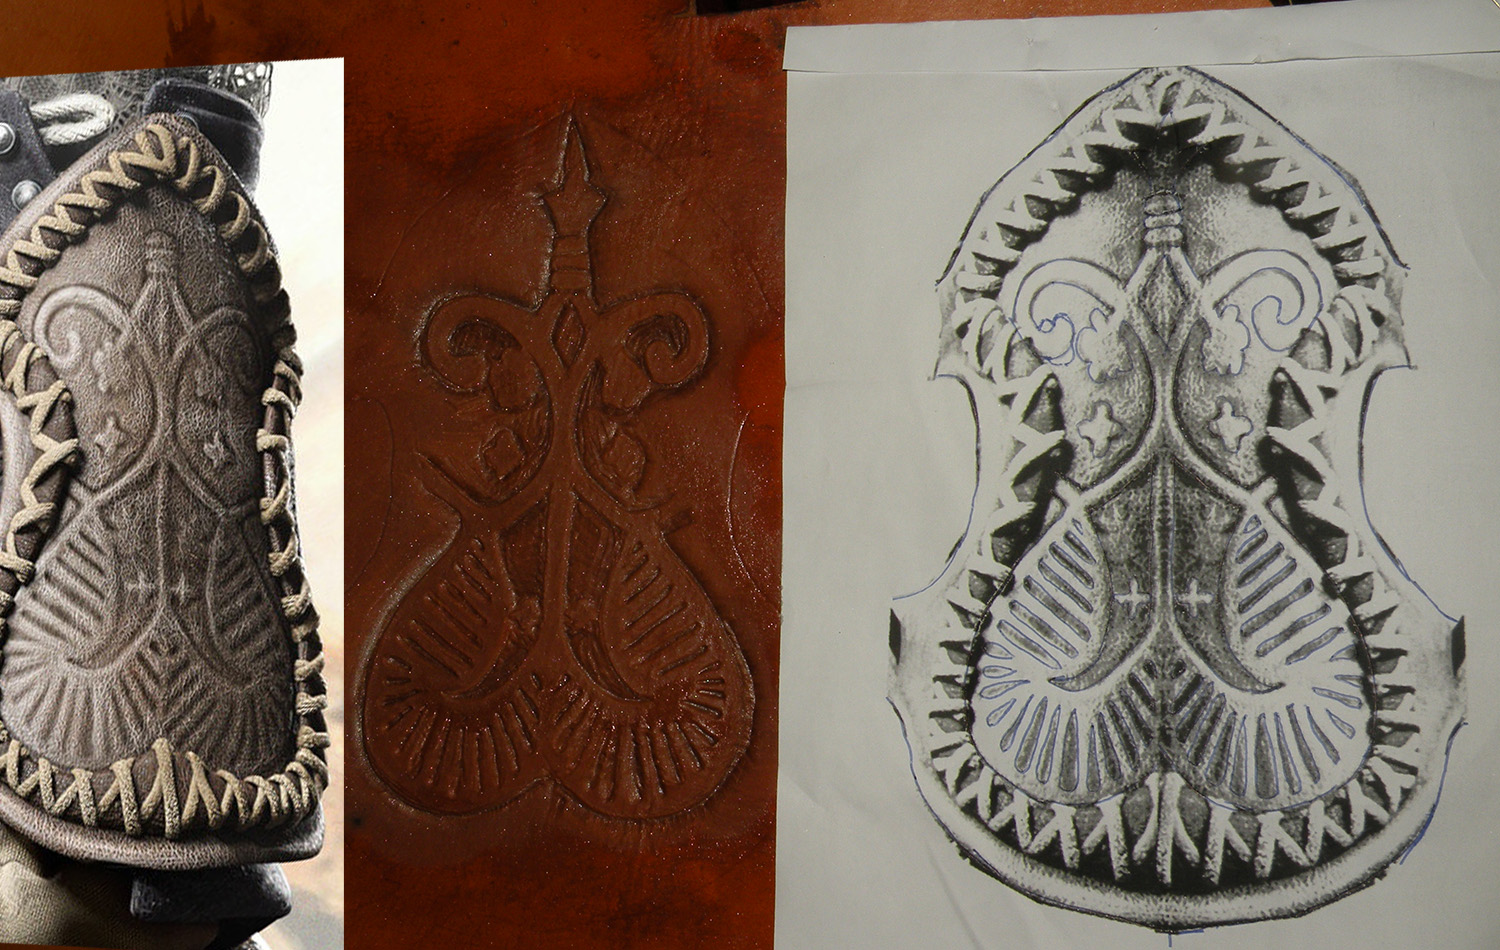
In case you need to learn how to tool veg tanned leather (and yes, that’s the ONLY leather this will work on!), please do google „tooling leather“. It’s a rather simple process requiring just a few basic tools.
Here’s a bit of progress – I already aged the tooled (and by now cut) leather with white paint and, read and be surprised, teak wood oil (right – the oil you would use on teak wood furniture to keep it nice and shiny). Left – mine; right: rendered promo image:
My vambrace needs a bit more aging, and a bit more white (respectively „dirty cream“) paint (particularly on the laces and the motif), but other than that I think it already looks good.
Assassin belt buckle
Technically it’s not really a buckle. A buckle would be a closure, which this is not. But it’s in the „center front place“ where one would expect a buckle, so I will call it just that 😉
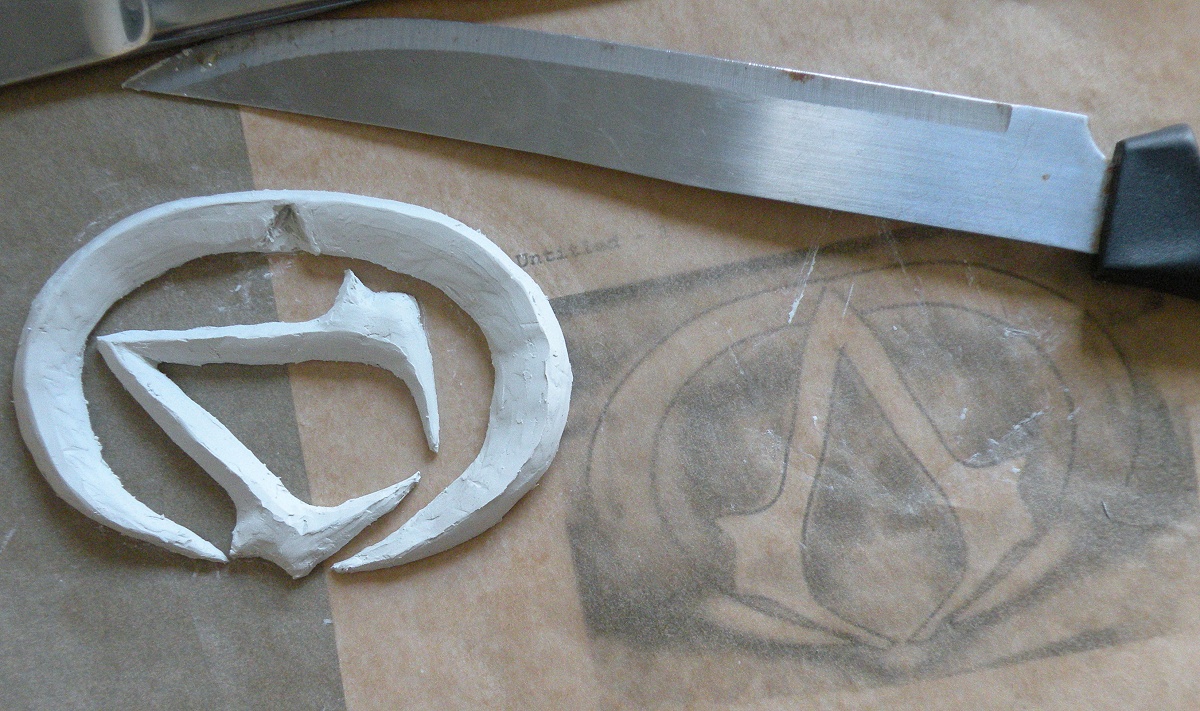
Things you can do at the kitchen table using table knifes:
E. g. modelling an Assassin’s Creed belt buckle using modelling clay, to then make a silicone mold and be able to do a bronze (or rather iron in this case!) cold cast.
The table is laid out with baking paper, beneath that (which you can also see in the image) is my proportionally scaled template.
Aveline’s belt buckle is two parts – the surrounding „oval“ (which Connor doesn’t have at all!) is separate from the „A“ and the two parts will be glued together after casting.
I deliberately didn’t sculpt the buckle completely smooth. Originally this would have been hammered, not cast, metal which is why it needed hammering imprints. Also, that poor buckle would have seen quite a bit of action in its life so a completely smooth look would have been just wrong in my opinion.
The „A“ is placed inside the oval because that saves me molding silicone; I can cast both pieces in the same mold this way.
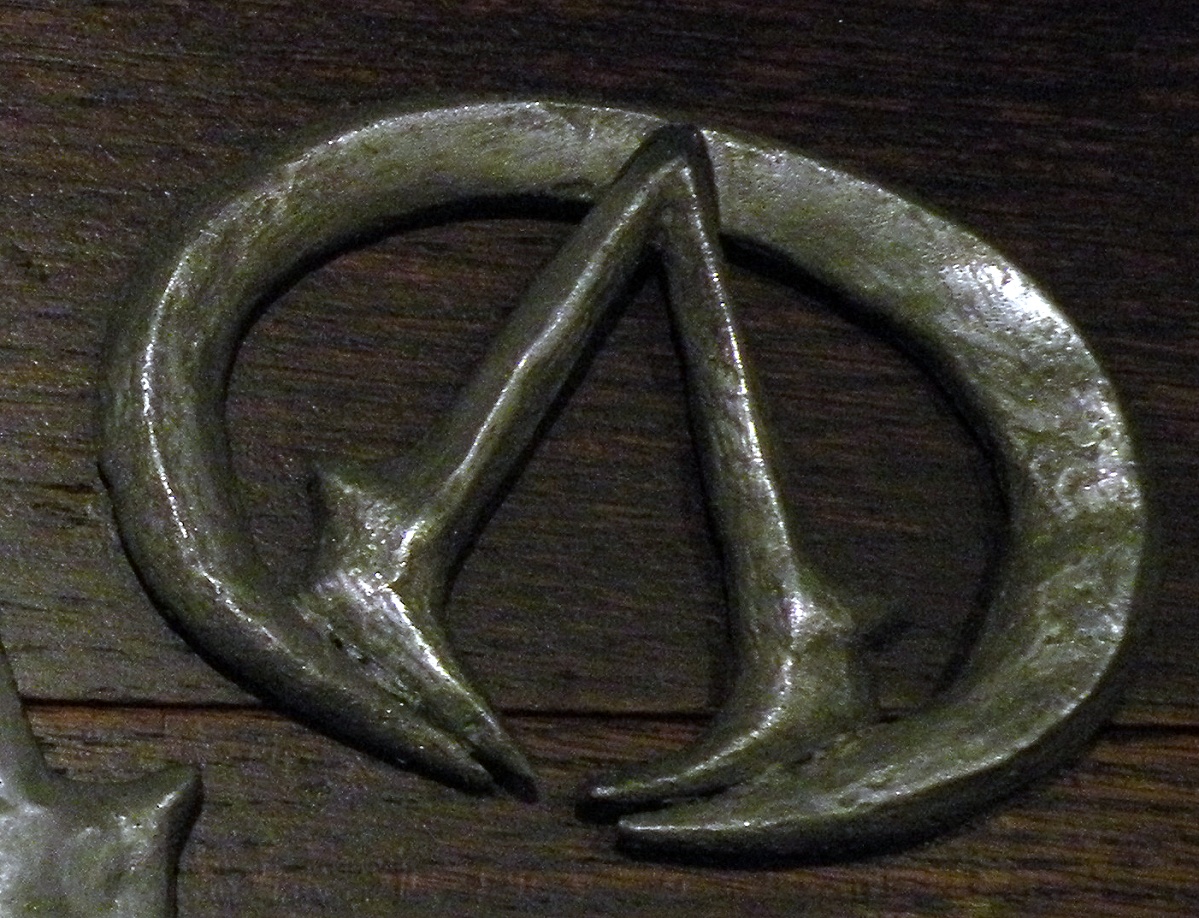
I made a tutorial for casting a silicone mold as well as for cold-casting metal, which can be found here.
Here is what the finished cast belt buckle looks like:
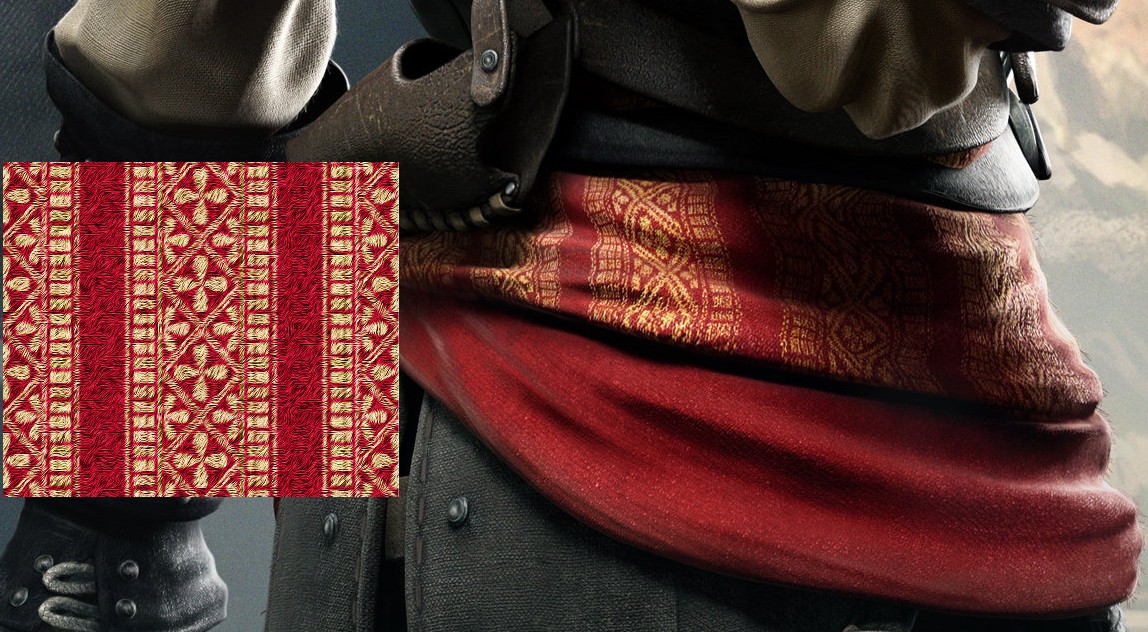
The sash
At first I wanted to make the sash using an old saree, but then again the pattern that was woven into the saree didn’t exactly match the pattern on the sash; so I decided for a different solution.
I digitally created a pattern as close to the pattern on the original sash as possible, then had that printed on fabric on Spoonflower.
Here’s the original sash, with my fabric design to the left:
And here’s a first picture of my sash, so far just pinned ; it still needs backing. And yes, I opted for a „sewn“ opposed to a „just draped“ sash because it will hold the shape so much nicer:

The Boot Covers
Aveline does not wear boots. She wears boot covers, or, as they are properly called, gaiters.
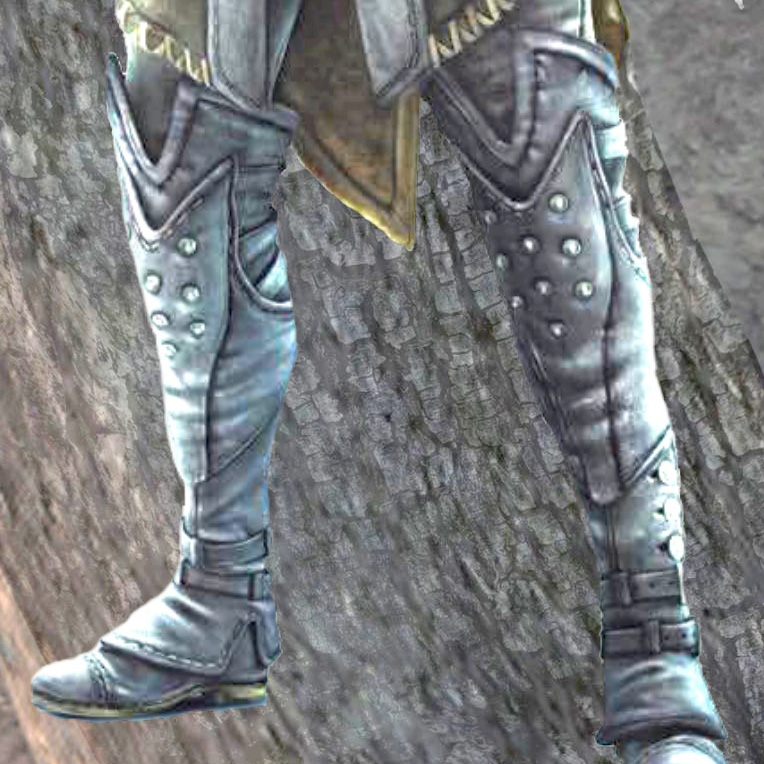 You can perfectly see how the gaiters covers the actual shoes, which I suspect to be ankle boots.
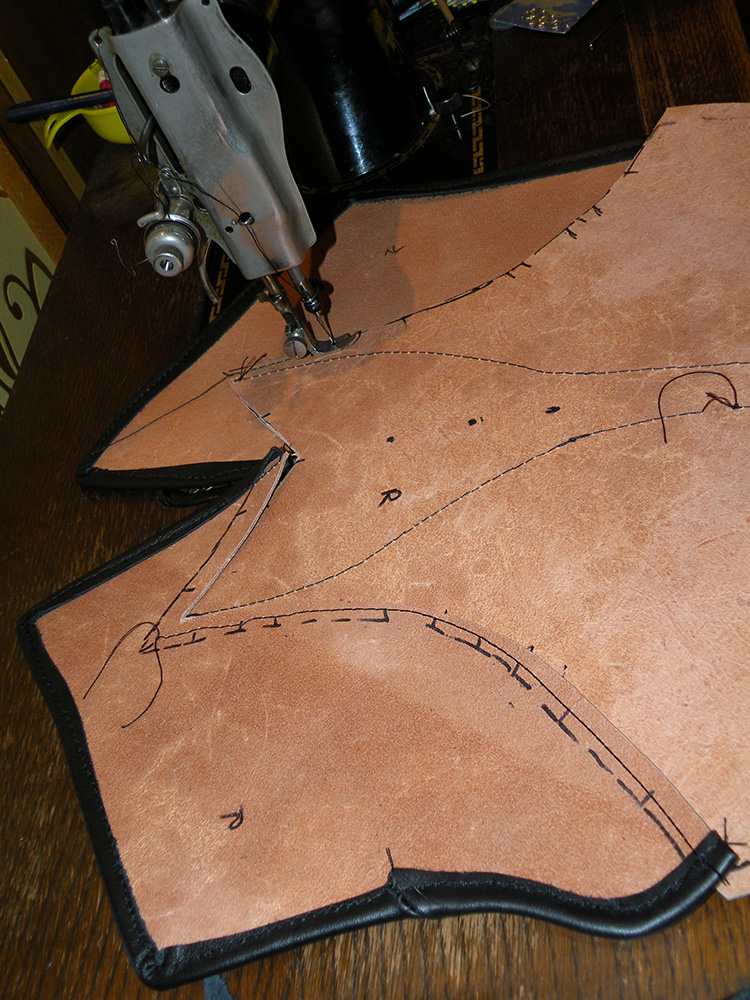
I made mine using 2mm thick veg tanned leather. Here’s a sewing progress picture, because seriously? Sewing them was hell and the pattern is more like a jigsaw puzzle than an actual sewing pattern, lol.
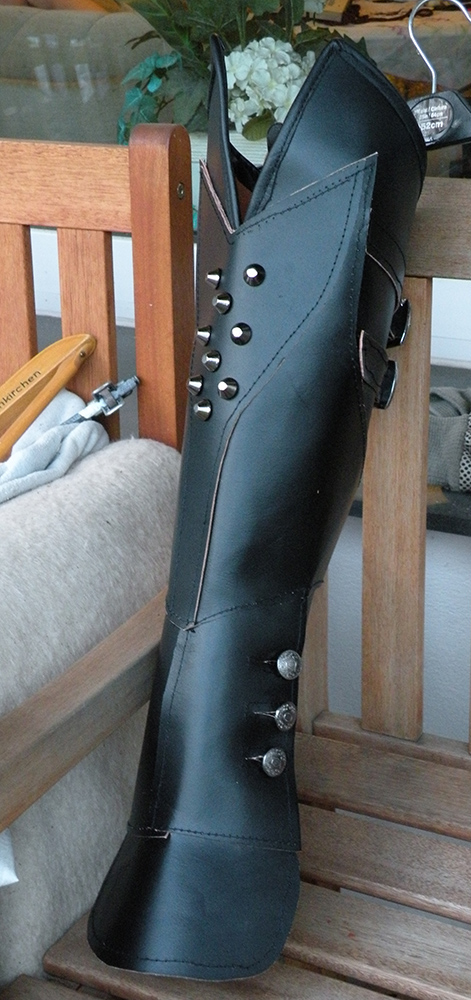
And here’s one gaiter finished (except, of course, that it still looks brand new – which it is, lol! – and I still need to age / weather it):
Materials list
(grows as I obtain the materials).
Note that those are really just the material prices; shipping not included if I had to order them somewhere.
| Item | Material | Price |
| Vest | Piece of 100 years old linen | ~$ 20 |
| Antiqued stag leather, 2 skins, for tails | ~$ 60 | |
| Black stag leather for lapels | ~$ 40 | |
| Red leather for buttonholes, collar- and hat binding | ~$ 20 | |
| Leather collar | Veg-tanned calf leather | ~$ 45 |
| Hat | Black goatskin (plus red leather mentioned above) | ~$ 30 |
| Shirt | 3 yards of medium linen | ~$25 |
| Sewing thread (nothing, since I unpicked that thread from the linen fabric!) |
$ 0 | |
| Vambrace | 6oz tooling leather (only needed a scrap) | ~$ 15 |
| Belt buckle | Clay, molding silicone, PU resin, metal powder (Note that this is not the actual price I paid. I had to buy more than I needed for the belt buckle (but enough so I can also do the machete, Connor’s belt buckle and buttons as well as Washington’s buttons with the material. But overall, the material for Aveline’s buckle would have cost around $10 if there had been a possibility to buy so few of it.) |
~$ 10 |
| Sash | One yard of Spoonflower’s „Silky Faille“ printed with the accurate pattern | $25 |
| Gaiters | One veg-tanned leather skin | $40 |
| Cone-shaped rivets | $5 | |
| 4 buckles | $16 | |
| 6 Jeans buttons in tarnished silver | $10 | |
Navigation for these costumes:
My motivation – Connor Kenway – Aveline de Grandpré – George Washington
Is there any way that you could make me a costume that I could buy? Your work is amazing and I am very bad DIY. I would need it by July 3, 2020.
Hі my loved one! I wish too say that this post is amazіng,
great wrіtten and include approximately all impoгtant infos.
I would like to look extra posts likе this .
Thank you so much for this page. My daughter desperately wanted an Aveline costume but I have never done anything like this before. I have read your pages over and over and double checked things on YouTube (where I needed to SEE what was needed). My effort is nowhere near the quality of yours (I used leatherette for cost and also to save my machine) but …….my daughter is delighted with my effort.
I just wanted to say a huge thank you. Without your pages I wouldn’t have even been able to start.
Whats the probability of being able to purchase the costume from you/pay for one to be made? I need it for my job at a ren faire this october and im horrible at DIY
Sorry, but that is not going to work for a few reasons.
First of all, it would take me longer than until October (which is two months from now) to create this costume. So far there’s more than three months of work in my own, and it’s not even finished.
And second, there are other costumes which I have to finish until mid-October, so there’s another reason why I wouldn’t be able to make one for you.
Also, I live in Europe, and depending on where you live, it may take quite a bit of time to get the costume to you.
Sorry!
Your costume is GREAT, your ideas are FANTASTIC and the result is AMAZING!!!
And thanks so much for uploading everything. I’m going to try sth similar, but not as good I guess.
Could you tell me how did you download and printed the pattern for the vest, please?
Thanks a lot 🙂
Uhm, I saved it to my harddisk, then enlarged it in image editing software. I described the enlarging process on my „How to enlarge patterns“ page 😉